Arduino + motors +
sensors + IOT
Arduino Car Projects is ideal for new Arduino Makers and graduates of Arduino Step by Step Getting Started.
Use your Arduino Uno and programs to control a car fitted with motors and sensors.
Use a joystick, and infrared controller, and your smartphone to drive your Arduino car.
This course is an opportunity to apply your new Arduino knowledge in a series of small project with a common theme: the Arduino Car.
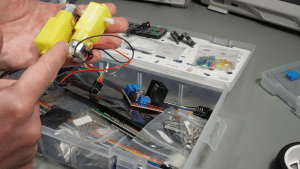
Learn how to combine a variety of hardware components to create an Arduino car with many fun features. Control your car with a joystick or with your phone. Learn how to wire motors and decode signals from an infrared controller (and much more).
This course will teach essential Arduino and programming skills through a series of fun mini-projects of increasing complexity.
The core theme of these mini-projects is an Arduino-powered car.
Each mini-project allows you to explore interesting hardware and programming topics.
For example, in one project, you will explore vehicle safety using an ultrasonic distance sensor.
In another project, you will learn how to control the Arduino car with your smartphone.
You will learn how to program motors, take input from sensors to implement automation features, and explore various options to control your car.
This course has a prerequisite: Arduino Step by Step Getting Started

This is not an introductory course.
You should know how to wire up simple circuits on a breadboard, and upload a sketch to your Arduino.
You should be able to read and understand simple Arduino code, install external libraries to the Arduino desktop IDE, and know how to fix simple code bugs and wiring errors.
If you don't feel confident about the skills I described, I recommend that you complete my course Arduino Step by Step Getting Started before attempting this course.
In this course you will learn software skills, such as:
- How to program car functions with the infrared remote control.
- How to use Bluetooth Low Energy along with your smartphone and the ArduinoBlue library to control the Arduino car.
- How to use the ESP01S WiFi module along with the Blink cloud platform and your smartphone to also control the Arduino car and its peripherals.
- How to compensate for tiny differences between the motors that effect the driving qualities of the car.
- How to use the distance sensor to prevent a crash.
- Two different ways to control the speed of the DC motors.
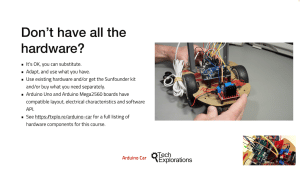
What hardware will you need?
This course requires an Arduino Uno or compatible board, a car chassis, motors, sensors, wires and various other components..
This hardware is not included in this course, and you must source it separately.
You can purchase these items as part of a kit sold by Sunfounder, or individually from your preferred retailer.
You can find a complete listing of the hardware you will need for this course in the course hardware page.
In this course, you will learn to use an Arduino Uno along with various peripherals, such as:
- One or two DC motors with the help of a motor controller module.
- An analog joystick.
- An infrared sensor that can receive encoded commands from an infrared remote control.
- An ultrasonic distance sensor.
- A buzzer.
- And two radio frequency communications modules:
- A Bluetooth BLE module for near-field connectivity.
- An ESP01S WiFi module for Internet connectivity.
You will also learn how to power your Arduino motor project with one or two batteries to separate the Arduino and motor sub-circuits.


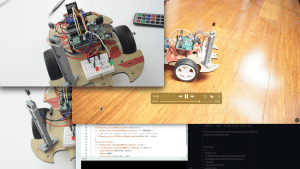
What is this course about and what to expect?
Please watch this video to learn about the course curriculum and outcomes. Find out exactly what to expect so that you can plan your learning and make the most out of this course.

Click to play
Hardware overview
Click to play
Study guide
Click to play
Example project objectives
Click to play
Get this course
You can enroll to our courses in one of three options: Solo, Community, and Mentor. For more information, please see this explainer page.
Solo
Once-off payment, best for self-sufficient learners on a budget.
€23.67
Once-off.
€23.67
Once-off.
Community
Best for the social learner: be a member of the course community.
€76.98
Once-off.
€76.98
Once off.
Mentor
Get one-on-one live meetings with a mentor, learn to mastery.
US$399
US$399
This button will take you to Stripe, our payments processor.
Consider a subscription
Did you know, you can get a subscription for immediate access to this and 20+ of our courses. All for a low monthly payment, cancel anytime.
Do you prefer to learn on Udemy?
On Udemy you will find all of the Tech Explorations courses at the lowest possible price.
Each course is individually priced by Udemy based on your location. We don't have control of the price on Udemy and so we can't display it on this page.
Click on the button below to open a new window where you can see the price of this course on the Udemy website.
Curriculum
What's in this video course?

01 - Introduction
What is this course about?
Hardware and kit overview
Software
02 - How to make the most out of this course
Getting to know the hardware - one at a time
Car chassis
Microcontroller
The joystick
Motors and motor drivers
The infrared sensor
The HC-SR04 ultrasonic sensor
The Bluetooth BLE AC-BT-V4 module
ESP-01S WiFi module - Configuration wiring
ESP-01S WiFi module - Configuration AT commands
ESP-01S WiFi module - Create Blynk account and project
ESP-01S WiFi module - Simple LED control with Blynk
Battery
03 - Assembly - Core Hardware
Assemble the car kit - preparation
Assemble the car kit
Wire the motors
Battery and power
Car Assembly completion
04 - Project 1: Simple wired control
Project introduction - objectives
Quick joystick demonstration
Wiring and cabling
Arduino motor control sketch
Testing
05 - Project 2: Remote control with infrared
Project introduction - objectives
Wiring
IR remote control and sensor testing
Arduino motor IR control sketch.
Testing
06 - Project 3: Remote control with Bluetooth BLE mobile app
Project introduction and objectives
Bluetooth BLE wiring
ArduinoBlue app control UI
Arduino motor control sketch
Testing
07 - Project 4: Remote control with WiFi and mobile phone via Blynk
Project introduction and objectives
ESP01S module wiring
Verify WiFi connectivity to Blynk
Setup RC Car Blynk project
Setup Blynk mobile dashboard
Arduino motor control sketch
Testing
08 - Improvements
Speed control with the joystick
Ultrasonic anti-crash system
Make the car beep with the buzzer
Fix not-straight drive
Motor start-stop button
Independent power source for the motors
Use the EN pins for speed control
The course instructor

The course instructor is Peter Dalmaris, PhD.
Peter has created over 30 courses on technology education and has written several books.
He is the author of Maker Education Revolution, a book on how making is changing the way we learn and teach.
He is the host of the Stemiverse and Tech Explorations podcasts, in which he discusses technology and education with engineers, educators, scientists and Makers from around the world.
Copyright 2025, Tech Explorations - Privacy