
It was a few minutes before midnight when the security alarm of our neighbors started whaling. It happens all the in our neighborhood, and nobody pays attention anymore. However, that night, I was alone in the house with our baby, so I took a nervous peek through the window.
And there it was.
Three men bursting out of our neighbor’s house, each with a large white bag thrown over their shoulders. They jump into a car. Tires screech as they drive away.
The police officer later told us that these burglars often use the same modus operandi. They typically visit properties, sneak in backyards at night, looking for vulnerabilities: a door that doesn’t close well or a weak window. They come back a few days later for the break-in.
This event immediately triggered the engineer sleeping inside of me. What if we could equip our property with various sensors to detect these nightly visits? It also seemed like an excellent match for another project I had: installing a connected weather station in the garden. Surely, I could throw an Arduino at this and get it done over a weekend.
In fact, it took 3 years to complete this project.
My initial approach was to build a sensor network around the ESP8266. These Arduino compatible low-cost Wi-Fi microcontrollers seemed ideal: put them in waterproof boxes with some batteries and you create your very own “Internet of Things” in your garden.
But I soon ran into two big issues: power and connectivity.
It turns out that WiFi is quite a power hungry technology. I would need to change batteries every few days. Not very practical. Moreover, the WiFi signals of my router stubbornly refused to reach one corner of the property. The project started growing in complexity. I needed cables for power, network extenders. Perhaps I should consider Zigbee instead of WiFi? And what else?
Well, if I was going to put down cables for power, why not use these same cables for networking as well?
To keep cabling as simple as possible, I wanted to be able to connect the sensors together with a single cable, forming a “daisy chain” that could span a couple of hundred meters (~ 600 feet).
So I prototyped a set of Arduino-compatible boards equipped with a CAN-bus network driver. CAN is a robust bus communication protocol that is widely used in industrial and automotive applications. Each board was connected to another similar board creating a network with 4 wires only: two wires for power and two wires for networking.
After countless prototypes, the NoCAN platform was born.
NoCAN is an Arduino-compatible ‘wired’ IoT platform for makers. It enables you to connect a set of Arduino-compatible ‘nodes’ to a Raspberry-Pi, using a single four-wire cable that brings both power and networking. The Raspberry-Pi controls the network and acts as a gateway to the outside world. You can connect sensors, lights, relays, and actuators to each ‘node’ and build complex IoT application easily. You can even control your network with your smartphone thanks to the ‘blynk’ gateway included in the software.
It’s a novel way to mix the Arduino and the Raspberry Pi universes!
The drawing below shows the basic structure of a NoCAN network:
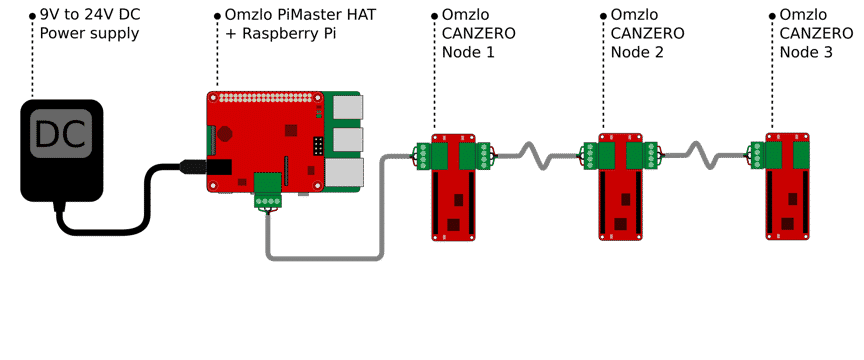
To build a NoCAN network you need:
- A Raspberry-Pi, with an Omzlo PiMaster HAT.
- A 9V to 24V DC power supply.
- One, two, three or more Omzlo CANZERO nodes.
- Cables, with 4 wires.
With the cables, you connect the Omzlo PiMaster HAT to the first Omlzo CANZERO. Then you connect the first Omzlo CANZERO to the second Omzlo CANZERO, following with the third, and so forth until you have connected all your Omzlo CANZERO nodes, forming a chain that can be 300 meters long! (yes, that’s 1000 feet!). You plug the DC power supply into the PiMaster HAT: this will power both the RaspberryPi and your newly created network. Now, connect to the RaspberryPi and launch the network manager application and you are ready to go.
You can now plug sensors, lights, relays, and actuators in each CANZERO node to create rich interactive IoT applications for your home and your garden.
You can write a sketch in the Arduino IDE and upload the corresponding firmware to any node directly over the network. No need to plug a USB cable into a CANZERO node from your laptop each time you want to make a change to the software! That would be annoying, especially if you have a few CANZERO nodes sitting inside nice waterproof enclosures in hard to reach locations!
CANZERO nodes communicate with each other and with the outside world using a ‘publish/subscribe’ mechanism. CANZERO nodes can create a ‘channel’ with a name (e.g. ‘temperature’) and all CANZERO nodes that subscribe to that channel will receive any data published on that channel. That simplifies things a lot, because you don’t need to deal with ‘addresses’ and all the other nitty-gritty details that normally come with networking. Sending data to multiple nodes is just as simple as sending data to a single node. It just takes a few lines of code in your Arduino sketch.
In July 2018, NoCAN was launched into the world through a successful Kickstarter campaign. After that, I decided to create a company called “Omzlo” to support the NoCAN platform.
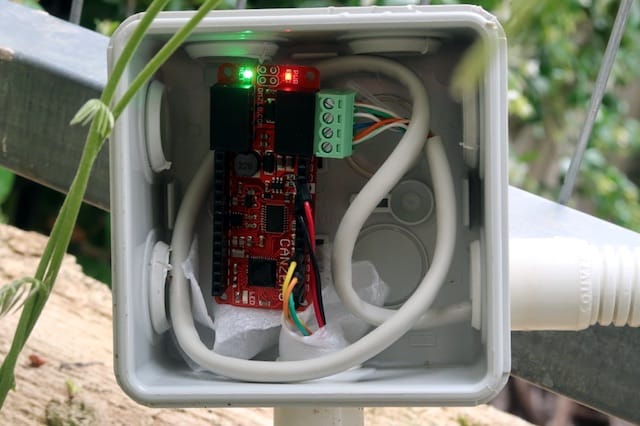
I have been running a NoCAN network for several months now. I notably have a CANZERO node connected to a passive infrared sensor, which sends me a notification each time there is someone in the backyard. Another node hosts a BME280 sensor and provides me with real-time temperature and humidity data on my phone.
So far I have not detected any burglars in our garden.
To learn more about NoCAN please go to the Omzlo page.
Related job opportunities
Are you looking for an IoT Engineering job? Find your dream job on Jooble, our job search partner.