Node-RED guide series
Node-RED, the "complete" node
Learn about the "complete" node and how to use in your flow to trigger an action

With the "complete" node, your can trigger a node in your flow when any other node (that supports this functionality) completes it's operation.
In this article, I will demonstrate the use of the "complete" node through an example.
You can find the "complete" node under "common" in the left toolbar.

The "complete" node.
Setup the "complete" node
Let's experiment with the "complete" node.
We'll use the test flow from the previous article on "flows".

The "Completed" debug node is triggered when "test" finishes.
In the original flow, I have added two nodes: a "complete" node that monitors the "test" node for completion, and a "debug" node.
The "complete" node is titled "Start when Function node completes".
The "debug" node is titled "Completed".
I have not made any changes to the original 5 nodes of the top row of the flow.
When the "test" function node completes its operation, the "Start when Function node completes" node is notified, and that triggers the "Completed" node.
In addition to the notification, the data from the node that has completed ("test" in this this case), is also passed along. So, the "Completed" node has access to the msg object of the "test" node.
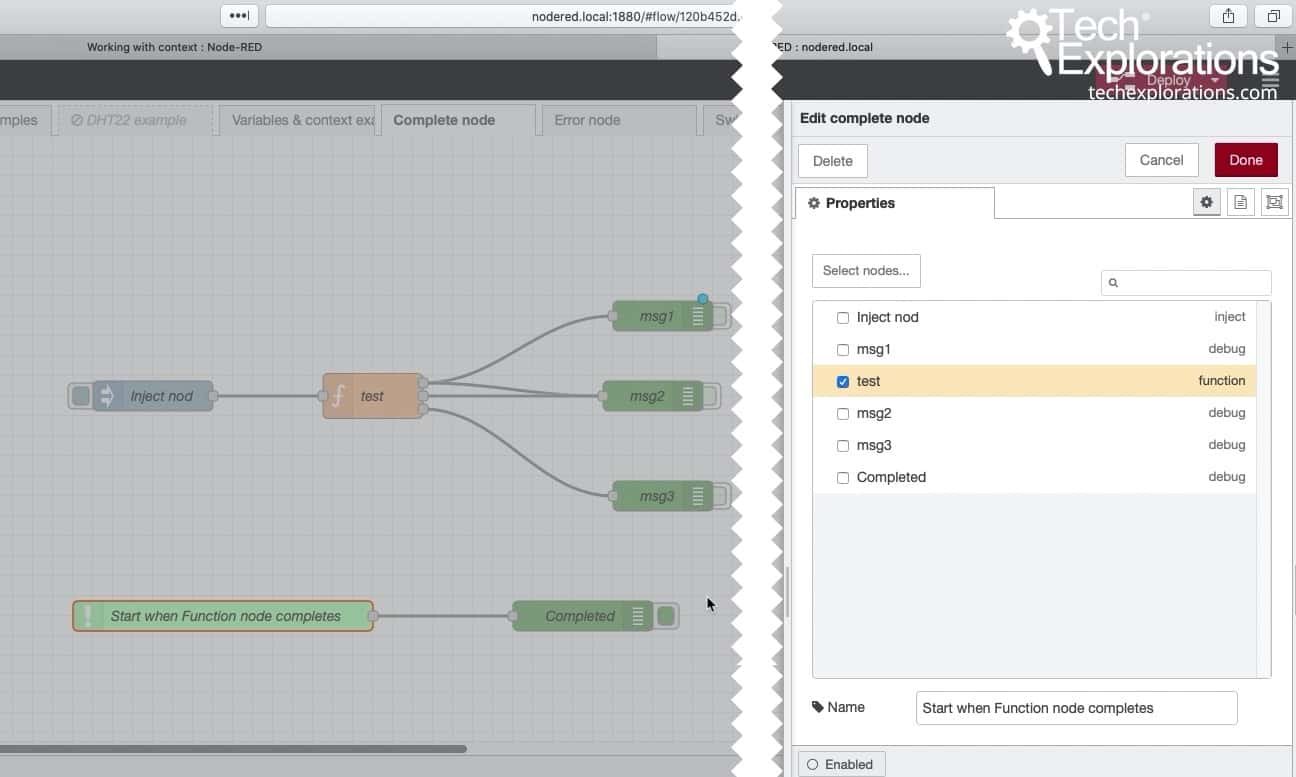
In the screenshot below, you can see how I have configured the "complete" node titled "Start when Function node completes":

The configuration of the "complete" node.
Double-click on the "complete" node to reveal its edit pane. In the Properties tab you will see a list of other nodes in the flow that are able to provide completion notifications.
Just click on one or more nodes that you want this "complete" node to receive completion notifications.
That's it.
After you deploy the flow, every time that any of the selected nodes completes its operation, your "complete" node will be notified, and whichever node is wired at its output will be triggered. The msg object of the completed node is also passed to the triggered node.

Learn Node-RED and how to use it with the ESP32
This course will guide you through the construction of an automated control system. The deliverable is a Terrarium controller.
Along the way, you will learn a great deal about useful technologies such as the Node Red programming environment and MQTT.
Jump to another article
1. Introduction to Node-RED
2. Install Node-RED on the Raspberry Pi
3. Configuration
4. Nodes
5. Flows
6. Messages and Variables
7. The "complete" node
8. The "catch" node
9. The "link out" and "link in" nodes
10. The "switch" node
11. The "range" node
12. The "delay" node
13. The "trigger" node
14. The "RBE" (Report by Exception) node
Last Updated 1 year ago.
We publish fresh content each week. Read how-to's on Arduino, ESP32, KiCad, Node-RED, drones and more. Listen to interviews. Learn about new tech with our comprehensive reviews. Get discount offers for our courses and books. Interact with our community. One email per week, no spam; unsubscribe at any time