Node-RED guide series
Node-RED, the "link out" and "link in" nodes
With the "link in" and "link out" nodes, you can connect and exchange data between nodes that belong to different flows.

You already know how to exchange data between nodes that belong to different flows using global variables. The "link out" and "link in" nodes provide you with an alternative method to do the same. These nodes are easy to set up, and especially useful if you simply want to share data from one node directly to another.
You will find the "link in" and "link out" nodes in the common group of the left toolbar.

The "link out" and "link in" nodes.
Setup the "link out" and "link in" nodes
To demonstrate how "link out" and "link in" works, we'll use the familiar flow from the previous few articles as our basis.
Here's a slightly modified version of the flow. Notice that I have added a new output in the function node, which I have connected to a link "out node".

This flow contains a "link out" node.
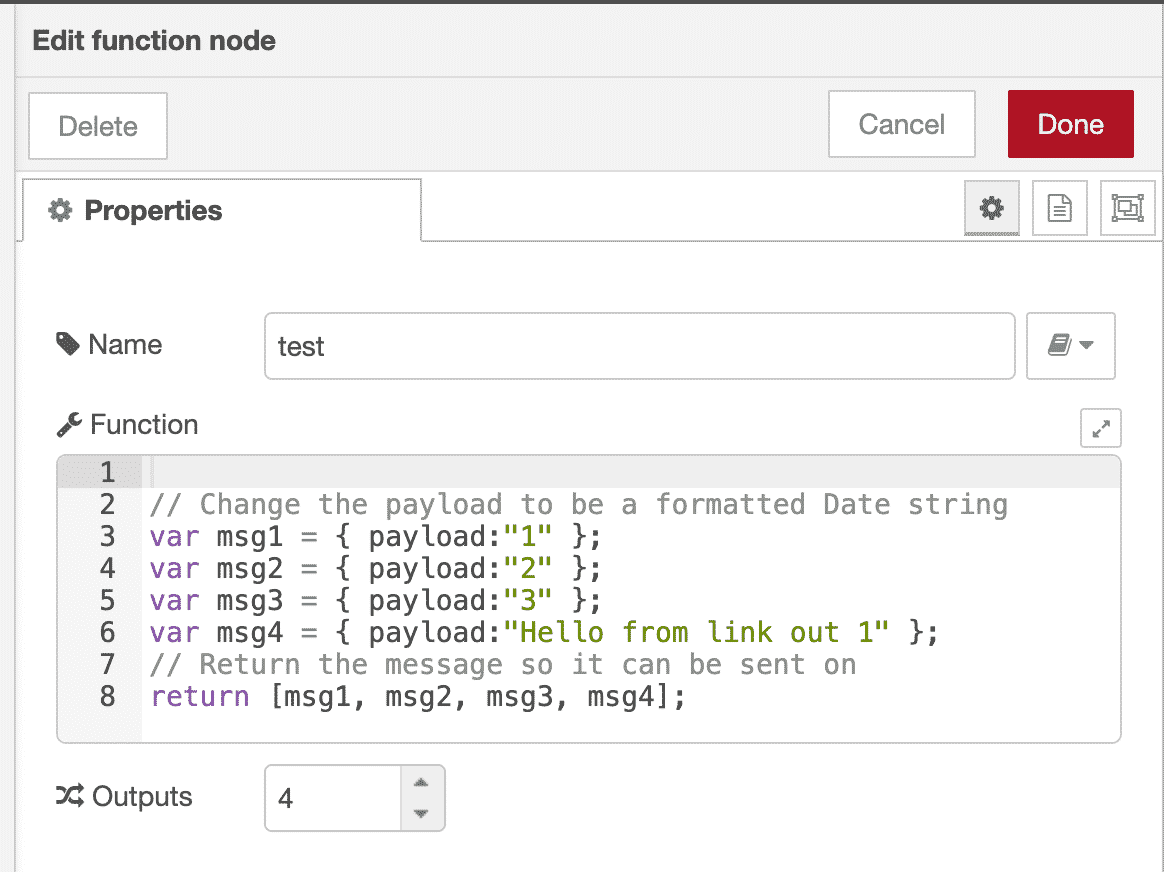
I have made a small change to the "function" node: I have added a fourth output and adjusted the JavaScript so that a string of text is send to the new output.

The fourth output is connected to a "link out" node.
Don't worry about configuring the "link out" node yet; it's best to do this after you have added the "link in" node.
Create a new flow, and create a simple flow with a "link in" and "debug" nodes, like this:

This flow contains a "link in" node.
Double-click on the "link in" node to see it's properties.
In the "Name" field, type in "Link in 1" or something reasonable. This name will appear in the "link out" properties so that you can easily select the target of the "link out" node. The properties for the "link in" node look like this:

The "link in" node properties.
Notice that the "link out" node is listed under the name field. Because our "link out" node does not have a name yet, Node-RED is showing the node ID. When you assign a name to the "link out" node, you will see the name in this list, instead of the node ID.
Continue with the flow that contains the "link out" node.
Double-click on the "link out" node to see the properties pane, and set its name to "Link out node 1" or anything else you want. The "link out" properties will look like this:

The "link out" node properties.
You can see that the "link in 1" node is listed as a candidate node to which you can link this node. Any other "link in" nodes that you may have created across all flows will be listed here.
Select the "link in" node, and click on Done.
Before you deploy the changes, check on the name of the "link out" node as it appears in the "link in" node. Instead of the node ID, you now see the actual node name.
You can link "link out" and "link in" node from wither one.
Deploy the changes and then click on the "inject" node's button.
You will see this message in the debug tab:

The output from "link in".
Link-in and link-out provide an alternative way for data to be shared among nodes that belong to different flows.

Learn Node-RED and how to use it with the ESP32
This course will guide you through the construction of an automated control system. The deliverable is a Terrarium controller.
Along the way, you will learn a great deal about useful technologies such as the Node Red programming environment and MQTT.
Jump to another article
1. Introduction to Node-RED
2. Install Node-RED on the Raspberry Pi
3. Configuration
4. Nodes
5. Flows
6. Messages and Variables
7. The "complete" node
8. The "catch" node
9. The "link out" and "link in" nodes
10. The "switch" node
11. The "range" node
12. The "delay" node
13. The "trigger" node
14. The "RBE" (Report by Exception) node
Last Updated 1 year ago.
We publish fresh content each week. Read how-to's on Arduino, ESP32, KiCad, Node-RED, drones and more. Listen to interviews. Learn about new tech with our comprehensive reviews. Get discount offers for our courses and books. Interact with our community. One email per week, no spam; unsubscribe at any time