Node-RED guide series
Node-RED Messages and Variables
Messages and variables are provide a mechanism by which nodes can pass data to each other and around the Node-RED flow.
In this article, I will explain the basics of messages and variables.

Documentation for messages and variables
If you have read the previous article in this series, you have already seen messages in action. There, I shows you a couple of examples the included the "msg" object.
In this article I will expand on messages and introduce Node-RED variables.
I also recommend that you have a look at the official Node-RED documentation, where messages and variables are covered in detail. You should also read the documentation page on context.
Messages vs variables
A confusion that arises among people that are new to Node-RED has to do with the differences and similarities between messages and variables.
Let's clear this up right now.
Similarities
Both messages and variables are used to pass data from one node to another.
That's it.
Differences
A message can only be passed from a node to the very next node to which it is connected.
A variable can be passed between a node to any other node. Variables can be passed between nodes that are not directly connected. Variables can even be passed between nodes that belong to different flows.
Messages
The main thing to remember about messages, is that the data that you want to pass to the next node is contained within an object named "msg". The msg object may contain as many attributes as you want. Some of those attributes are built-in, but you can also create your own.
The most important attribute is called "payload".
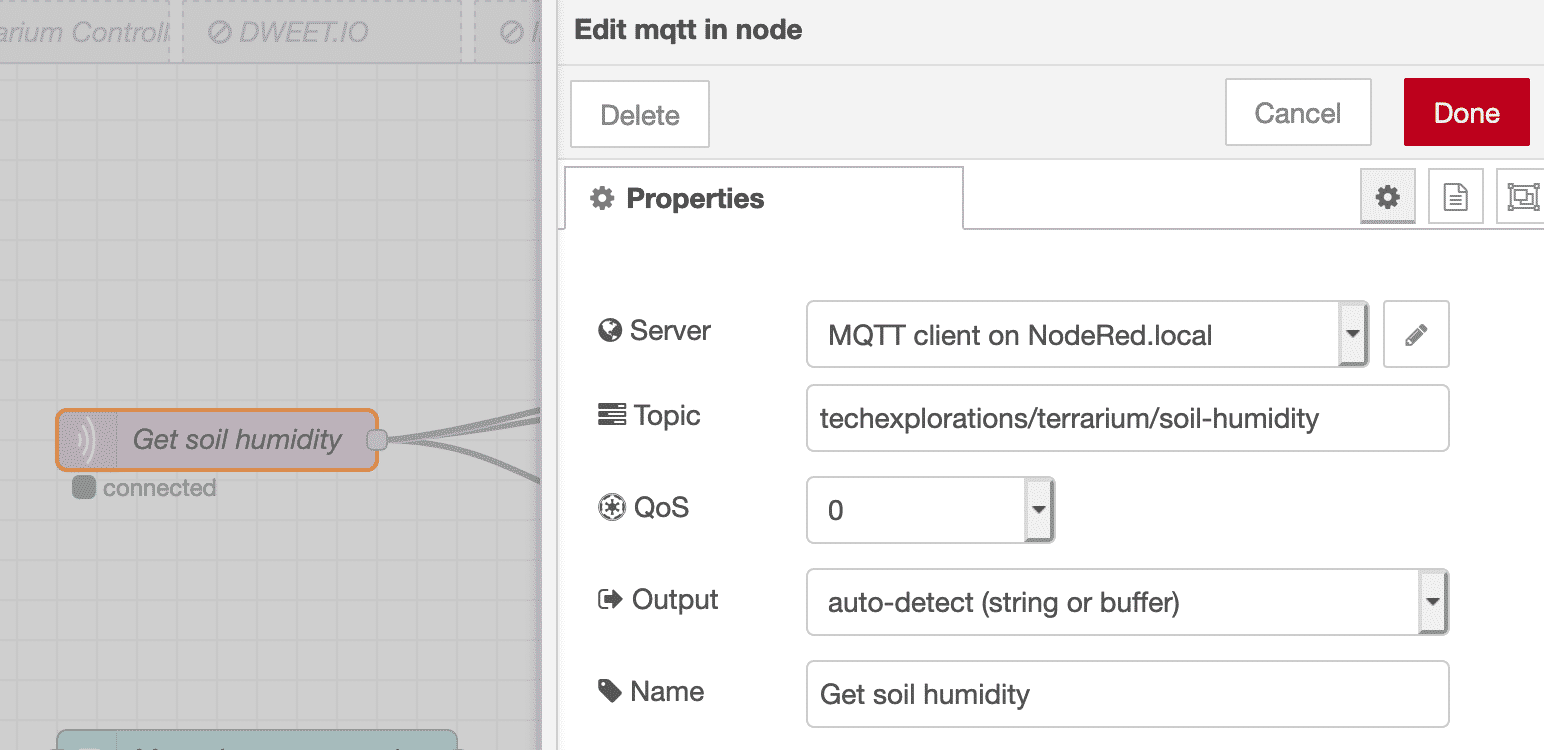
Most nodes will automatically save data in the payload attribute. For example, consider the MQTT-in node:

The MQTT-in node will store data in the msg.payload attribute.
This node (like most other nodes), will store data in the msg.payload attribute. This is done by convention. You don't have to do anything specific to make this happen.
Because of this, you know that you can get the data you need to process or display in the next node by reading the contents of the payload.
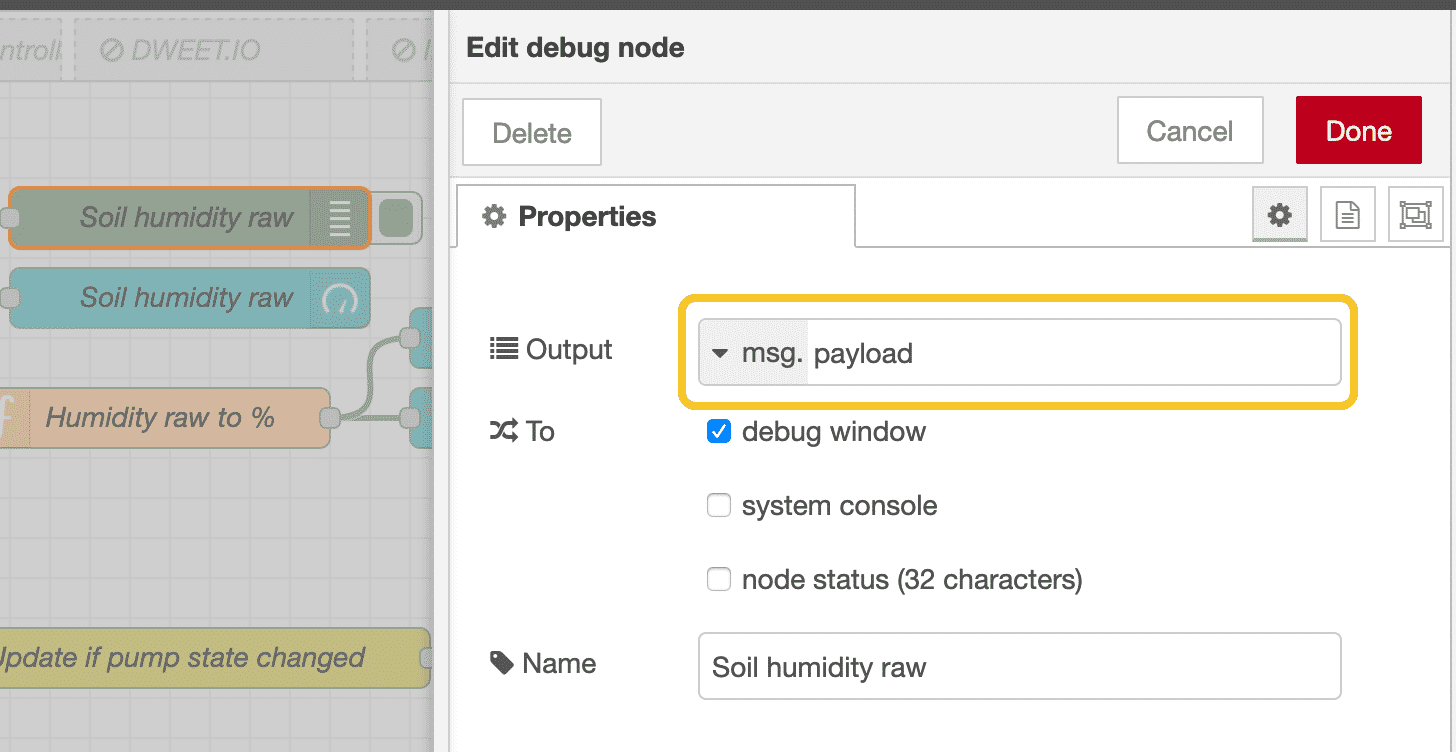
Here is an example of displaying the MQTT-in node data using a debug node:

Get the MQTT-in data from the payload attribute of the msg object.
Notice that the output of the debug node comes from the msg object. In the text field, I have typed "payload" so that I can access the payload data.
In the payload, you can store these types of data:
- Boolean. Valid values: true, false
- Number, such as 0, 123.4
- String, such as "hello"
- Array, such as [1,2,3,4]
- JSON Object, such as { "a": 1, "b": 2}
- Null
JSON object payloads are very flexible. As long as the JSON expression is valid, it can be stored in the message payload.
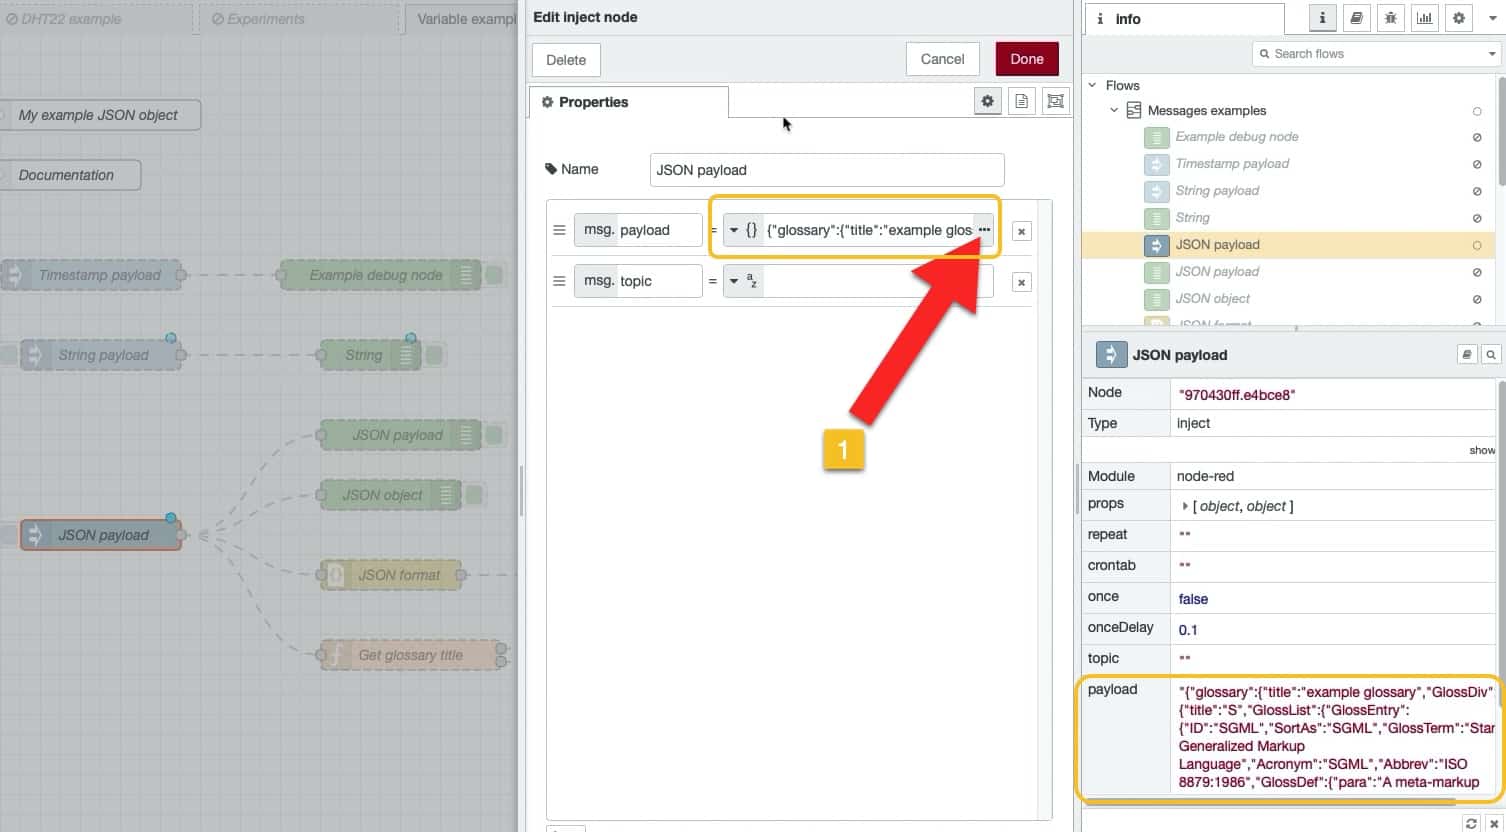
In the example below, you can see an inject node where I have set it's payload to contain a JSON document.

The payload of this inject node is a JSON document.
In the inject node, you can insert the JSON document in the payload by selecting the appropriate JSON data type, and then clicking on the button marked "..." (see arrow "1").
This will show the JSON editor:

The JSON editor.
The JSON editor makes it easy to create a JSON document. There is also a visual editor tab that allows you to browse through a JSON document.
You can pass this JSON (or other datatype) payload to the next node. For example, if the next node is a debug node, it will be configured like this:

A debug node configured to receive a message payload.
In the debug window, the JSON document will look like this:

JSON output from a debug node.
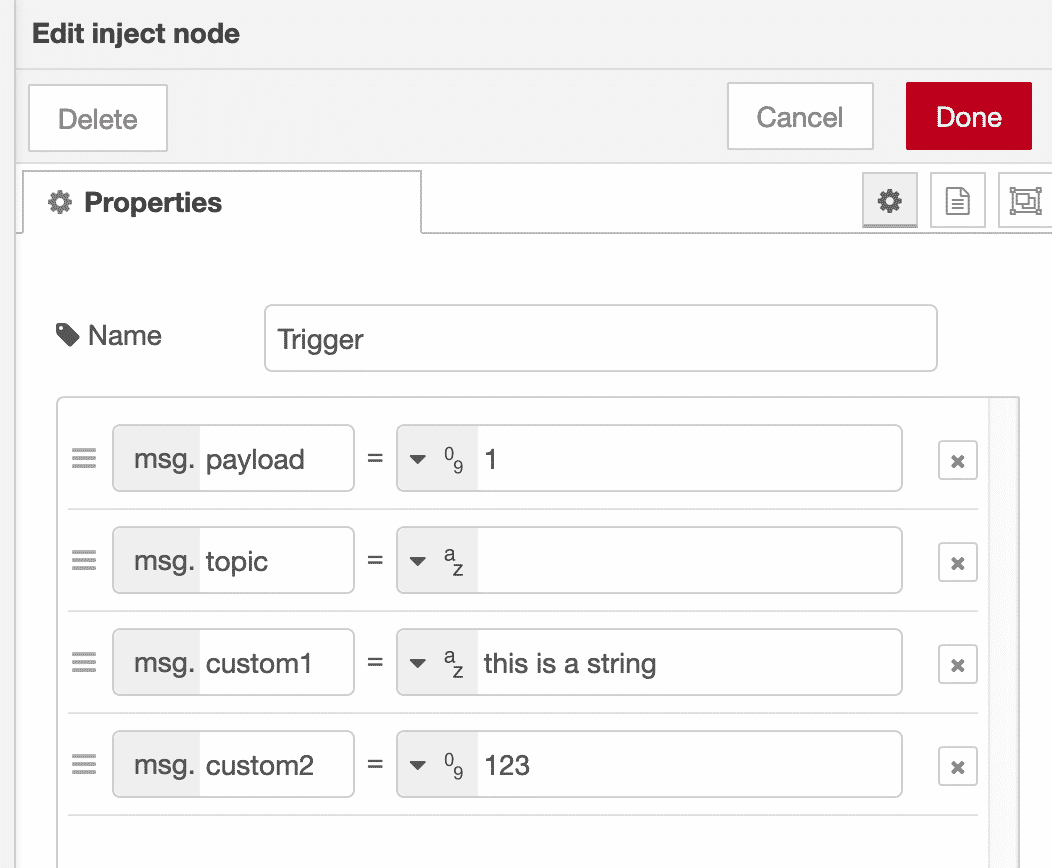
Some nodes, such as the inject node, can also work with custom attributes attached to the msg object. Here is an example:

This inject node msg object contains custom attributes.
In this example, I have created two custom attributes, a number and a string. I can use these attributes in the next node by referencing them:

I can access the data in the custom attributes by referencing the attribute name.
Variables
Next up: variables.
With variables you can share data across any nodes, and even flows.
Think of variables in Node-RED as variables in a programming language like Ruby and Python. In such languages we have global and local variables. Access to the variable depends on the variable's scope.
Similarly in Node-RED, we have the concept of scope, and as a result there are variables that allow access to their values depending on their scope.
You can learn more about context in Node-RED by reading this documentation page.
In Node-RED there are three scopes:
- Node (equivalent to a local variable in Python). It is only visible to the node that set the value.
- Flow (equivalent to a global variable in Python). It is only visible to all nodes on the same flow (or tab in the editor)
- Global (equivalent to a system variable in Python) - visible to all nodes
A global variable is can be set by a node in one flow, and be read by another node in any other flow. In a programming language like Python, this is roughly equivalent to the concept of cross-process (or inter-process) communication.
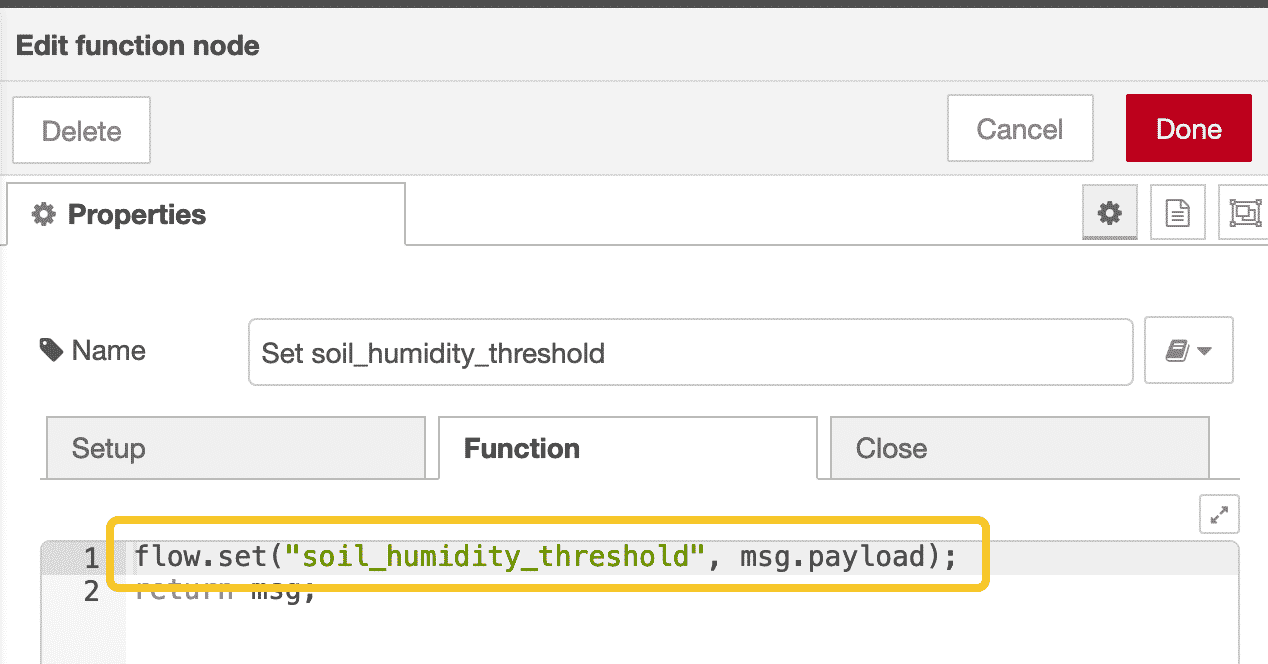
Most often you will be working within a flow context. In such case, you can set a flow variable using the "flow.set()" function.
Here is an example from the Terrarium project:

Set a flow variable.
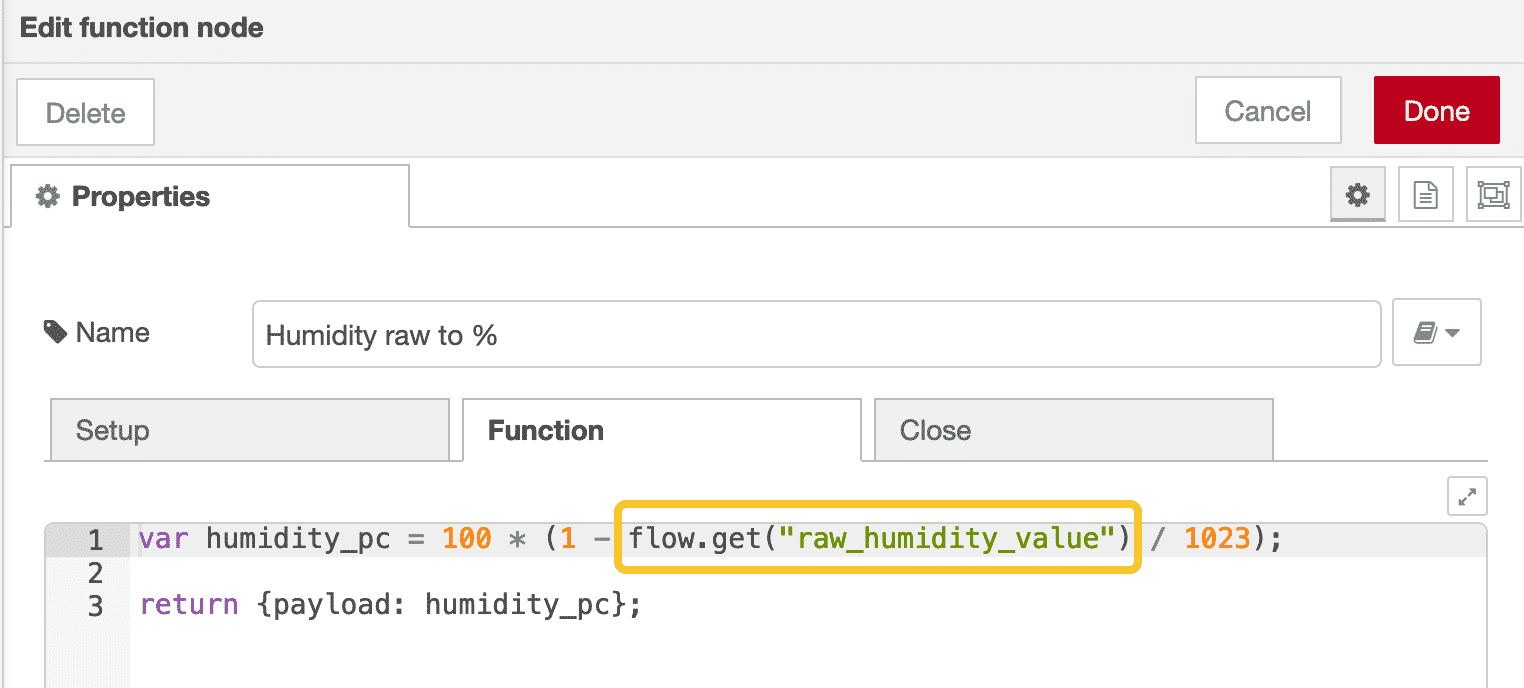
To read a flow variable, you can use the "flow.get()" function. Here is an example from another function node:

Edit your caption text here
Here, I read the value stored in a flow variable called "raw_humidity_value", and apply it to a calculation.
At this point, you have a good basis for getting into hands-on examples of flows that contains the most common Node-RED nodes.
In the next article, you will dive into the debug node.

Learn Node-RED and how to use it with the ESP32
This course will guide you through the construction of an automated control system. The deliverable is a Terrarium controller.
Along the way, you will learn a great deal about useful technologies such as the Node Red programming environment and MQTT.
Jump to another article
1. Introduction to Node-RED
2. Install Node-RED on the Raspberry Pi
3. Configuration
4. Nodes
5. Flows
6. Messages and Variables
7. The "complete" node
8. The "catch" node
9. The "link out" and "link in" nodes
10. The "switch" node
11. The "range" node
12. The "delay" node
13. The "trigger" node
14. The "RBE" (Report by Exception) node
Last Updated 1 year ago.
We publish fresh content each week. Read how-to's on Arduino, ESP32, KiCad, Node-RED, drones and more. Listen to interviews. Learn about new tech with our comprehensive reviews. Get discount offers for our courses and books. Interact with our community. One email per week, no spam; unsubscribe at any time