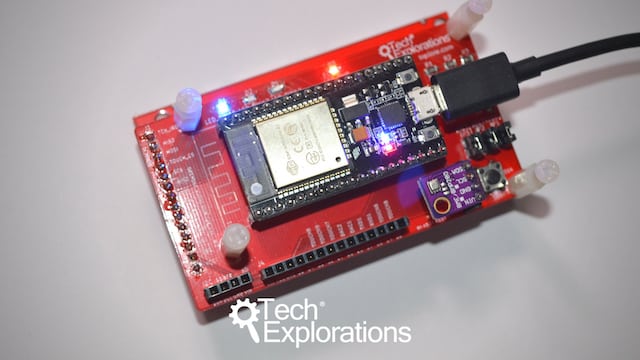
In my last project update, I wrote about the PCB I designed on KiCad. These prototype boards are manufactured by PCBWay.
The purpose of this PCB is:
- To move the project from the breadboard to a reliable platform (no loose wires!)
- To make it easier to experiment and learn with the ESP32 as I found that the breadboard can be a limiting factor.
Once I went past the basics, I found that the TFT screen was very useful for display information about what is happening with the operation of a sketch running in the ESP32. Having the screen to display this information meant that I could now untether the gadget from the computer. So, the TFT screen quickly became a permanent fixture in my ESP32 projects. Having it wired on a breadboard was a no-no.
With my IoT project in particular, a basic requirement was provision for a sensor. The sensor provided me with sample data I could use to experiment with datalogging, MQTT, HTTP REST, the screen, and more. So, the PCB needed provision for an I2C socket.
I also wanted various indicator lights, some useful text on the board to indicate pin roles, and a breakout for any remaining pins so that I can use them for other purposes.
After a few attempts, I now have version 1.2 of the board. It is flawless (at least at the moment, I'm sure flaws are there to be found). In previous versions I had made an error with the size of the ESP32 footprint. The ESP32 Dev Kit v4 (which I am also using the ESP32 for Busy People course) did not fit, and I had to bent the pins slightly to make it fit. In version 1.2, the footprint is perfect, and the board just hooks in.
I am pleased to say, everything works. The TFT screen and the sensor are plug and play. The SMD components are 0805 size and easy to solder by hand. The silkscreen is very helpful to quickly convey in and orientation information.
The gadget itself has been working flawlessly for weeks. I have recorded a high of 22600 MQTT sensor data updates to Adafruit IO. It would have gone much higher if it wasn't for me having to unplug power because I needed the power supply for something else.
With this, I can go ahead to produce a follow up course for ESP32 for Busy People which will focus on IoT and the set of technologies that power this environment monitoring and control gadget. More about this project soon.
Enjoy these photos 🙂
PS. Please leave your comments below. I am particularly interested in your ideas on how to improve the ESP32 Dev Kit breakout to make learning and tinkering easier.
Ready for some serious learning?
Enrol to
ESP32 for Busy People
This is our comprehensive ESP32 course for Arduino Makers.
It's packed with high-quality video, mini-projects, and everything you need to learn Arduino from the ground up.
Just click on the big red button to learn more.

Ready for some serious learning?
Enrol to
ESP32 Unleashed
A new learning adventure awaits you.
Create an application that will stretch your existing knowledge and skills.
ESP32 Unleashed is a project course
This course is perfect for people familiar with the ESP32, especially graduates of ESP32 For Busy People.
It is a guided project, designed to teach you how to use modern tools to create modern embedded applications based on the ESP32.
Just click on the big red button to learn more.
