
I recently received a new kit from Seeed Studio: The Grove Beginner Kit for Arduino.
Grove is a system of connectors and components that make it very easy to create circuits. Just plug in the special Grove cables into the connector, and move on to work on the sketch, knowing that the wiring is solid and reliable. As a result, the Grove system is perfect for people new to the Arduino.
But, with the Grove Beginner Kit for Arduino, Seeed went a step further: They got rid of the wires. Although the kit contains modules such as an OLED screen, five sensors, and various actuators like a button and a potentiometer, you don’t have to do any wiring.
I have recorded a 90 second video to show you how the Grove Beginner Kit for Arduino works, out of the box.
You can find it further down in this post.
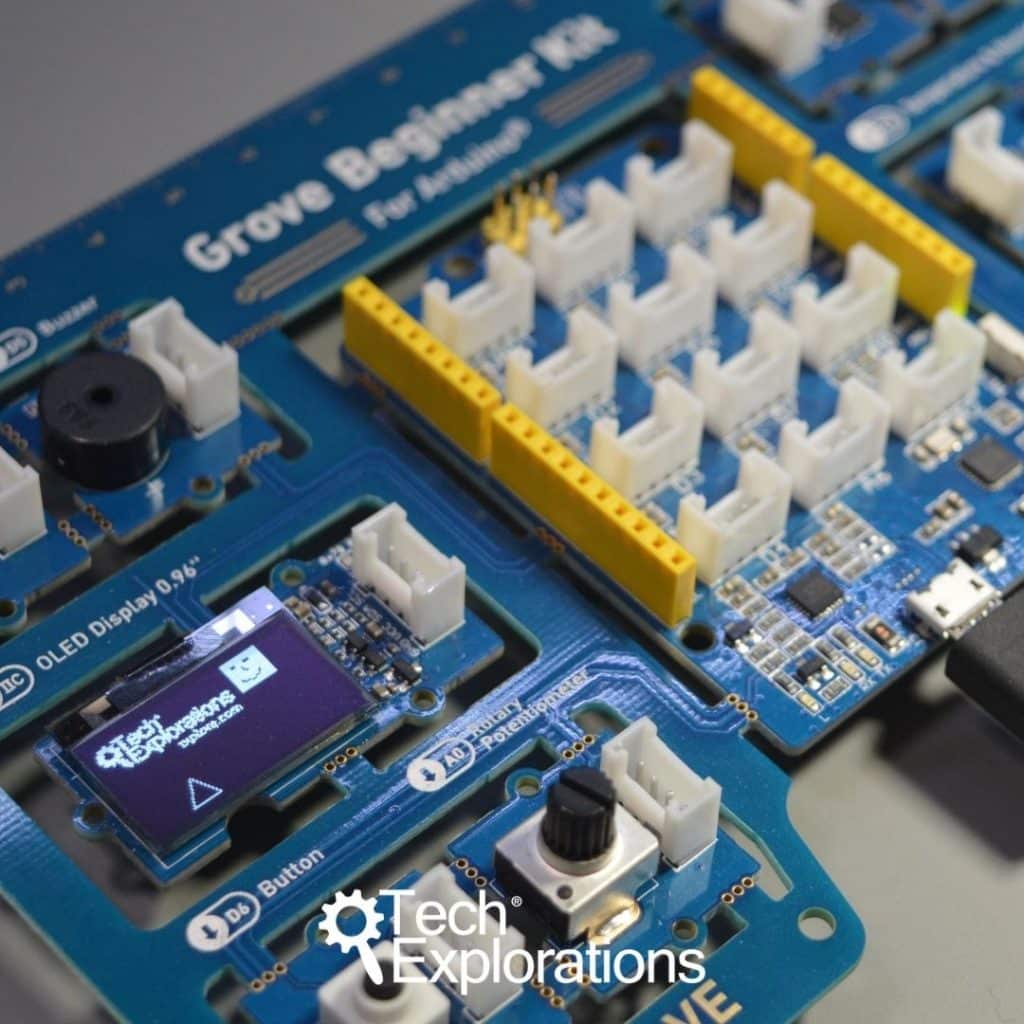
Look at the photo of the Grove Beginner Kit:
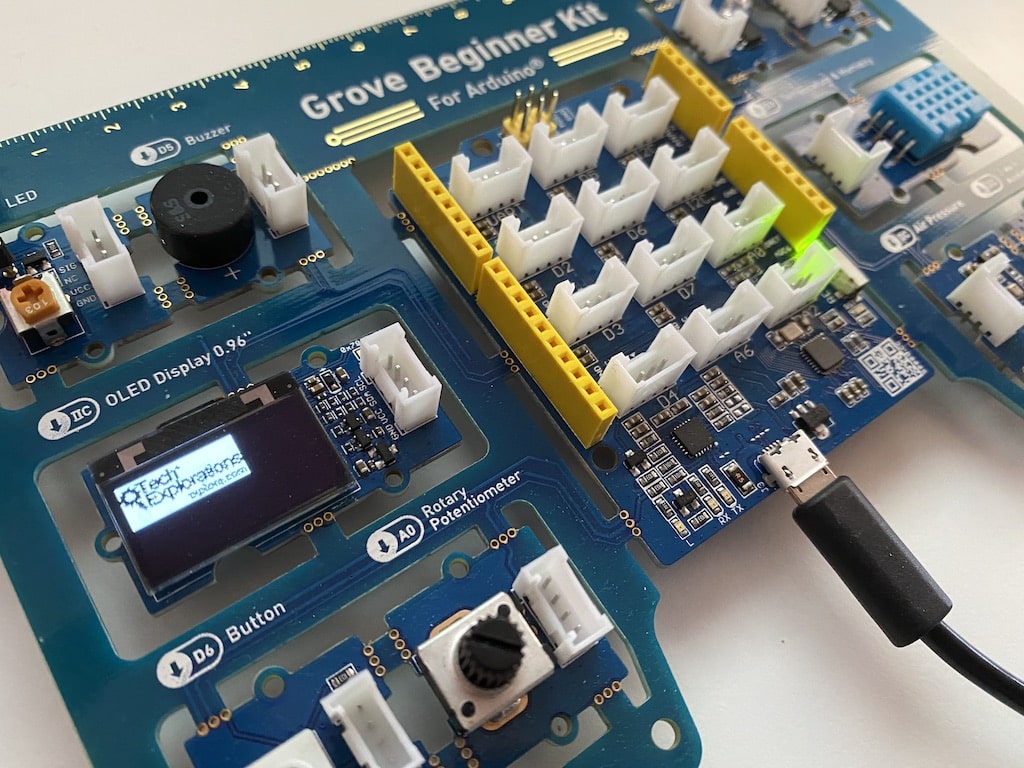
The Kit is a single PCB.
The PCB contains an Arduino clone with Grove connectors and a standard set of headers that can accommodate Arduino shields.
Around the Arduino, the PCB contains modules with sensors (humidity, light, sound etc.) and actuators (LED, button, potentiometer, buzzer).
Arduino for Beginners with Grove
This course will introduce you to the Arduino by teaching you how to use all of the hardware that comes with the innovative Grove Beginner Kit for Arduino.
The innovation
Seeed’s innovation is that they have connected all those modules to the Arduino via the PCB itself. On the PCB, there are traces that connect, for example, the LED module in the top-left corner of the kit to Arduino digital pin 4. The buzzer is connected to digital pin 5. The OLED display to the I2C interface of the Arduino.
This is indeed very clever.
You can simply take the kit out of the box, plug it to any USB power supply (or your computer), and it will execute the factory-uploaded sketch that cycles through the various components.
The PCB design is very clever (it’s Ok to repeat my self about this!).
If you want to remove a module from the PCB, you can use a cutting tool to snap of the joints (don’t simply apply pressure in the joints as this might cause damage to the board and the module).
You can also connect other Grove modules via the Grove connectors on the Arduino, or via jumper wires. Of course, you can attach any compatible Arduino shield.
Once you had enough playing with the demo sketch, you can start the Arduino IDE, set the board to “Arduino Uno”, and start writing your own sketches to use any of the kit’s modules… without doing any wiring.
Implications
This is game-changing for classrooms, where most of the time goes to fixing loose or incorrect wiring.
I actually started re-working my 10 Arduino mastery projects to work with the Grove Beginners Kit for Arduino, and added a few more. Of course, without jumper wires.
Seeed has offered an Arduino Kit in the past: the Grove Starter Kit for Arduino. It was a classic kit, with a basic collection of modules, but no Arduino to keep the cost down. I even created a course based on this kit. It was good, but not that different or innovative against other options. You still had to wire things together and try not to loose anything.
There was also an older version of the Grove Beginner Kit for Arduino (old), that included an Arduino clone.
As an educator, my main struggle when I help a new learner get started with electronics and the Arduino is to make the learning curve as gentle as possible for them. Most learners seem to give up early because of the sheer amount of information that has to be absorbed and skill that has to be earned.
Learning is a long-term endeavor, so, as educators, anything that we can do to reduce the risk of dropping out early on increases the probability that the learner will stick around long enough to get to the good stuff (i.e. to become an independent creator).
Innovations such as the Scratch (or other graphical) programming languages contribute towards that end.
And Seeed, with the Grove Beginner Kit for Arduino, does the same on the hardware side.
The learner’s hardware-software dilemma
I have spent a lot of time trying to figure out what I should teach first to a new student:
- Should I start by showing them how to wire a circuit?
- Perhaps start with the sketch?
- Maybe fix it all up through a simple project?
- Or, focus on explaining how to use a single component or module?
I have done a lot of thinking and reading about this, and I have also spent a lot of time talking to other educators.
After all this, I realize that it does not matter.
Learning happens in many different ways, that are unique to all of us.
Prescribing that a student should start with this first, then that, then the other, just doesn’t work.
In my experience, when it comes to learning there are four things to consider:
- What is it that we want to learn and teach?
- What are the tools that we have available?
- Who is the student (along with their unique circumstances such as what they already know, what kind of skills they bring along, what are their own wishes)
- Who is the teachers (along with their unique… you know…)
In summary, it is the result that counts (“what”). The “how” depends on the teacher, the student and the tools that they have at their disposal.
You can achieve the desirable result in many ways.
But when it comes to metrics, an important one is time.
How long does it take for the student to experience their first success?
How long does it take for the student to experience their second success?
How long does it take for the student to experience a steady stream of successes?
Each success increases the student’s willingness to continue learning. Their reward is a dopamine rush, which leaves them craving for more.
If we can structure our teaching to increase good feelings coming out of the learning process (success rather then pain), then we are on the right track.
When it comes to electronics and programming, things like loose wires and damaged Arduinos generate pain and result in a lower desire to continue.
With technologies such as Scratch and the Grove Beginner Kit for Arduino, we can increase the ratio of success vs failure so that we can improve the probability that the student will “stick with it” for long enough to become an independent creator.
Some technical notes
Before I finish writing this post, I wanted to mention a few things I discovered as I was playing with the Grove kit.
All of the Grove components (both in the kit and those sold separately) are stock-standard. The only difference between the Grove barometer sensor module (that contains a BMP280) and a generic BMP280 breakout that you can find on eBay, and the Grove connector. To use them in your sketches, you use the exact same code and libraries.
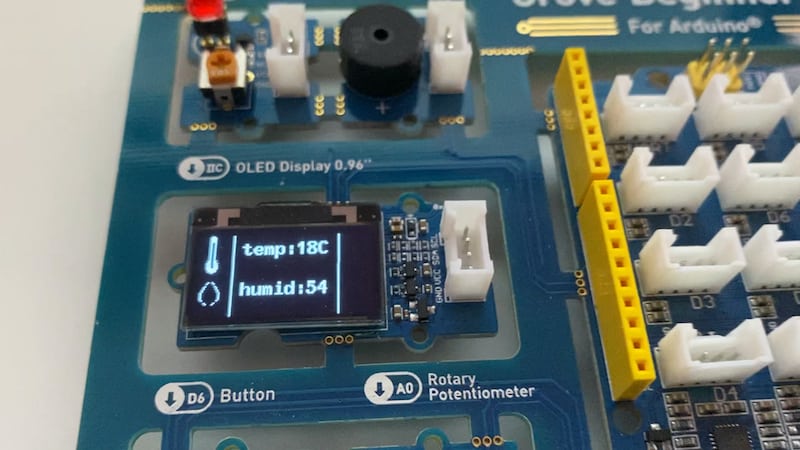
The screen is a standard 0.96″ OLED module with the SSD1315 driver chip and 128×64 dot resolution. In your sketch, import the U8g2lib library. This library has excellent documentation, perhaps the best of all of its alternatives.
You can use it to create a user interface with letters, numbers, and graphics. You can create graphics programmatically using the graphics primitives (lines, pixels, boxes, circles etc.), or create your own bitmap graphics. I have documented out an easy process to create custom bitmaps.
Each module is connected to the Arduino via traces on the PCB. The pins used are marked on the silkscreen so that you can set them in the sketch. The display, pressure sensor and accelerometer are connected via I2C. The rest of the components are connected to unique pins. This means that you can use all of the modules at the same time, as there are no shared pins.
To keep the cost down, the kit’s Arduino board uses the CP1202 USB driver. You may need to install the appropriate driver for your PC to make this work. I had no problem doing that on my iMac, running Mac OS Catalina.
You can find out information about this kit in the Seeed Studio wiki.