Programming Arduino with Altair Embed
Demo: ultrasonic distance sensor project
In this lesson, I demonstrate a simple Embed model. This model is compiled into C++ code, which you can upload to an Arduino Uno. The model uses an ultrasonic distance sensor to measure the distance between the sensor and a target in front of it.
What is a "model"?
A graphical model in Embed, a graphical program essentially in Embed, that recreates the functionality of a simple program, a simple sketch from the Arduino IDE.
You can see a simple Embed mode in Image 1 (below).
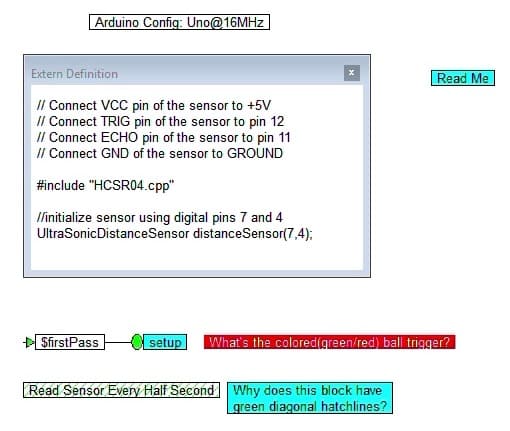
Image 1: A simple Embed model
A model is a program.
Each block is an instruction. A block may contain other blocks inside it (in which case, it is a "compound block").
Each block may also have its own configuration, which can control various aspects of its operation (more about this further down in this lesson).
Blocks may be connected to other blocks. They can read or write variables, do calculations, operate on files, and hardware.
Anything that can be done in traditional text-based programming, can be done in a model, using blocks.
Altair Embed is a development environment that uses models instead of classic C text based programming.
The example in Image 1 is very simple. As you can imagine, they can get a lot more complicated.
Embed IDE is designed for building firmware for large industrial applications, consumer electronics, appliances, automotive, aerospace and so on.
Altair, the company which makes Embed has recently released a version of the software for the Arduino. It is freely available for download and usage. No strings attached.
The Embed IDE ships with numerous blocks that you can use in your models, doing all sorts of things. Many of those blocks are specifically targeting Arduino functions.
For example, there are blocks for:
- Using the analog digital converter.
- Read and writing from the digital inputs and outputs.
- API and I2C communications
- PWM
- Using external function's, which is what we are doing in this example here
- ... and so on.
Image 2 show some of the available blocks dedicated to Arduino functions.
The full version of Embed provides support for a lot more microcontrollers from various manufacturers.
There's a full library of blocks as well that you can drag and drop into your model.
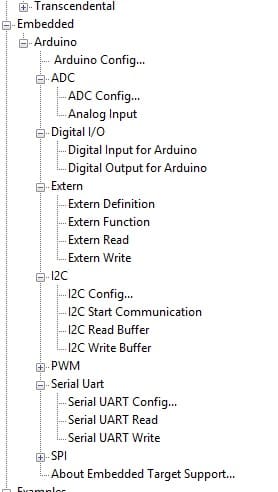
Image 2: Arduino blocks in Embed
What is the demo about?
This model demonstrates how to implement one of the simple examples that ship with the Arduino IDE in Embed. A goal of this demo is also to show how easy it is to use Arduino libraries in Embed models.
The example sketch is that of the ultrasonic distance sensor.
It uses the HCSR04 distance sensor to calculate the distance between the sensor and an object in front of it. The sketch outcome is this distance in centimeters, printed in the Arduino IDE serial monitor.
In this example, I'm using the HCSR04 library, that makes is very easy to work with this sensor. I have installed this library directly to Arduino IDE's core libraries folder (not the user libraries folder located in the sketchbook directory - see video for instructions).
The Embed IDE, looks for Arduino libraries in the Arduino IDE core libraries folder.
The ultrasonic sensor sketch as an Embed model
Now let's have a look at what this sketch looks like as a model in Embed.
Below, I make reference to the model in Image 1.
Blocks are shown with a black line and a name inside the border. In Image 1, you can see these blocks:
- Arduino Config: Uno@16MHz
- Extern Definition
- $firstPass
- setup
- Read Sensor Every Half Second
Each block contains some functionality. The last two in the list (in bold), are compound blocks. These blocks contain one or more blocks, grouped together. These are the equivalent of a function in text-based programming languages.
As I mentioned earlier, blocks have their own configuration properties, and can be connected to other blocks. These connections represent inputs and outputs.
Aside from blocks, a model also contains labels. In the model of Image 1, you can see these labels:
- Read Me
- What's the colored (green/red) ball trigger?
- Why does this block have green diagonal hatch lines?
These labels contain text and/or images. They are the equivalent of a comment in a traditional programming language, though more powerful. You can fully document a model using labels, which means that documentation and code (model) can ship together.
The Arduino config block
Let's look at the properties of the Arduino Config block. Just right click on it to open the properties window.
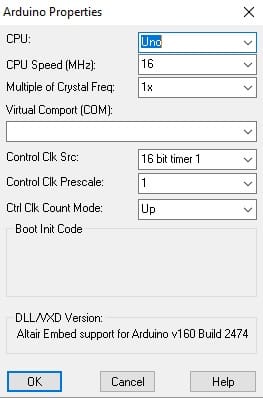
Image 3: The Arduino config block properties
You can see the properties window in Image 3.
This is where you can configure the attributes of the Arduino board you want to use.
The CPU speed, the COM port, the prescaler, and other aspects of functionality of your model target (i.e. the hardware on which the model will execute).
The Extern Definition block
In the Extend Definition block we can insert regular Arduino code. Obviously , this is very important for people familiar with the Arduino.
With the Extend Definition you can actually copy code from your original programs that allow you, for example, in this case to set up your program.
This is how we include a library, one or more libraries.
In this model, this is where we initialize the distance sensor object, which is essentially code that we've copied from the original sketch.
Arduino libraries
If you want to use an Arduino library in your Embed model, you must declare this using the libraries tool.
You can access this tool by doing a right-click on the Extern Definition block.
Select the libraries you want to include (multiple select is possible).
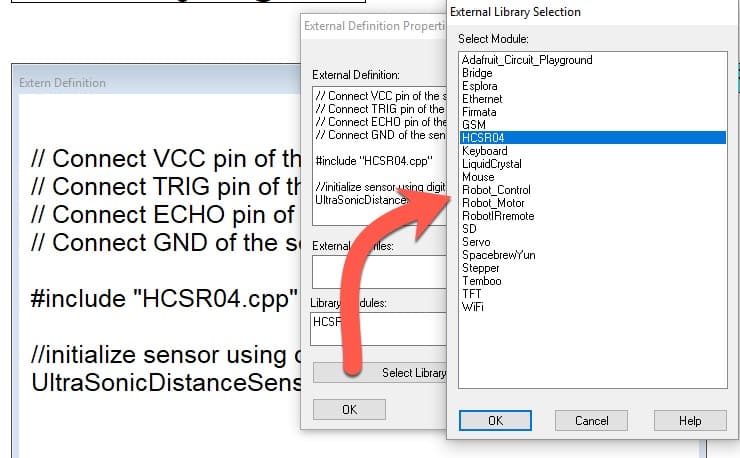
Image 4: Used libraries must be declared
Setup and External Function Calls
The Setup block is compound. That means, it contains other blocks.
Right click the Setup block to drill in, and see the two External Function Call blocks.
Inside those blocks, you can see more familiar Arduino code, simply copied from the Arduino example.
Right click on any of the two blocks here to bring up its properties. This is where you can insert your Arduino instructions.
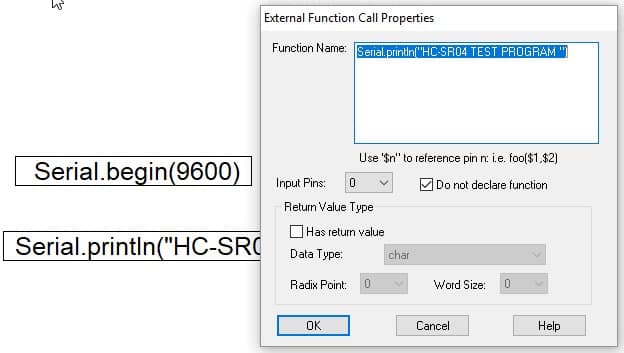
Image 5: The properties of the External Function Call block
Because we want whatever is inside the setup block to execute only once, we connect it to a $firstPass block.
The $firstPass block will emit "one" (true) as an output the first time that the model executes; after that, it will emit "zero" (false), which means that the setup block will never execute again.
The "Read Sensor Every Half Second" block
This is also a compound block.
In it and you'll find a Serial.println function, and the call to the library function that gives us the distance in centimeters (see Image 6).

Image 6: A call to Serial.println and a library function
Equally as "cool" is the configuration of the "Read Sensor..." block. This is where we can configure it to execute at a required frequency, without using a delay function.
You can see the properties window in Image 7.
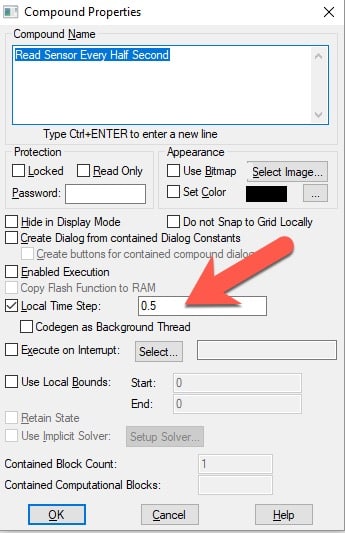
Image 7: The Compound block properties
In Embed, code executes at the specified frequency, without blocking other functionality.
To open the Compound block properties window, hold down the control key and then right click on the block to go into the compound block properties.
Notice how many options are available to customize how you'd like the code inside the compound Block to be executed.
In this example, we just want the block to be executed at every half a second so we enter "0.5" in the local time step box.
Compile the code
To compile the code from an Embed model to an Arduino sketch, go to Tools, Codegen, and then click on Compile. This will use the C compiler that comes with the Arduino IDE.
1 2 3 4 5 6 7 8 9 10 11 12 13 14 15 16 17 18 19 20 21 22 23 24 25 26 27 28 29 30 31 32 33 34 35 36 37 38 39 40 41 42 43 44 45 46 47 48 49 50 51 52 53 54 55 56 57 58 59 60 61 62 63 64 65 66 67 68 69 70 71 |
/*** Altair Embed 2019.0.1 Basic Build 41 Automatic C Code Generator ***/ /* Output for Ultrasonic-Uno-Library.vsm at Tue Mar 12 10:39:21 2019 */ /* Target: Arduino[Uno] */ #include "math.h" #include "cgen.h" void main(void) __attribute__((noreturn)); void dspWaitStandAlone(void) __attribute__((noreturn)); #include "avr/io.h" #include "avr/interrupt.h" #include "Arduino.h" #include "vsmArduinoWrapper.h" int MHZ=16; // Connect VCC pin of the sensor to +5V // Connect TRIG pin of the sensor to pin 12 // Connect ECHO pin of the sensor to pin 11 // Connect GND of the sensor to GROUND #include "HCSR04.cpp" //initialize sensor using digital pins 7 and 4 UltraSonicDistanceSensor distanceSensor(7,4); /* Read Sensor Every Half Second */ extern void subsystem1() { Serial.println(distanceSensor.measureDistanceCm()); } /* setup */ extern void subsystem4() { Serial.begin(9600); Serial.println("HC-SR04 TEST PROGRAM "); } static SIM_STATE tSim={0,0,0 ,0,0,0,0,0,0,0,0,0,1,1,0,0,0,0,0,0}; SIM_STATE *sim=&tSim; ISR(TIMER1_CAPT_vect) { static unsigned _pulseCnt1=50; enable_interrupts(); ; if ((++_pulseCnt1 > 49?_pulseCnt1=0,1:0) ) { /* Read Sensor Every Half Second */ subsystem1(); } } void main() { init(); /* call Arduino timer/ADC init code */ initFlash(); simInit( 0 ); startSimDsp(); subsystem4(); /* setup */ TCCR1A = 0; TCCR1B = (1<< WGM13)|0x2; /*Enable Timer and PreScaler */ ICR1=0x2710; TIMSK1 |= (1 << ICIE1); resetInterrupts(); enable_interrupts(); // Global Start Interrupts dspWaitStandAlone(); } |
Browse this code and look for segments that you can also recognise in the model in Image 1.
Look at the "extend void" function, in particular. is given it automatically a name for the function. See how this function relates to the "Read Sensor..." block?
This is very efficient C++ code.
Upload and execute
Let's upload the compiled model to the Arduino and execute it. Click on the download button to send this code over to the Arduino and see it in action.
(Best to watch this happening in the video)
The programmer is AVRDude, that comes with the Arduino IDE.
When the upload is complete, start eh serial monitor from the Arduino IDE to see the output. You will see that the program works as expected, except, more efficiently
This concludes this demonstration of how you can migrate a very simple program from the Arduino IDE to Embed.
Looking forward to any comments may have or questions.
Last Updated 4 years ago.
We publish fresh content each week. Read how-to's on Arduino, ESP32, KiCad, Node-RED, drones and more. Listen to interviews. Learn about new tech with our comprehensive reviews. Get discount offers for our courses and books. Interact with our community. One email per week, no spam; unsubscribe at any time
