Arduino peripherals guide series
PIR sensor calibration
Learn how to calibrate and improve the reliability of the infrared motion sensor.

The PIR sensor is very sensitive and often generates false triggers.
The example sketch in lecture 0500 of Arduino Step by Step Getting Started is very simple; it merely reports what the sensor is telling it, and does not try to compensate for its limitations.
There are two things you can do to create a more reliable detection system (and this can deliver the functionality you are asking for).
1. Calibrate the sensor (hardware)

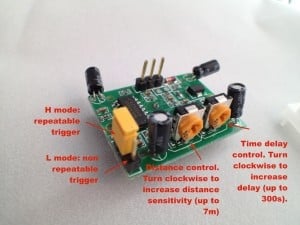
Look at the annotated photograph (above) where I have marked the purpise of each knob.
Notice the two orange knobs on one side of the sensor?
The one on the left controls the sensor range. Turn it clockwise to calibrate the effective range. The maximum range is around 7 meters.
I usually calibrate the range to its minimum setting, but turning the left knob all the way anticlockwise. I do this because most of my experiments involve small distances.
The knob on the right controls sensitivity. Turn it clockwise to decrease sensitivity. Decreased sensitivity means that the device will trigger (i.e. report movement) only when said movement is prolonged.
I keep the sensitivity setting high by turning the sensitivity knob all the way anti-clockwise. This means that the sensor will trigger even for very small movements in front of it. Beware, that at this sensitivity setting you will have erroneous triggers.
There is also a jumper swtch that controls the trigger mode. I normally use H-mode triggering (as in the photo). In H-mode, the sensor will repeatedly trigger when it “thinks” that there is movement.
2. Improve reliability in software
You can improve the reliability of the sensor by adding additional logic to your Arduino sketch.
In this example (heavily borrowing from a sketch I found in the Arduino playground), I define a cutoff time. Any LOW triggers from the sensor within this cutoff time are ignored as false, and the Arduino continues to think that there is movement. Have a look at it (but get a copy from Github if you want to try it out):
/*
* PIR sensor tester
*/
int ledPin = 13; // choose the pin for the LED
int inputPin = 3; // choose the input pin (for PIR sensor)
int pirState = true; // we start, assuming no motion detected
int val = 0; // variable for reading the pin status
int minimummSecsLowForInactive = 5000; // If the sensor reports low for
// more than this time, then assume no activity
long unsigned int timeLow;
boolean takeLowTime;
//the time we give the sensor to calibrate (10-60 secs according to the datasheet)
int calibrationTime = 30;
void setup() {
pinMode(ledPin, OUTPUT); // declare LED as output
pinMode(inputPin, INPUT); // declare sensor as input
Serial.begin(9600);
//give the sensor some time to calibrate
Serial.print("calibrating sensor ");
for(int i = 0; i < calibrationTime; i++){
Serial.print(".");
delay(1000);
}
Serial.println(" done");
Serial.println("SENSOR ACTIVE");
delay(50);
}
void loop(){
val = digitalRead(inputPin); // read input value
if (val == HIGH) { // check if the input is HIGH
digitalWrite(ledPin, HIGH); // turn LED ON
if (pirState) {
// we have just turned on
pirState = false;
Serial.println("Motion detected!");
// We only want to print on the output change, not state
delay(50);
}
takeLowTime = true;
} else {
digitalWrite(ledPin, LOW); // turn LED OFF
if (takeLowTime){
timeLow = millis();
takeLowTime = false;
}
if(!pirState && millis() - timeLow > minimummSecsLowForInactive){
pirState = true;
Serial.println("Motion ended!");
delay(50);
}
}
}
New to the Arduino?
Arduino Step by Step Getting Started is our most popular course for beginners.
This course is packed with high-quality video, mini-projects, and everything you need to learn Arduino from the ground up. We'll help you get started and at every step with top-notch instruction and our super-helpful course discussion space.
Jump to another article
2. Basics of the TimerOne library
3. How to find device I2C address
4. Getting started with I2C on the Arduino
5. Using I2C: True digital to analog conversion on the Arduino Uno
6. How accurate are thermometer sensors?
7. MCP9808: an accurate thermometer module for your Arduino
8. Getting useful motion data from the MPU-6050 device
9. What to do with unused pins on an Atmega328P or Attiny85?

Done with the basics? Looking for more advanced topics?
Arduino Step by Step Getting Serious is our comprehensive Arduino course for people ready to go to the next level.
Learn about Wi-Fi, BLE and radio, motors (servo, DC and stepper motors with various controllers), LCD, OLED and TFT screens with buttons and touch interfaces, control large loads like relays and lights, and much much MUCH more.
Last Updated 2 years ago.
We publish fresh content each week. Read how-to's on Arduino, ESP32, KiCad, Node-RED, drones and more. Listen to interviews. Learn about new tech with our comprehensive reviews. Get discount offers for our courses and books. Interact with our community. One email per week, no spam; unsubscribe at any time

