Arduino peripherals guide series
The basic functions of the TimerOne library
Learn the basic functions of the TimerOne library that makes it easy to use the Atmega328's 16-bit counter.

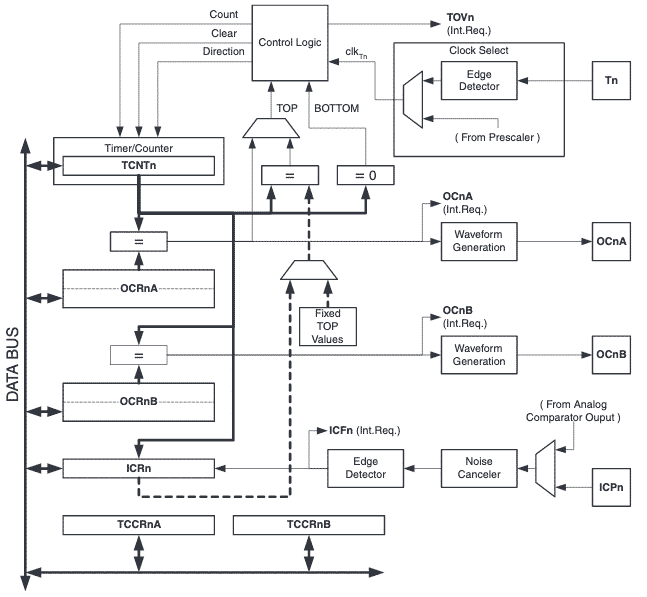
Timer1 s one of the libraries written to take advantage of the 16-bit counter that comes with the Atmega328 (datasheet, see section 16, page 111).
Think of it as a clock. Every time the Atmega oscillator ticks, the counter increases by one.
The Timer1 library makes it easy to start, stop and reset/restart the counter, just like you can do with a regular timer wrist-watch (remember those?).
Initialization
To initialize the timer1 object, you can use this syntax:
Timer1.initialize(1000);
This will set the period of the timer object to 1000 microseconds. In practical terms, this code will setup the counter to generate a timer interrupt every 1000 microseconds.
To handle this interrupt, you must write an interrupt service routine.
Using the timer
Imagine this scenario: let's say that you want to stop this timer, temporarily.
You can connect a button to a digital input. When the user presses the button, your sketch will stop the timer like this:
Timer1.stop();
When the user wants to restart the times, he can press the same button again, and your sketch start the timer like this:
Timer1.start();
This call will get the timer to continue where it left off. Just like with a standard timer watch.
The user may want to reset the timer and start from the beginning. You can add another button to your circuit, the reset button. When the user presses this button, the sketch will reset the counter like this:
Timer.restart();
As a result, the timer will start again from zero.
An example sketch
The Timer1 library comes with an example sketch which I copy below.
I have removed the comments to compact the code.
There are a few things to notice in this sketch:
- The interrupt handler. Notice the code "Timer1.attachInterrupt(blinkLED);" This registers the function "blinkLED" as the one that will handle the interrupts from Timer1.
- The variable "blinkCount" is declared as "volatile" as it is used inside the interrupt hander ("blinkLED") and the rest of the sketch. Volatile variables are loaded from the RAM, always, instead of the CPU register. Registers contains temporary variable values which may loose consistency when are accessed by interrupt request handlers.
- Any code in the regular part of the sketch that must not be interrupted (i.e. "critical code") is enclosed between the "noInterrupts();" and "interrupts();" functions. This way, we ensure that variables must be updated reliably, contain reliable values.
#include <TimerOne.h>
const int led = LED_BUILTIN; // the pin with a LED
void setup(void)
{
pinMode(led, OUTPUT);
Timer1.initialize(150000);
Timer1.attachInterrupt(blinkLED);
Serial.begin(9600);
}
int ledState = LOW;
volatile unsigned long blinkCount = 0;
void blinkLED(void)
{
if (ledState == LOW) {
ledState = HIGH;
blinkCount = blinkCount + 1;
} else {
ledState = LOW;
}
digitalWrite(led, ledState);
}
void loop(void)
{
unsigned long blinkCopy; // holds a copy of the blinkCount
noInterrupts();
blinkCopy = blinkCount;
interrupts();
Serial.print("blinkCount = ");
Serial.println(blinkCopy);
delay(100);
}
Now that you know the basics of the TimerOne library go ahead and give it a try.
New to the Arduino?
Arduino Step by Step Getting Started is our most popular course for beginners.
This course is packed with high-quality video, mini-projects, and everything you need to learn Arduino from the ground up. We'll help you get started and at every step with top-notch instruction and our super-helpful course discussion space.
Jump to another article
2. Basics of the TimerOne library
3. How to find device I2C address
4. Getting started with I2C on the Arduino
5. Using I2C: True digital to analog conversion on the Arduino Uno
6. How accurate are thermometer sensors?
7. MCP9808: an accurate thermometer module for your Arduino
8. Getting useful motion data from the MPU-6050 device
9. What to do with unused pins on an Atmega328P or Attiny85?

Done with the basics? Looking for more advanced topics?
Arduino Step by Step Getting Serious is our comprehensive Arduino course for people ready to go to the next level.
Learn about Wi-Fi, BLE and radio, motors (servo, DC and stepper motors with various controllers), LCD, OLED and TFT screens with buttons and touch interfaces, control large loads like relays and lights, and much much MUCH more.
Last Updated 1 year ago.
We publish fresh content each week. Read how-to's on Arduino, ESP32, KiCad, Node-RED, drones and more. Listen to interviews. Learn about new tech with our comprehensive reviews. Get discount offers for our courses and books. Interact with our community. One email per week, no spam; unsubscribe at any time

