Arduino peripherals guide series
Getting started with I2C on the Arduino
What is I2C? How many devices are supported on a bus? Is I2C supported by the Arduino Uno? How does it work?

Many peripheral devices use the I2C bus to communicate with the outside world. The Arduino and the various Atmega microcontrollers, of course, support I2C.
What is I2C?
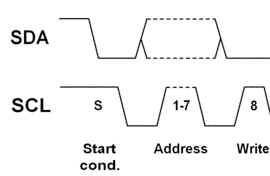
The I2C bus is a technology that allows multiple devices to communicate over a single pair of wires. The pair contains a wire for data, and a wire for the clock signal.
To regulate traffic, a I2C bus contains a single node (often referred to as "master"), and multiple regular nodes (often referred to as "slaves"). The master will control the bus by sending commands and information to individual slaves.
It is also possible to have multi-master I2C environments. In such environments, and the term reveals, multiple master devices can be connected to multiple regular devices on a single bus.
Because the bus is shared by many devices, only one of them can communicate with the host at one time, and the system depends on each device having a unique address.
How are I2C devices addressed?
An I2C bus is a byte with seven bits, which allows for 128 addresses. Therefore, theoretically, an I2C bus can support up to 128 connected devices. |
|---|
However, several of these addresses are reserved for "special purposes." |
|---|
From I2C-bus.org, I copy these special-purpose addresses, in case you are wondering (here is the original): |
|---|
10-bit addresses, binary noted, MSB is left |
Purpose |
|---|---|
0000000 0 |
General Call |
0000000 1 |
Start Byte |
0000001 X |
CBUS Addresses |
0000010 X |
Reserved for Different Bus Formats |
0000011 X |
Reserved for future purposes |
00001XX X |
High-Speed Master Code |
11110XX X |
10-bit Slave Addressing |
11111XX X |
Reserved for future purposes |
Once we subtract the reserved addresses, we are left with 112 addresses available to use on a single I2C bus, using 7-bits for each address.
You probably think that 112 devices are more than enough for any conceivable project. That's true, but consider that I2C is designed for use in industrial, telecommunications and medical applications, to name a few.
Practically, it is everywhere, including in your car. So 112 addresses are not enough! That's why I2C supports 10-bit addressing that increases the address space by 10 times to 1023, in case you need it.
You can find more details here.
How to use I2C in the Arduino Uno?
In the Arduino Uno, which is powered by an Atmega328P microcontroller unit, you can use a compatible version of the original I2C, known as TWI.
TWI is short for "Two Wire Interface".
You can find details in the Atmega328P documentation (see page 215).
TWI on the Atmega328P supports the 7-bit I2C addressing scheme, multi-master, and can operate as both a master or a slave device.
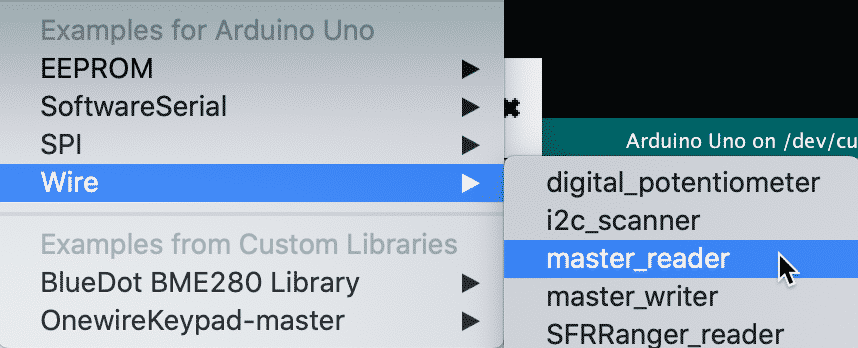
The Arduino IDE provides the Wire library which makes it easy to use TWI in your sketches. You can find example sketches under Examples --> Wire.

Let's have a looks at two of the provided examples so that you can learn how your Arduino can read and write data using the I2C bus.
Example: Arduino reads I2C data as master
In the first one, the Arduino operates as a master device, and requests data from a slave device. The slave could be another Arduino, or a sensor.
This example is titled "master_reader", and ships with the Arduino IDE under "Wire".
#include <Wire.h>
void setup() {
Wire.begin();
Serial.begin(9600);
}
void loop() {
Wire.requestFrom(8, 6);
while (Wire.available()) {
char c = Wire.read();
Serial.print(c);
}
delay(500);
}
In the sketch, we include the Wire library at the top with the "include" statement.
Inside setup(), we initiate the Arduino on the I2C bus using "Wire.begin()". We only need to do this once. In this example, the "begin()" function does not contain an address parameter. This means that the Arduino will join the I2C bus as a master device.
If you wanted to make the Arduino a slave, you would provide an address, like this:
Wire.begin(8);
With this, the Arduino will join the bus as a slave, listening to address "8".
In the loop(), we use "Wire.requestFrom(8, 6);" to ask a slave device to return data. The first parameter ("8") is the slave device address, and the second ("6") is the quantity of data (in bytes) that we want from the slave.
When the slave starts sending the requested data, the Arduino will store them temporarily in a buffer. We can use "Wire.available()" to check to data. If data is available, we can use "Wire.read()" to get one byte at a time from the buffer and store it in a variable for later use.
We can repeat this process in a loop until the buffer is empty.
To know what to do with each byte, you will need to have some information about the way that the slave device formats data. The slave, for example, may be storing a 2-byte integer in the first two bytes of its response, and a single character (byte) in the 3rd byte of its response. Every device is different in this regard, and I2C is only responsible for the reliable communications between the devices, not for the content of the communications.
Example: Arduino writes I2C data as master
In the second example, the Arduino operates again as a master device, but this time it sends data to another device. The second device could be another Arduino, or a sensor.
This example is titled "master_writer", and ships with the Arduino IDE under "Wire".
Here's the sketch:
#include <Wire.h>
void setup() {
Wire.begin();
}
byte x = 0;
void loop() {
Wire.beginTransmission(8);
Wire.write("x is ");
Wire.write(x);
Wire.endTransmission();
x++;
delay(500);
}
Much of this sketch is familiar. We include the Wire library in the header, and call "Wire.begin()" to join the I2C bus.
Inside the loop(), we use "beginTransmission(8);" to begin the transmission of an arbitrary number of bytes to a listening device with address "8".
We then use "Wire.write("x is ");" and "Wire.write(x);" to send a string and a single byte respectively.You can use either one repeatedly.
The "write()" function is overloaded with three types so that you can either send a single byte, or a string, or a predetermined number of bytes when used with a second parameter in the form of "Wire.write(data, length)".
If you use the version of "write" with the two parameters, then the first parameter must be an array of bytes, and the second is the number of bytes to transmit.
To signal to the bus listeners that the Arduino has finished sending data, use "Wire.endTransmission();". This way, another device will be able to use the bus.
New to the Arduino?
Arduino Step by Step Getting Started is our most popular course for beginners.
This course is packed with high-quality video, mini-projects, and everything you need to learn Arduino from the ground up. We'll help you get started and at every step with top-notch instruction and our super-helpful course discussion space.
Jump to another article
2. Basics of the TimerOne library
3. How to find device I2C address
4. Getting started with I2C on the Arduino
5. Using I2C: True digital to analog conversion on the Arduino Uno
6. How accurate are thermometer sensors?
7. MCP9808: an accurate thermometer module for your Arduino
8. Getting useful motion data from the MPU-6050 device
9. What to do with unused pins on an Atmega328P or Attiny85?

Done with the basics? Looking for more advanced topics?
Arduino Step by Step Getting Serious is our comprehensive Arduino course for people ready to go to the next level.
Learn about Wi-Fi, BLE and radio, motors (servo, DC and stepper motors with various controllers), LCD, OLED and TFT screens with buttons and touch interfaces, control large loads like relays and lights, and much much MUCH more.
Last Updated 1 year ago.
We publish fresh content each week. Read how-to's on Arduino, ESP32, KiCad, Node-RED, drones and more. Listen to interviews. Learn about new tech with our comprehensive reviews. Get discount offers for our courses and books. Interact with our community. One email per week, no spam; unsubscribe at any time

