An IoT Mastery Project guide series
ESP32 Unleashed, Multi-file projects: Keep your files simple
In the world of the Arduino, in particular of the Arduino Uno, we call applications “sketches” to emphasize the experimental aspect of what we do. Each sketch is a relatively small program.
The Arduino IDE is smart enough to keep things simple for us.

In the last two articles, I wrote about how working on a large project helped me to really get a grasp on the capabilities of the ESP32. This project gave me the opportunity to put to use what I learned about the ESP32 when I was working on my previous course, ESP32 For Busy People.
It also helped me to expand this knowledge into several other areas that I needed in order to complete it.
One of those areas was learning how to integrate three Cloud IoT services so that I could speak to my gadget. I wrote about this in my first article.
Another area has to do with the programming toolchain. I wrote about this in my last article, and I explained how awesome it is to combine PlatformIO with MS Code (very).
There’s so much more I can say about the mindstorm that my brain went through during this project, but for the sake of brevity, I’ll pick on just one: spitting you project application into multiple smaller files.
In the world of the Arduino, in particular of the Arduino Uno, we call applications “sketches” to emphasize the experimental aspect of what we do. Each sketch is a relatively small program.
The Arduino IDE is smart enough to keep things simple for us.
For example, we don’t have to explicitly include the Arduino framework in our sketch; the IDE does that on our behalf.
In the rare case where we want to split our program into multiple files, we can simply create a new file via the Arduino IDE, and it will be automatically included in our project.
When we decide it is time to “grow up” and move to a more appropriate tool for larger projects, we need to face the truth: the safety net that the Arduino IDE gave us will no longer be available.
We’ll have to understand some of the inner-workings of C++ pre-compilers and compilers, and treat our Arduino and ESP32 programs as… normal C++ programs. Not small Arduino sketches.
And so, one of the first things you will need to understand is how to link multiple project files so that your compiler can produce the final executable.
This is something I cover in detail in ESP32 Unleashed, but in this email, I want to give you a quick, self-contained preview.
In C++ and PlatformIO, the file that contains our main code is named “main.cpp.” In this project, we are still using the Arduino framework, so inside main.cpp we have the familiar setup() and loop() functions.
However, because we want to build our project using a more sensible multi-file architecture, we opt to write our code in multiple files.
The execution of the application is coordinated by code in main.cpp, and in the loop() function in particular, but code written in other files does all the work.
For this to work, the code in main.cpp needs to “know” where to find the rest of the code.
We can do this with the use of the “#include” statement.
I am sure that you are familiar with #include (if not, please ask). You have used it many times to access libraries.
In this project, you will also use "#include" to access your own code, that exists outside the main file.
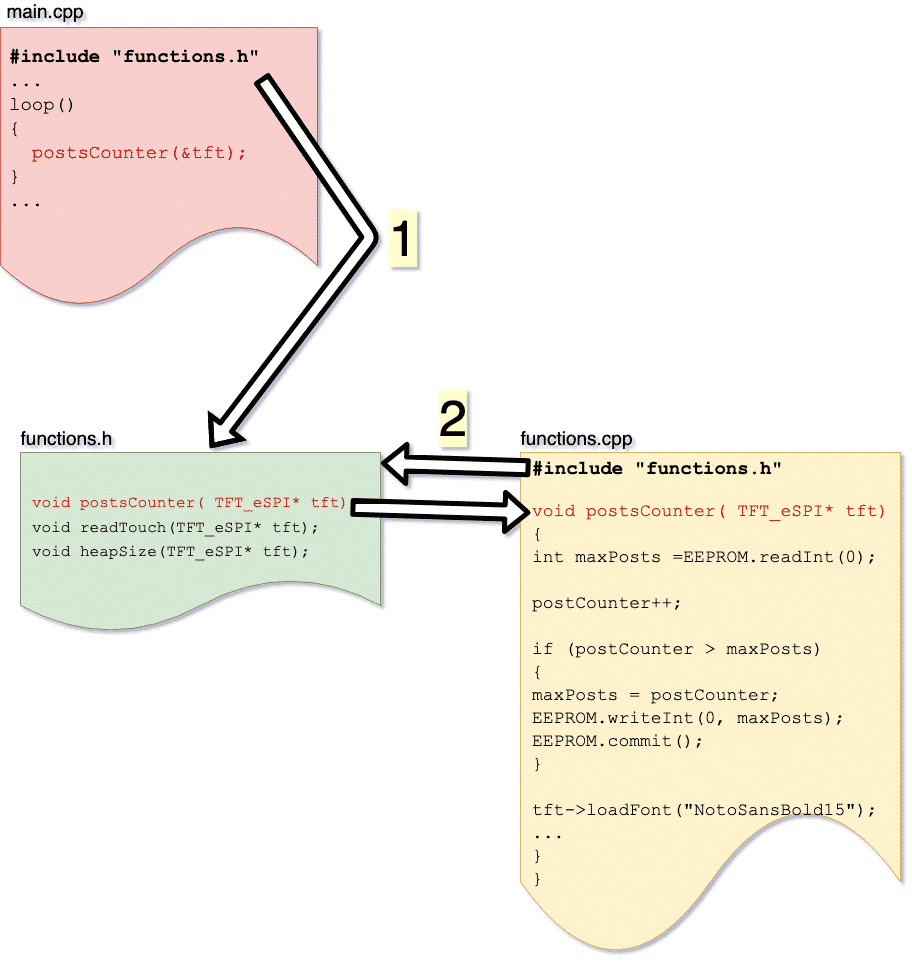
For example, let's say that in your main.cpp file, in loop(), you have a call to a function called "postsCounter()".
I have implemented this function in a separate file titled "functions.cpp."
There are a few different ways to link these files together, but the most common and accepted way is by the use of a header file and an implementation file.
While you can use a single file to hold this function (and omit the header file), having a header file is better for the programmer. Splitting your code to the header and implementation files results in faster and more efficient programming and fewer mistakes. If you want to check how to use a function, you can have a quick look at the header file. The header file is much smaller than the implementation file. Hence it is easier to read and understand.
The header file contains only the definitions of functions and variables.
The implementation file contains the implementation of the functions that are defined in the header file.
For the main.cpp file to know that function "postsCounter" is implemented in the "functions.cpp" file, you simply add an "#include" statement that points to the header file counterpart of "functions.cpp."
I have illustrated this in the diagram below (arrow 1).

How to link the files that make up a C++ program using the #include keyword
If your header file contains variables or functions that your code inside the implementation file needs, then you should also include the header file in the implementation file (arrow 2).
For example, say that in some part of functions.cpp, you make a call to function readTouch(), which I have also implemented in functions.cpp. You can see that I have defined this function in functions.h.
To make this work, you must let function.cpp "know" that readTouch() is implemented somewhere in function.cpp (itself!).
So, you do exactly what you did in main.cpp:
#include “functions.h”
This is not necessary if readTouch() is implemented at a location in the file before when it is called, but by doing the inclusion anyway, you don't have to worry about keeping track of relative call and implementation positions.
There's more to it, but I hope that at this point, you have a basic understanding of how program splitting is done in C++. You will learn a lot more about this topic "hands-on" if you wish (hint: enrol to ESP32 Unleashed!).

Ready for some serious learning?
Enrol to
ESP32 Unleashed
A new learning adventure awaits you.
Create an application that will stretch your existing knowledge and skills.
ESP32 Unleashed is a project course
This course is perfect for people familiar with the ESP32, especially graduates of ESP32 For Busy People.
It is a guided project, designed to teach you how to use modern tools to create modern embedded applications based on the ESP32.
Just click on the big red button to learn more.
Jump to another article
Lessons
1: Why use PlatformIO to program the ESP32?
2: How to install PlatformIO and MS Code (Mac OS)
3: How to install PlatformIO and MS Code (Windows 10)
4: Set up an ESP32 project in PlatformIO
5: Upload and test the new project
6: Create the Git repository
7: Split the program into two files
8: Test the multi-file project
9: How to use Git version control
We publish fresh content each week. Read how-to's on Arduino, ESP32, KiCad, Node-RED, drones and more. Listen to interviews. Learn about new tech with our comprehensive reviews. Get discount offers for our courses and books. Interact with our community. One email per week, no spam; unsubscribe at any time
