An IoT Mastery Project guide series
Split main.cpp into multiple files
In this article, I’ll show you how to split the code that is currently in main.cpp into multiple files. To do this, first we will look at what parts of main.cpp can go into their own individual files.
In this article, I’ll show you how to split the code that is currently in main.cpp into multiple files.
Deciding on what to remove from main.cpp
To do this, first, look at what parts of main.cpp can go into their own individual files.
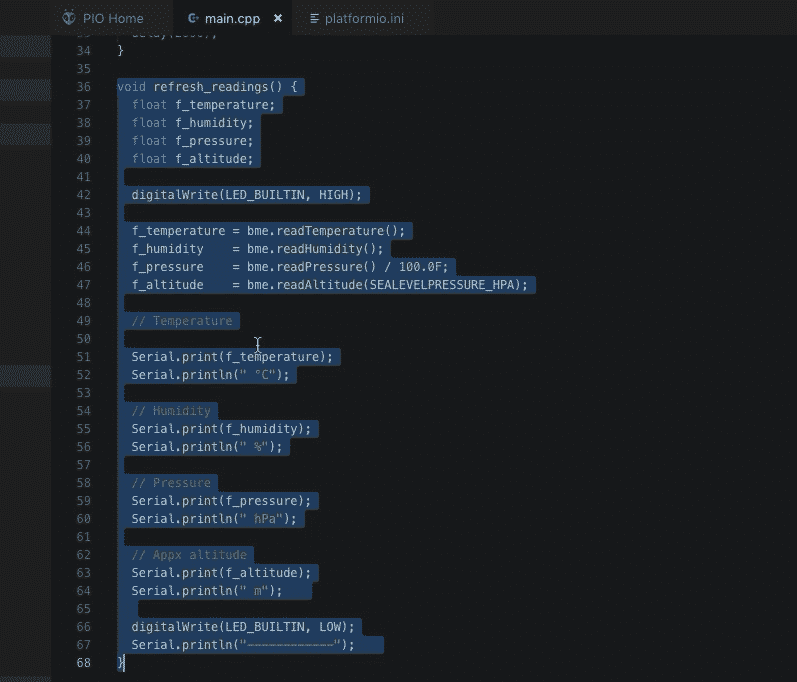
The refresh_readings() function in main.cpp is a good candidate since it is a function that deals specifically with the sensor. That is, it has a well-defined, specific purpose.

We'll move this function into a new file
I can create a new file called something like "sensor_readings" and then put this content in that new file.
Also, at the top of main.cpp are a few things that can be moved into new file, like inclusions and definitions that eventually will be shared with other elements across the program.

The code in the header can also move into a new file
I can see the case whereas the project progresses, multiple files will need access to those settings. So, it also makes sense to remove some of the code in the header of main.cpp and put it in a separate file, perhaps called something like "settings".
Then, we’ll link those files with main.cpp, so that main.cpp can operate properly, as it is now.
Create a new file
Let's begin and create a new file. In the Explorer pane, click on the new file button.
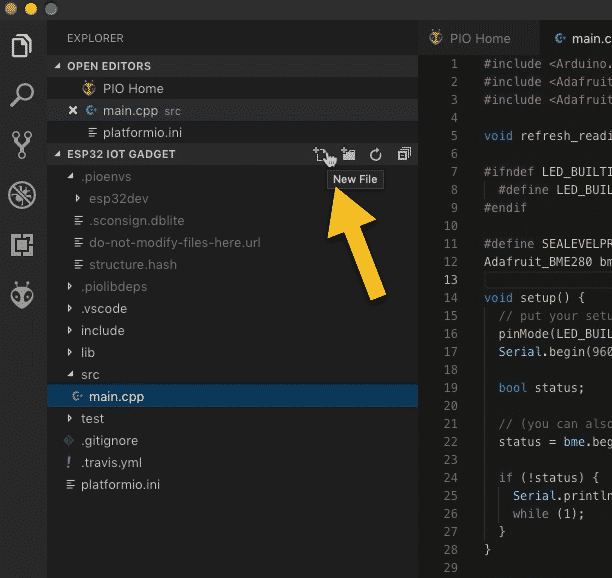
Create a new file
In the text box that appears, enter the name for the new file: "sensor_readings.cpp".
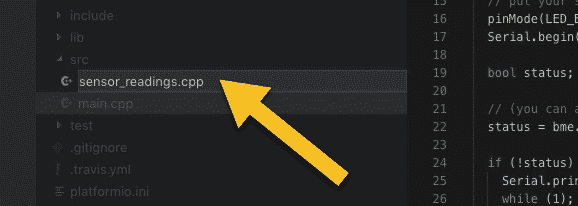
Give the new file a name
In C++, we typically use the "cpp" extension for files that contain the implementation of our program and the "h" extension ("h" stands for “header”), for files that contain the declaration for things such as variables and functions.
Now, we have a new empty file, called "sensor_readings.cpp" (1, see below). It is located in the "src" directory (2) and it is currently empty (3). Double-click on “sensor_readings.cpp” to open the file.
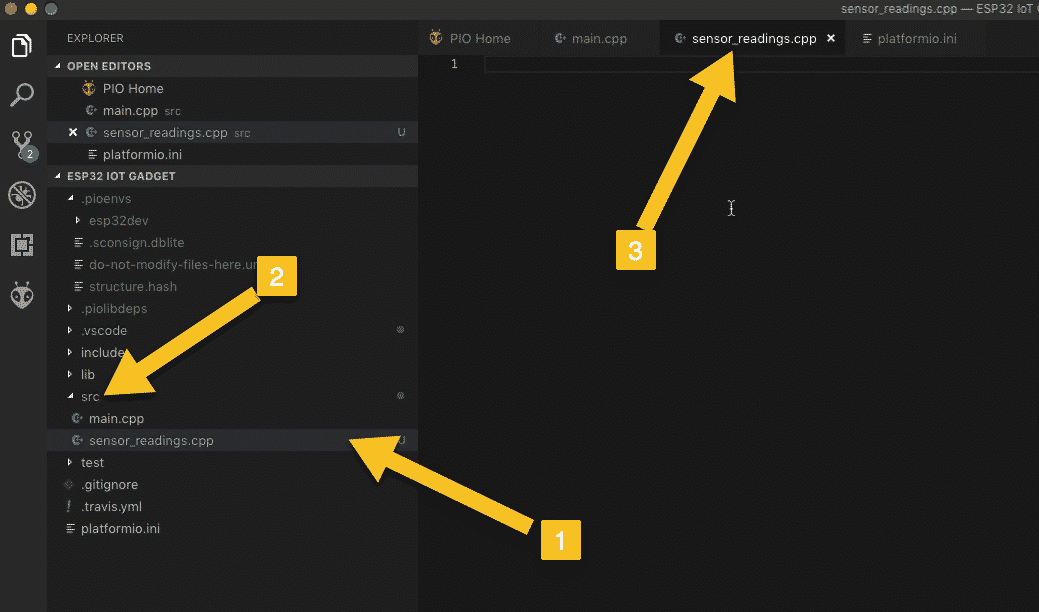
The new file is ready to receive your code
Let’s add some code. Go back to main.cpp.
Copy the code in the refresh_readings() function:
1 2 3 4 5 6 7 8 9 10 11 12 13 14 15 16 17 18 19 20 21 22 23 24 25 26 27 28 29 30 31 32 33 |
void refresh_readings() { float f_temperature; float f_humidity; float f_pressure; float f_altitude; digitalWrite(LED_BUILTIN, HIGH); f_temperature = bme.readTemperature(); f_humidity = bme.readHumidity(); f_pressure = bme.readPressure() / 100.0F; f_altitude = bme.readAltitude(SEALEVELPRESSURE_HPA); // Temperature Serial.print(f_temperature); Serial.println(" °C"); // Humidity Serial.print(f_humidity); Serial.println(" %"); // Pressure Serial.print(f_pressure); Serial.println(" hPa"); // Appx altitude Serial.print(f_altitude); Serial.println(" m"); digitalWrite(LED_BUILTIN, LOW); Serial.println("------------"); } |
Paste it in sensor_readings.cpp (and remove it from main.cpp).
The new file now looks like this:
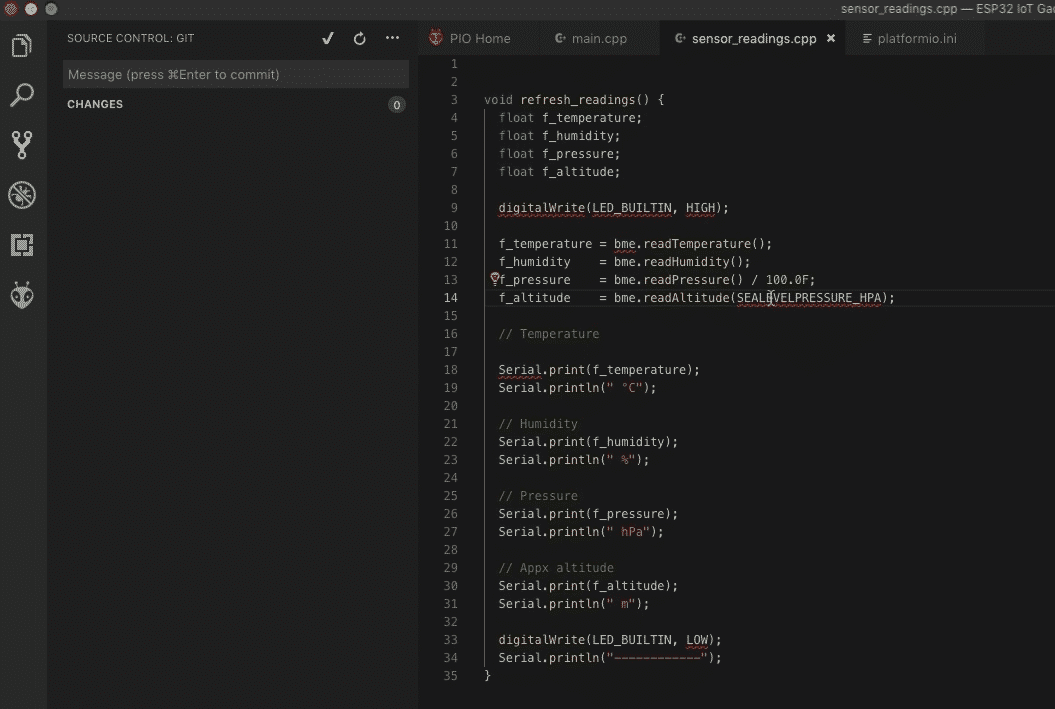
The code in sensor_readings.cpp
Code has identified a few issues with the code, and marked them with a red curly line. We’ll fix those issues shortly.
And save the file.
Commit the change to the repository
We have only made a small change to our code, and without some fixes the program will not compile. However, I think this is a good opportunity to do some work with the repository.
Go into the terminal down here and check on the status of the GitHub repository.
Type:
git status
The result will look something like this:
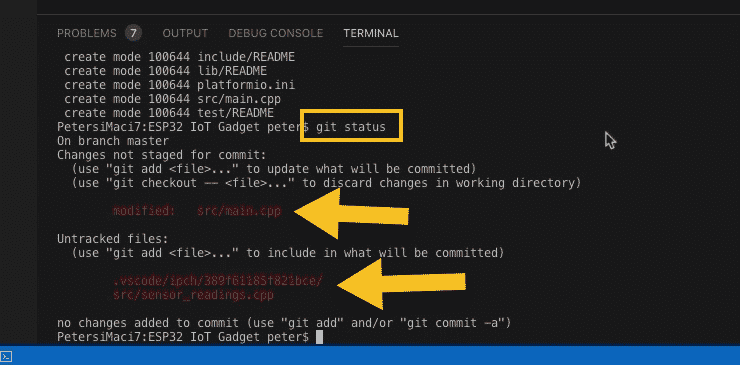
Check the status of the repository
Git has detected a change in the main.cpp file, and also a new file "sensor_readings.cpp". There is also a third file inside the .vscode directory which was created by the editor.
The same information appears in the source control tab:
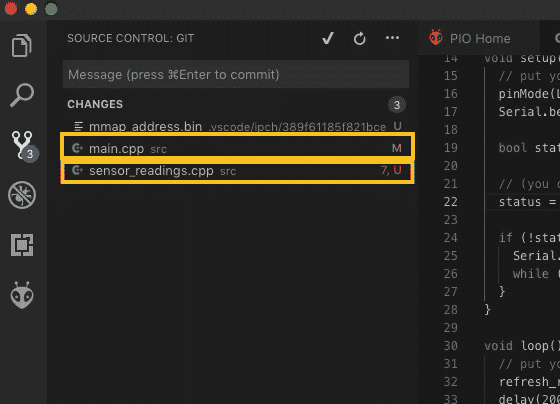
The source control tab shows the changes in the repository
The letter “M” next to main.cpp indicates that this file is tracked and contains changes that are not committed. The red letter “U” next to “sensor_readings.cpp” indicates that this file is un-tracked by Git.
Just like we did in the previous article, we can add the new file to the index so that Git can track it. Then, we can commit it to the repository.
In the terminal, type
git add .
The “.” is a shortcut that means “all”. This Git command will add all untracked files to the index.
Check the status again:
git status
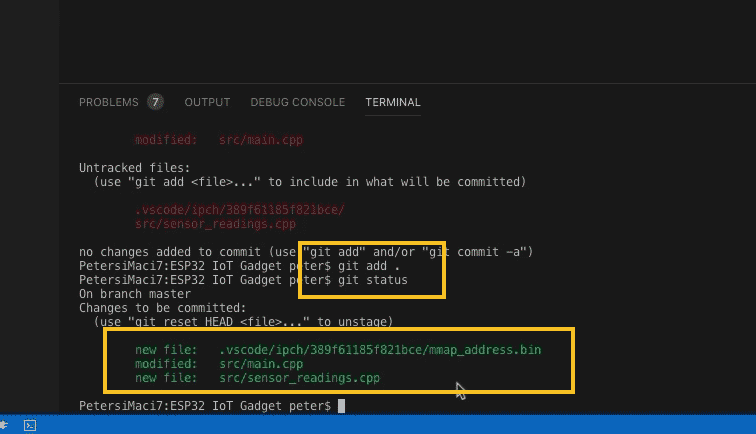
Add the new files to the repository index
So we've got a new file it's now being tracked. But we haven't committed our actual changes yet.
Let’s do that now. Type:
git commit -am “Moved sensor code to new file.”
The terminal should look like this:
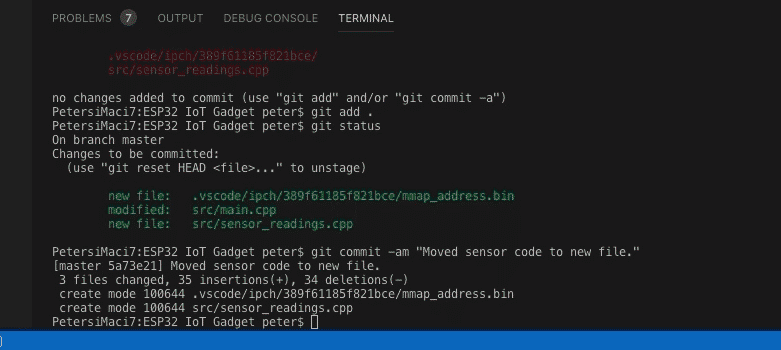
Commit the changes to the repository
How to link code across files
Go into the "sensor_readings.cpp" tab, and you'll see multiple curly lines indicating problems.
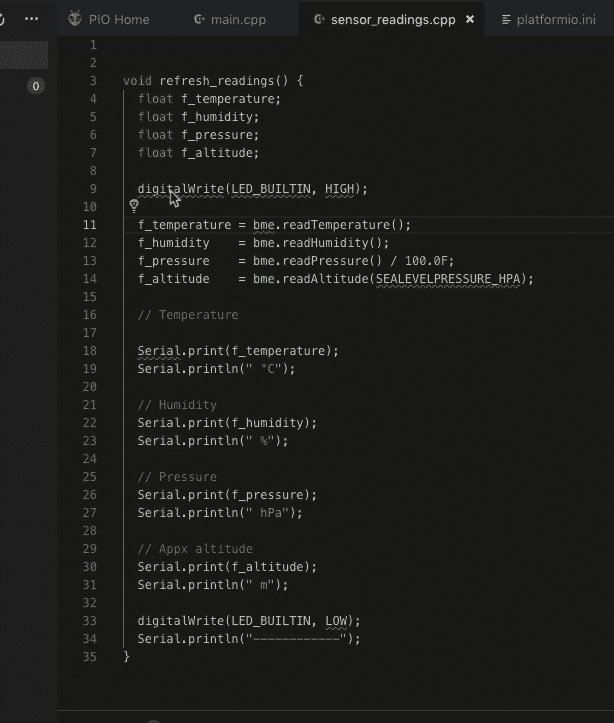
The contents of the sensor_readings.cpp
The IDE has detected references to variables and functions that it does not know anything about.
For example, the Serial class is part of the Arduino framework. "sensor_readings.cpp" contains references to Serial without first linking to it. When the IDE looks inside this specific file, it does so in isolation to anything outside this file, unless it is linked to via an “#include” statement.
To fix this specific problem, simply add “#include <Arduino.h>” at the top of "sensor_readings.cpp".
The result is this:
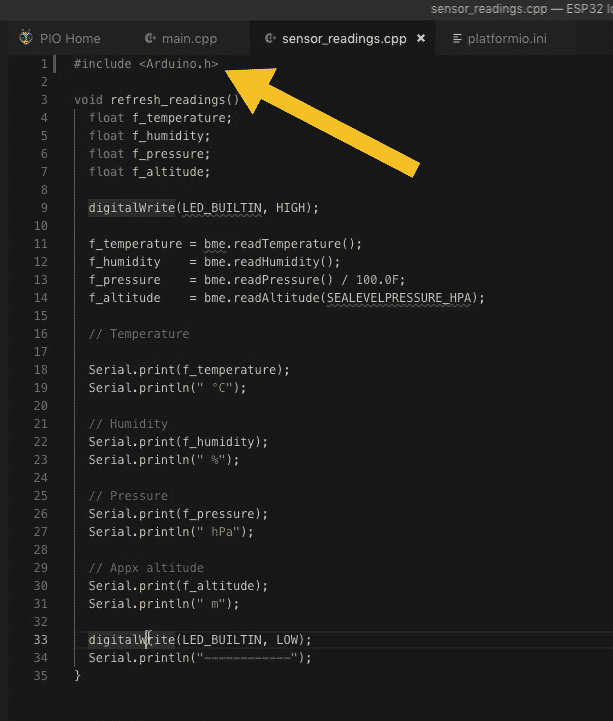
To use the Arduino framework, you should include the Arduino.h file
There is no curly line under Serial, which means that this issue is fixed.
There are other issues remaining, but they are of the same category. The constants “LED_BUILTIN” and “SEALEVELPRESSURE_HPA”, and the object “bme” are undefined in this file, and we have not linked it to file where they are defined.
All of these are currently defined in main.cpp.
In the video I have linked at the top of this page, I show how I methodically work my way towards fixing these issues.
Here, I will give a summary of the process of splitting main.cpp into multiple files.
Continuing with "sensor_readings.cpp", update the file to contain this content:
1 2 3 4 5 6 7 8 9 10 11 12 13 14 15 16 17 18 19 20 21 22 23 24 25 26 27 28 29 30 31 32 33 34 35 36 37 |
#include <Arduino.h> #include "settings.h" #include "sensor_readings.h" void refresh_readings(Adafruit_BME280 bme) { float f_temperature; float f_humidity; float f_pressure; float f_altitude; digitalWrite(LED_BUILTIN, HIGH); f_temperature = bme.readTemperature(); f_humidity = bme.readHumidity(); f_pressure = bme.readPressure() / 100.0F; f_altitude = bme.readAltitude(SEALEVELPRESSURE_HPA); // Temperature Serial.print(f_temperature); Serial.println(" °C"); // Humidity Serial.print(f_humidity); Serial.println(" %"); // Pressure Serial.print(f_pressure); Serial.println(" hPa"); // Appx altitude Serial.print(f_altitude); Serial.println(" m"); digitalWrite(LED_BUILTIN, LOW); Serial.println("------------"); } |
In the header of this file, notice the inclusions of Arduino.h, and also two new header files:
- settings.h
- sensor_readings.h
In sensor_readings.h is the header counterpart of sensor_readings.cpp. As is the convention in C++, this file contains function and variable declarations that are implemented in the cpp file. The header file may also include other headers that contain function and variable definitions used by the code in the cpp file.
Here are the contents of sensor_readings.h:
1 2 3 4 5 6 7 8 9 10 11 12 |
#ifndef SENSOR_READINGS_H #define SENSOR_READINGS_H #include <Arduino.h> #include <Adafruit_Sensor.h> #include <Adafruit_BME280.h> #define SEALEVELPRESSURE_HPA (1013.25) void refresh_readings(Adafruit_BME280 bme); #endif |
Take a few minutes to read this code. Notice how some of its content used to be in main.cpp? For example, the definition of SEALEVELPRESSURE_HPA and the inclusion of Adafruit_BME280 was in main.cpp, but is now in sensor_readings.h
The second new file is “settings.h”. Here are its contents:
1 2 3 4 |
#ifndef SETTINGS_H #define SETTINGS_H #define LED_BUILTIN 2 // This is valid for my devkit #endif |
This file contains the definition of the LED_BUILTIN constant. But, we will be adding a lot more code in here in other lectures in ESP32 Unleashed, that is used by other parts of the program. I decided it was a good idea to set up this file now.
And what about main.cpp? It is much smaller now. Here are its current contents:
1 2 3 4 5 6 7 8 9 10 11 12 13 14 15 16 17 18 19 20 21 22 23 24 25 26 27 |
#include <Arduino.h> #include "sensor_readings.h" #include "settings.h" Adafruit_BME280 bme; // I2C void setup() { // put your setup code here, to run once: pinMode(LED_BUILTIN,OUTPUT); Serial.begin(9600); bool status; // (you can also pass in a Wire library object like &Wire2) status = bme.begin(0x76); if (!status) { Serial.println("Could not find a valid BME280 sensor, check wiring!"); while (1); } } void loop() { // put your main code here, to run repeatedly: refresh_readings(bme); delay(2000); } |
All the code that does the heavy lifting in this program is in sensor_readings.cpp.
Once you finish working on the changes, try to compile the project. It should compile without any issues:
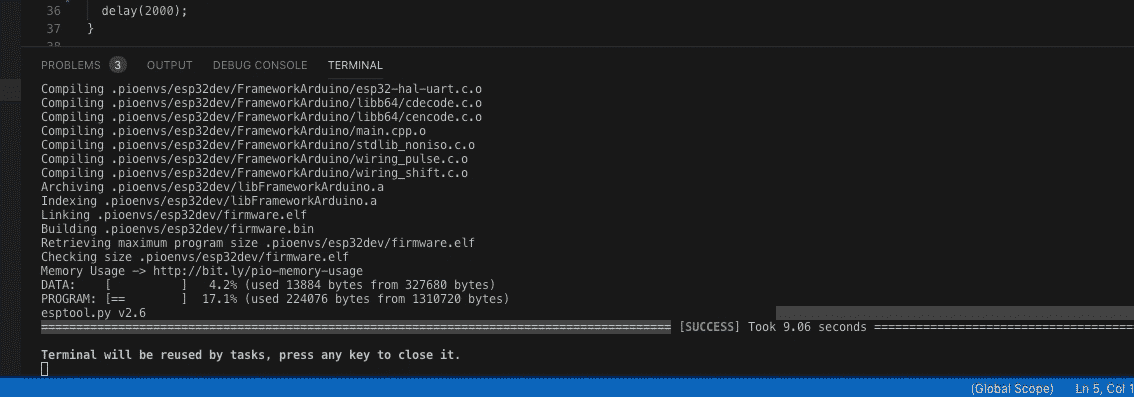
Compilation of the multi-file project was successful
In the header files, notice how I have used the "ifndef" and "endif" keywords? These are pre-compiler statements that segment the code they include. This structure ensure that the enclosed code is only evaluated once during the compilation. This way, there is no risk of defining variables, constants, and functions more than once (which will cause the compiler to emit an error).
Commit changes to Git
Let's check the status of the Git repository. Type:
git status
You should see this:
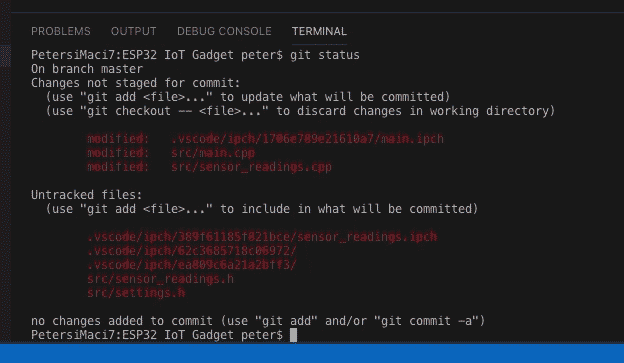
Two files, main.cpp, and sensor_readings.cpp contain changes. There are also a few new files in the “src” and in “.vscode” directories.
Let's add the new files so that we can start tracking them:
git add .
Check the status:
git status
Here it is:
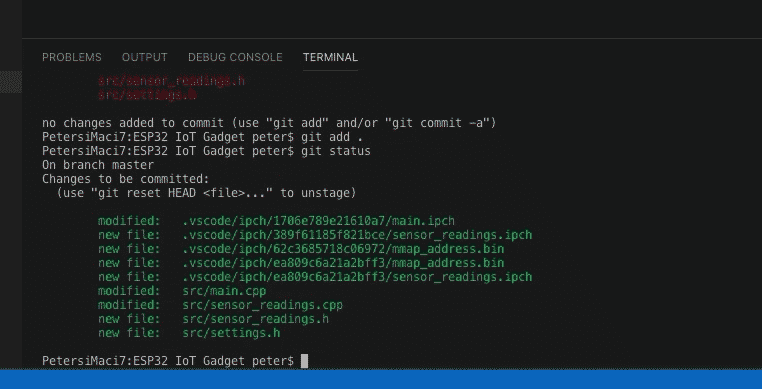
Let's commit the changes:
git commit -am "Split main.cpp into two new files".
And check the status once again, to be sure:
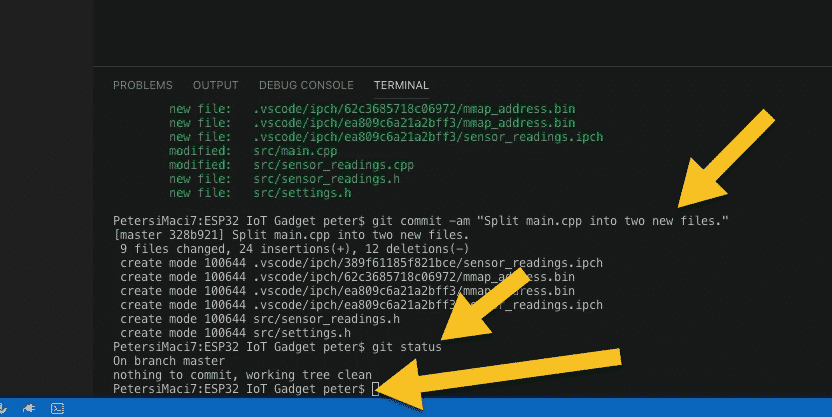
All good!
The source control pane is empty, which is also an indication that there are no changes pending to commit.
So let's move ahead now in the next lecture where we'll test the new version of the application on the board.
Ready for some serious learning?
Enrol to
ESP32 Unleashed
A new learning adventure awaits you.
Create an application that will stretch your existing knowledge and skills.
ESP32 Unleashed is a project course
This course is perfect for people familiar with the ESP32, especially graduates of ESP32 For Busy People.
It is a guided project, designed to teach you how to use modern tools to create modern embedded applications based on the ESP32.
Just click on the big red button to learn more.
Jump to another article
Lessons
1: Why use PlatformIO to program the ESP32?
2: How to install PlatformIO and MS Code (Mac OS)
3: How to install PlatformIO and MS Code (Windows 10)
4: Set up an ESP32 project in PlatformIO
5: Upload and test the new project
6: Create the Git repository
7: Split the program into two files
8: Test the multi-file project
9: How to use Git version control
Last Updated 12 months ago.
We publish fresh content each week. Read how-to's on Arduino, ESP32, KiCad, Node-RED, drones and more. Listen to interviews. Learn about new tech with our comprehensive reviews. Get discount offers for our courses and books. Interact with our community. One email per week, no spam; unsubscribe at any time
