An IoT Mastery Project guide series
Create a new project
In this article, I’ll show you how to start a new PlatformIO project, configure it, add some simple C++ code that calls on the Arduino framework, compile it, and upload it to your ESP32 dev board.
In this article, I’ll show you how to start a new PlatformIO project, configure it, add some simple C++ code that calls on the Arduino framework, compile it, and upload it to your ESP32 dev board.
Create a new project
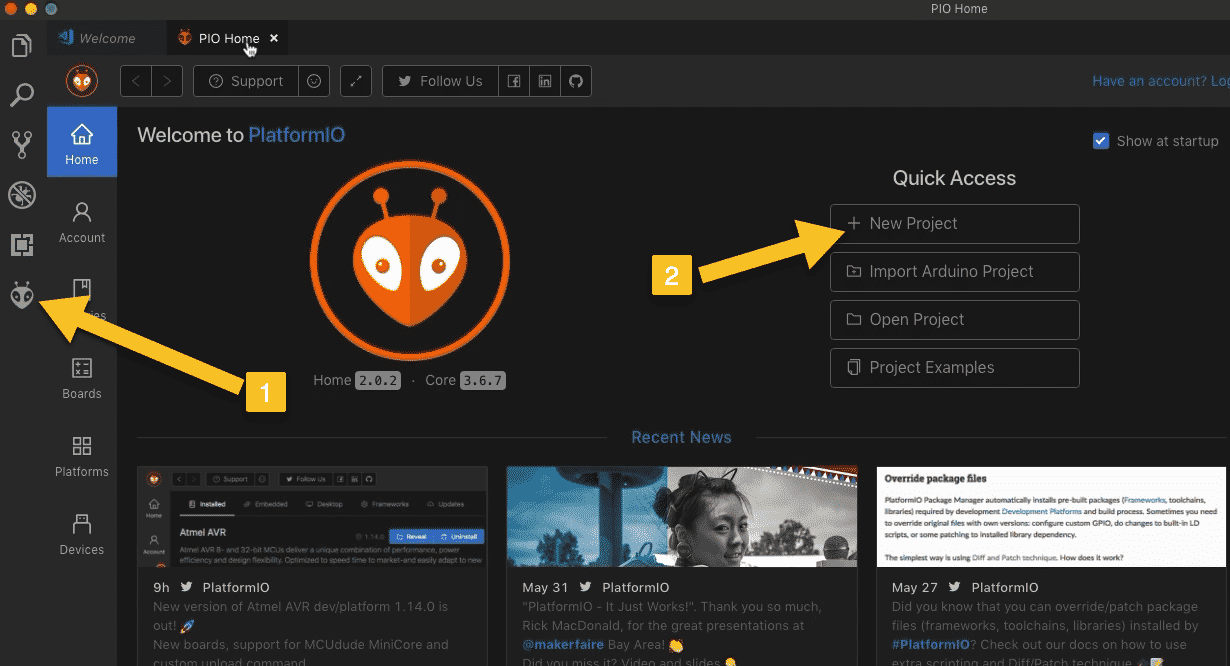
Start Code, and click on the PlatformIO icon to show the PIO Home tab (1).
This will bring up the PlatformIO tab (“PIO Home”). To get started with a new project, click the “New Project” button (2).

Create a new PlatformIO project
Let’s give our project a name, something that describes what we're about to do. Let’s call it "ESP32 IoT gadget" (1).
For the board, select “Espressif ESP32 Dev Module” (2).
For the framework, select “Arduino” (3).
Click on “Finish” to create the new project (4).
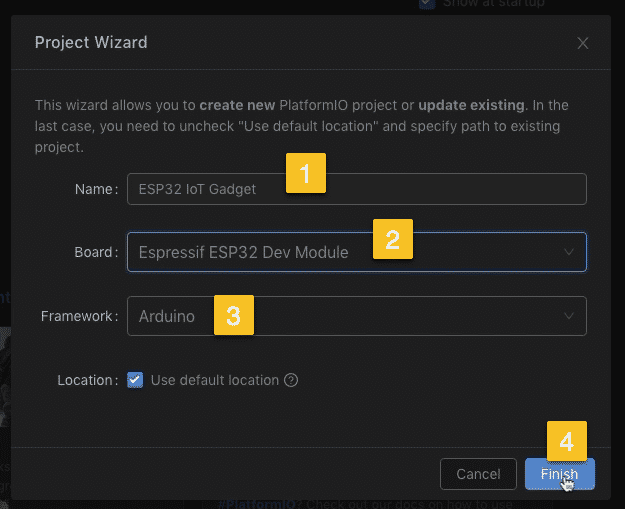
The basic project configuration
In the “Explorer” area you will be able to see the project directory with various files and subdirectories.
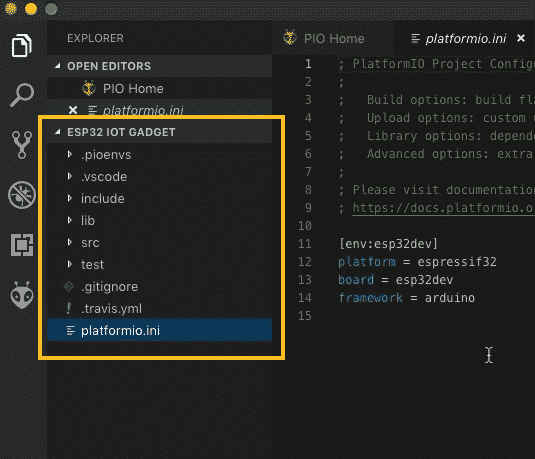
The Explorer pane shows the contents of the project directory
Let’s edit the platformio.ini file first. This file contains the project configuration. Double click to open it.
Configure the project in platformio.ini
So let's have a look in the platformio.ini file, and double click on it as well.
By default, this file contains the basic configuration of the project. These are the values that you set in the project wizard in the previous step.
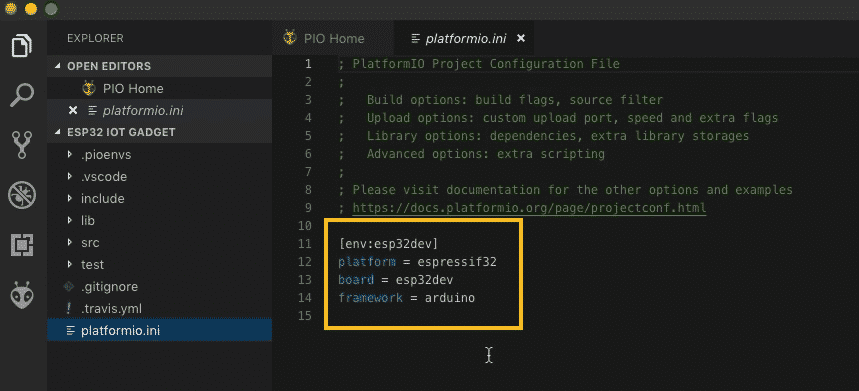
File platformio.ini contains the basic project configuration
These values, for the platform, board, and framework, are bundled under the “esp32dev” target environment (“env:esp32dev”).
You are free to customize the name and configuration of your target environment. You can also create multiple target environments.
For example, let's say that you have a project that targets two ESP32 modules. One is the receiver, and the other is the transmitter. You can create two targets:
Target one is named “env:esp32dev_TX”
Target two is named “env:esp32dev_RX”
Each target can have its own, independent set of configurations, and dependencies. You can also mix different kinds of targets. For example, your project might consist of an Arduino Uno and an ESP32.
While in this project we will be working with a single target, this is a very powerful feature, worth mentioning here.
For this first iteration of the project, I'd like it to be able to take readings from the BME280 sensor and print those readings in the Serial monitor.
To do this, I must configure a serial port, and I also need to configure a couple of dependent libraries.
In platformio.ini we specify library dependencies for a project using the “lib_deps” keyword.
We can list the dependent libraries in platformio.ini, and with this information, PlatformIO will go out on to its known repositories on the Internet, download those libraries, and integrate them to the project.
They will be stored inside the same directory as the rest of my project code.
Apart from the libraries, we can also specify, the configuration for our Serial monitor port. This includes the port and communications speed.
Use “monitor_port” for the port and “monitor_speed” for the speed.
Here’s what platformio.ini looks like now:
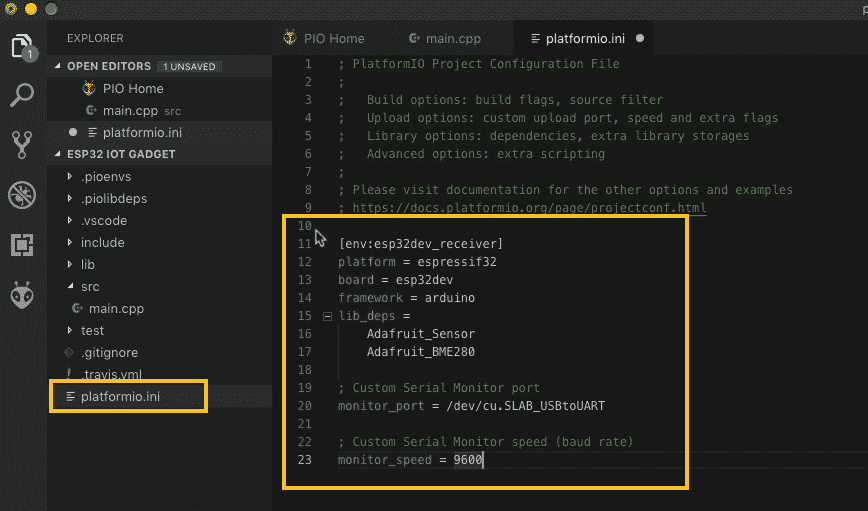
There are many configuration options you can use in platformio.ini
Here is the code in platformio.ini.
[env:esp32dev]
platform = [email protected]     ; Available versions https://github.com/platformio/platform-espressif32/releases
board = esp32dev
framework = arduino
lib_deps =
    Adafruit_Sensor
    Adafruit_BME280
    TFT_eSPI
    FS
    TaskScheduler
    ezTime
    Adafruit IO Arduino
    EEPROM
    SPIFFS


; Custom Serial Monitor port
monitor_port = /dev/cu.SLAB_USBtoUART

; Custom Serial Monitor speed (baud rate)
monitor_speed = 9600
If you're using Windows this would be a COM4 port or COM5 depending on your device.
There's a lot more you can configure in platformio.ini.
f you're curious to learn more about these configuration options, then go to docs.platformio.org and then click on the platformio.ini section, and see what else is available.
Save platformio.ini and let’s continue with main.cpp.
Add code in main.cpp
We are working on a C++ that uses the Arduino frameowork, without the assistance of the integrated development environment to simplify things for us.
The thing that you need to do always when you're writing a program that targets the Arduino framework is to include "#include <Arduino.h>" in the header.
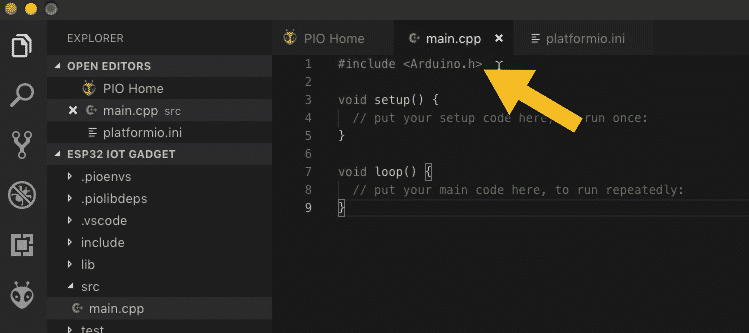 Since we are using the Arduino framework, include Arduino.h in main.cpp
When you use the Arduino IDE, you don't have to do this because the Arduino IDE inserts this inclusion behind the scenes on your behalf.
By including Arduino.h, we get access to all of the built-in libraries of the Arduino language.
Next, let's write the rest of the first iteration of the program.
Here’s the code (it contains a tiny bug which we will fix later):
1 2 3 4 5 6 7 8 9 10 11 12 13 14 15 16 17 18 19 20 21 22 23 24 25 26 27 28 29 30 31 32 33 34 35 36 37 38 39 40 41 42 43 44 45 46 47 48 49 50 51 52 53 54 55 56 57 58 59 60 61 62 63 64 65 66 |
#include <Arduino.h> #include <Adafruit_Sensor.h> #include <Adafruit_BME280.h> #ifndef LED_BUILTIN #define LED_BUILTIN 2 // This is valid for my devkit #endif #define SEALEVELPRESSURE_HPA (1013.25) Adafruit_BME280 bme; // I2C void setup() { // put your setup code here, to run once: pinMode(LED_BUILTIN,OUTPUT); Serial.begin(9600); bool status; // (you can also pass in a Wire library object like &Wire2) status = bme.begin(0x76); if (!status) { Serial.println("Could not find a valid BME280 sensor, check wiring!"); while (1); } } void loop() { // put your main code here, to run repeatedly: refresh_readings(); delay(2000); } void refresh_readings() { float f_temperature; float f_humidity; float f_pressure; float f_altitude; digitalWrite(LED_BUILTIN, HIGH); f_temperature = bme.readTemperature(); f_humidity = bme.readHumidity(); f_pressure = bme.readPressure() / 100.0F; f_altitude = bme.readAltitude(SEALEVELPRESSURE_HPA); // Temperature Serial.print(f_temperature); Serial.println(" °C"); // Humidity Serial.print(f_humidity); Serial.println(" %"); // Pressure Serial.print(f_pressure); Serial.println(" hPa"); // Appx altitude Serial.print(f_altitude); Serial.println(" m"); digitalWrite(LED_BUILTIN, LOW); Serial.println("------------"); } |
This code should be easy to read.
To use the sensor we need to include the two Adafruit libraries, Adafruit Sensor and BME280.
I use a function, “refresh_readigns” to take readings from the sensor and print the values to the serial monitor.
In the main.cpp header, I define LED_BUILDIN to GPIO 2, since this is where my ESP32 dev kit build-in LED is connected to.
I also configure the sea level air pressure for the sensor.
In the setup(), set the LED pin to output, and prepare the serial port.
Then, start communication with the BME sensor at address hexadecimal 76.
Inside the loop, call the "refresh_readings" function once per loop, then wait for two seconds for the next reading.
Let's save the program.
Time to compile it, by clicking on the “tick” button.
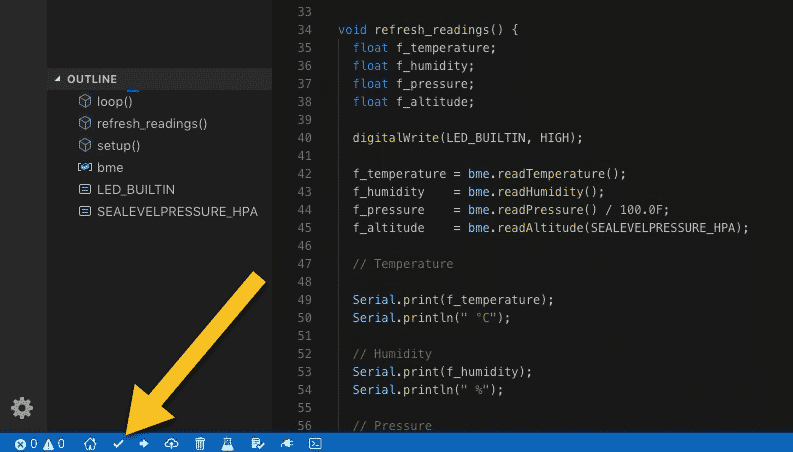
Click on the compile button to compile the project
Aha, we've got an error!
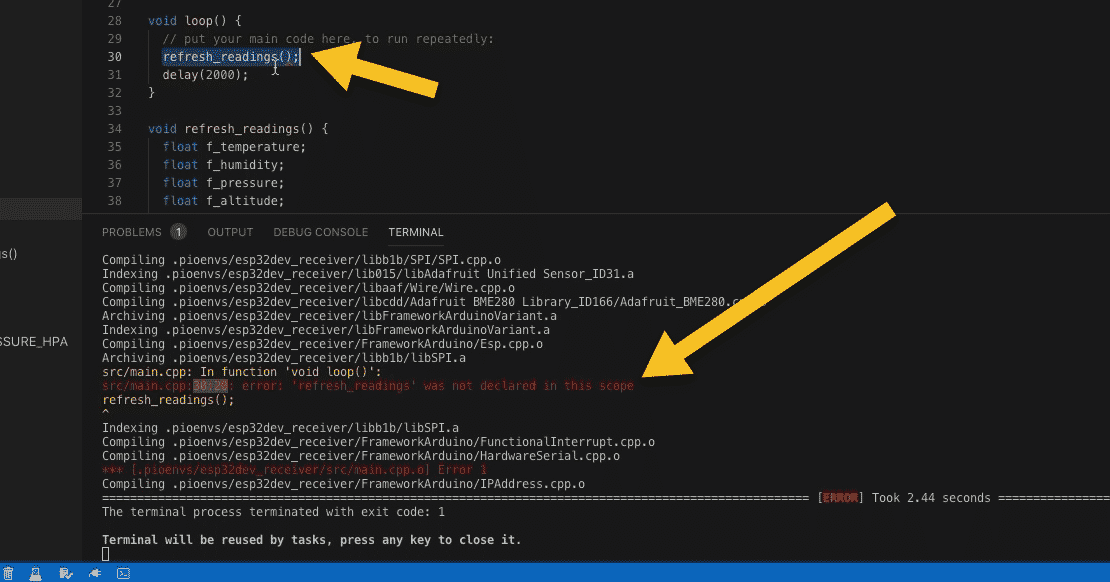
Compilation failed due to a bug in the code
The compiler complains about "refresh_readings was not declared in this scope"?
The message points to a problem in line 30.
What the compiler is saying is that I'm making a call to the “refresh_readings()”, however at that point, the compiler doesn't know anything about this function.
Even though this function is defined further down, in line 34, when I make the first call to it, it isn’t yet known to the compiler. The compiler only knows about the code that it has seen in the past. Not the code that appears later in a file.
This is something that you need to remember.
If you make a call to a function that appears further down in your program then you need to tell the compiler about it prior to its first call.
The compiler will not look further down in order to satisfy a requirement for a function call.
To deal with this error, we need to declare such functions either in a header file (.h) as will do in ESP32 Unleashed, or at the top of the program file. Either way, we must tell the compiler know about a function before we make the first call.
Let's fix this bug now.
Add this code:
void refresh_readings();
... just after the inclusions.
The new code in main.cpp, complete, looks like this:
1 2 3 4 5 6 7 8 9 10 11 12 13 14 15 16 17 18 19 20 21 22 23 24 25 26 27 28 29 30 31 32 33 34 35 36 37 38 39 40 41 42 43 44 45 46 47 48 49 50 51 52 53 54 55 56 57 58 59 60 61 62 63 64 65 66 67 68 |
#include <Arduino.h> #include <Adafruit_Sensor.h> #include <Adafruit_BME280.h> void refresh_readings(); // Declare in the header so that the compiler knows about it before it is called in loop() #ifndef LED_BUILTIN #define LED_BUILTIN 2 // This is valid for my devkit #endif #define SEALEVELPRESSURE_HPA (1013.25) Adafruit_BME280 bme; // I2C void setup() { // put your setup code here, to run once: pinMode(LED_BUILTIN,OUTPUT); Serial.begin(9600); bool status; // (you can also pass in a Wire library object like &Wire2) status = bme.begin(0x76); if (!status) { Serial.println("Could not find a valid BME280 sensor, check wiring!"); while (1); } } void loop() { // put your main code here, to run repeatedly: refresh_readings(); delay(2000); } void refresh_readings() { float f_temperature; float f_humidity; float f_pressure; float f_altitude; digitalWrite(LED_BUILTIN, HIGH); f_temperature = bme.readTemperature(); f_humidity = bme.readHumidity(); f_pressure = bme.readPressure() / 100.0F; f_altitude = bme.readAltitude(SEALEVELPRESSURE_HPA); // Temperature Serial.print(f_temperature); Serial.println(" °C"); // Humidity Serial.print(f_humidity); Serial.println(" %"); // Pressure Serial.print(f_pressure); Serial.println(" hPa"); // Appx altitude Serial.print(f_altitude); Serial.println(" m"); digitalWrite(LED_BUILTIN, LOW); Serial.println("------------"); } |
Try the compilation again, click the tick button.
The program should compile flawlessly now.

Compilation is successful
Continue with the next article where we'll upload the compiled version of this program to the board and make sure it works.
Ready for some serious learning?
Enrol to
ESP32 Unleashed
A new learning adventure awaits you.
Create an application that will stretch your existing knowledge and skills.
ESP32 Unleashed is a project course
This course is perfect for people familiar with the ESP32, especially graduates of ESP32 For Busy People.
It is a guided project, designed to teach you how to use modern tools to create modern embedded applications based on the ESP32.
Just click on the big red button to learn more.
Jump to another article
Lessons
1: Why use PlatformIO to program the ESP32?
2: How to install PlatformIO and MS Code (Mac OS)
3: How to install PlatformIO and MS Code (Windows 10)
4: Set up an ESP32 project in PlatformIO
5: Upload and test the new project
6: Create the Git repository
7: Split the program into two files
8: Test the multi-file project
9: How to use Git version control
We publish fresh content each week. Read how-to's on Arduino, ESP32, KiCad, Node-RED, drones and more. Listen to interviews. Learn about new tech with our comprehensive reviews. Get discount offers for our courses and books. Interact with our community. One email per week, no spam; unsubscribe at any time
