An IoT Mastery Project guide series
Test the multi-file project
In this article, I’ll show you how to test the application after the work you did in up to now (please check the previous article if necessary).

In this article, I’ll show you how to test the application after the work you did in up to now (please check the previous article if necessary).
I remind you that at this point, we have an application that consists of four files:
- main.cpp
- sensor_readings.cpp
- sensor_readings.h
- setting.h
In the previous article, we compiled the program successfully. Now, let’s test it on the target device.
Connect your ESP32 to your computer. Click on the compile and upload button.

Upload the program to the ESP32 board
In the previous article, we only changed the internal organization of the application, not its functionality. Therefore, I expect to see the same output on the device as in the previous test.
You may need to hold on the boot button to put the ESP32 to upload mode if the first upload attempt does not succeed.
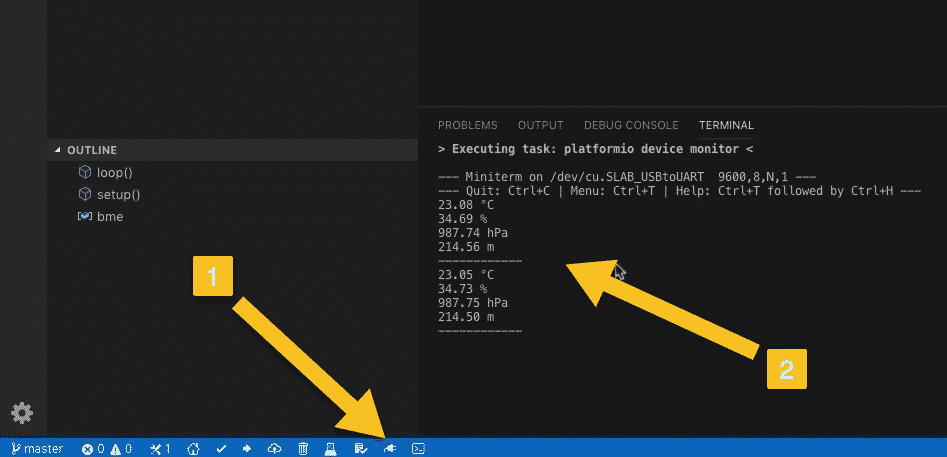
Once the upload is finished, open the serial port (1, see image below).
You should see the sensor values rolling through (2).

Open the serial monitor (1) and see the text coming from the board (2)
It means that the application with its new organization and architecture works as expected.
Awesome
Let's move on to the next lecture now where we'll spend a little bit more time playing around with the Git repository.
Ready for some serious learning?
Enrol to
ESP32 Unleashed
A new learning adventure awaits you.
Create an application that will stretch your existing knowledge and skills.
ESP32 Unleashed is a project course
This course is perfect for people familiar with the ESP32, especially graduates of ESP32 For Busy People.
It is a guided project, designed to teach you how to use modern tools to create modern embedded applications based on the ESP32.
Just click on the big red button to learn more.
Jump to another article
Lessons
1: Why use PlatformIO to program the ESP32?
2: How to install PlatformIO and MS Code (Mac OS)
3: How to install PlatformIO and MS Code (Windows 10)
4: Set up an ESP32 project in PlatformIO
5: Upload and test the new project
6: Create the Git repository
7: Split the program into two files
8: Test the multi-file project
9: How to use Git version control