
A World of Interruptions
Picture this: you’re relaxing, sipping on your morning coffee when suddenly, your phone buzzes. It’s an email notification. That’s a pretty relatable experience, right?
Now, imagine if your Arduino board could behave in a similar way. It’s doing its thing, running its code, when suddenly – bam! – an external event happens, and it immediately switches its attention to deal with it. That’s the power of external interrupts.
External interrupts, in a nutshell, are a way for an Arduino board to immediately respond to a specific change in an external condition, such as a button being pressed or a sensor being triggered. They’re like the buzzing of your phone that tells you to check your email – they interrupt the regular flow of the Arduino’s operations to execute a specific piece of code called an Interrupt Service Routine (ISR).
Why Use External Interrupts?
You might be wondering why you’d want to use external interrupts. Well, there are a couple of good reasons. The first one is speed. External interrupts allow your Arduino to respond almost instantaneously to an event, much faster than if it were using a regular polling technique, where it would have to check the status of a pin or a variable constantly.
The second reason is efficiency. Using external interrupts can save a lot of processing power because your Arduino doesn’t have to keep checking the status of a pin or a variable – it can just chill until it gets interrupted. This is especially useful in power-sensitive applications, where every milliampere counts.
The Mechanics of External Interrupts
Let’s get our hands dirty and delve into how external interrupts work. Every Arduino Uno has two pins that can be used as external interrupts: pin 2 and pin 3. You can set these pins to trigger an interrupt when they go from LOW to HIGH (RISING), from HIGH to LOW (FALLING), or when they change state (CHANGE).
The code to use an external interrupt is quite simple. First, you need to declare a function that will be executed when the interrupt happens – this is your ISR. Then, you attach this function to a specific pin and a trigger condition with the attachInterrupt() function. Here’s a basic example:
void setup() {
  pinMode(2, INPUT_PULLUP);
  attachInterrupt(digitalPinToInterrupt(2), myISR, FALLING);
}

void loop() {
  // your regular code here
}

void myISR() {
  // code to execute when the interrupt happens
}
In this example, myISR will be called whenever pin 2 goes from HIGH to LOW.
Practical Example: Button-Triggered LED
To illustrate the power of external interrupts, let’s build a simple circuit with a button and an LED. When you press the button, the LED will light up, but instead of using a regular digitalRead() in the loop, we’ll use an external interrupt.
Here’s a simple step-by-step guide on how to set up a circuit for an external interrupt using a momentary button and an LED:
- Arduino Power: Connect the 5V power pin from the Arduino to the positive rail on your breadboard, and connect the GND pin to the negative rail.
- LED Setup: Connect your LED’s anode (longer lead) to pin 13 on the Arduino. Connect the cathode (shorter lead) to a 220-ohm resistor, and then connect the other end of the resistor to the GND on your breadboard.
- Button Setup: Place your momentary button on the breadboard. One side of the button should be connected to the 5V power from the breadboard’s positive rail.
- Interrupt Connection: Connect the other side of the button to digital pin 2 on the Arduino Uno. This pin is one of the Arduino Uno’s external interrupt pins.
- Grounding the Button: Finally, connect a 10k-ohm resistor from the side of the button connected to pin 2, and connect the other end of the resistor to the GND on your breadboard. This resistor acts as a pull-down resistor, ensuring that the button input is low (0V) when the button is not pressed.
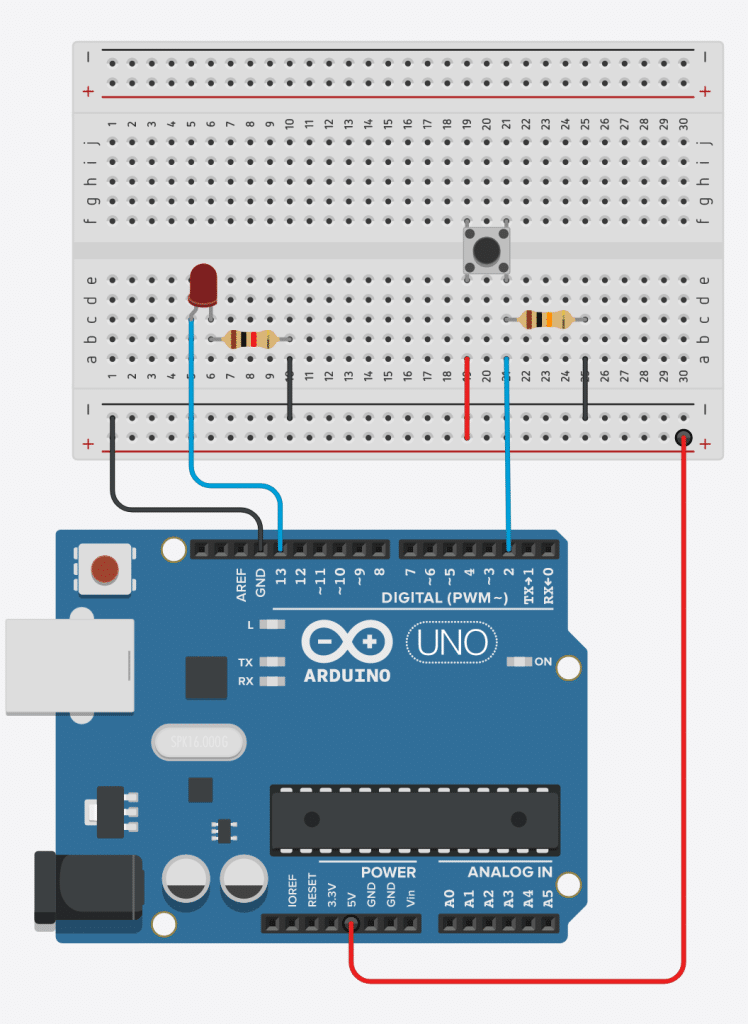
See my original wiring diagram on TinkerCAD.
You’ve set up your circuit. Pressing the button will trigger an interrupt on pin 2, and in response, the LED on pin 13 will light up.
And here’s the code:
volatile int ledState = LOW;

void setup() {
  pinMode(2, INPUT_PULLUP);
  pinMode(13, OUTPUT);
  attachInterrupt(digitalPinToInterrupt(2), toggleLED, FALLING);
}

void loop() {
  digitalWrite(13, ledState);
}

void toggleLED() {
  ledState = !ledState;
}
An equivalent example code is below, in which the loop() function is empty. All of the work happens inside the toggleLED function:
void setup() {
  pinMode(2, INPUT_PULLUP);
  pinMode(13, OUTPUT);
  attachInterrupt(digitalPinToInterrupt(2), toggleLED, FALLING);
}

void loop() {
  //Empty!
}

void toggleLED() {
  digitalWrite(13, !digitalRead(13)); //Toggle the LED state
}
Understanding the ‘volatile’ Keyword in Arduino
Here’s a neat piece of info: Arduino’s ‘volatile’ keyword plays a crucial role, especially when dealing with interruptions. The term ‘volatile’ might sound dramatic, but its purpose is surprisingly straightforward.
In C/C++ programming, including Arduino, ‘volatile’ is used before the datatype of a variable. It tells the compiler that this particular variable might change at any moment outside the usual sequence of operations in the code. It’s like putting up a signpost that says, “Hey, this variable is unpredictable!”
But why is this important? Well, during the process of optimization, compilers make assumptions about variables. They might say, “this variable hasn’t changed recently, so it’s safe to assume it will stay the same.” Most of the time, this is a safe assumption and helps your code run faster and more efficiently.
However, when it comes to variables associated with interrupts, this assumption could lead to problems. An interrupt can change a variable at any time, and that’s where ‘volatile’ comes in. By declaring a variable as ‘volatile’, you’re telling the compiler not to make any assumptions about that variable and always to read its actual value from memory, not from a cached copy that might be outdated.
Here’s a quick example:
volatile int buttonState = 0;

void setup() {
  // Interrupt setup code here
}

void loop() {
  // Main code here
}

void ISR() {
  buttonState = digitalRead(2);
}
In this code, buttonState is declared as a volatile int. This means that even though buttonState is modified in the interrupt service routine (ISR), the compiler won’t make any assumptions about its value in the main loop. Instead, it will always read its current value from memory. This ensures that your program always knows the actual, most recent state of the button.
So, when you’re coding with interrupts, remember to make good use of the ‘volatile’ keyword. It’s an essential tool for ensuring your variables are always up-to-date.
When External Interrupts Beat Internal Timer Interrupts
Let’s look at situations where an external interrupt might outshine an internal timer interrupt or other ways to trigger a function. One key advantage of an external interrupt is its ability to respond immediately to a change, making it perfect for time-critical applications.
Imagine you’re creating a data logger for temperature and humidity. Using an internal timer, you could poll the sensor every few seconds, but what happens if the conditions change dramatically between readings? You might miss an important event! If, instead, you use an external interrupt triggered by the sensor reaching a certain threshold, your Arduino would instantly log the event, capturing the data at the exact moment it happens.
Another example might be a speedometer for a bike. You could set a timer to check the wheel’s position every few milliseconds, but this method might introduce some lag and inaccuracies. If you use an external interrupt triggered by a magnet passing a sensor, however, you can calculate the speed precisely, as the interrupt would occur exactly when the wheel has completed a full rotation.
Real-Life Applications: Automation and Security
Let’s get practical and see how external interrupts can be used in real-life projects. Automation and security immediately come to mind, but there are many possibilities.
In home automation, for instance, an external interrupt could control lights. Imagine you have a light sensor outside your house. It triggers an interrupt that turns on the lights inside when it gets dark. No need for you to lift a finger!
In security systems, external interrupts are invaluable. Consider a door alarm system. An interrupt could be triggered by a door opening unexpectedly. This would immediately activate an alarm, alerting you to potential intruders. Without an interrupt, the system would need to constantly check the status of the door, which could be less responsive and more power-hungry.
And how about a wildlife camera? A motion sensor could trigger an interrupt that activates the camera to capture a photo. This way, you don’t miss out on capturing those elusive nocturnal critters!
These examples only scratch what you can achieve with external interrupts. Whether for precision, responsiveness, or power efficiency, they’re powerful in any maker’s toolkit. Keep exploring and experimenting, and you’ll find even more creative ways to use them in your projects.
Dealing with Debouncing: What It Is and How to Fix It
Let’s tackle a tricky yet common issue when working with momentary buttons or switches: debouncing. If you’ve ever worked with buttons in your Arduino projects, you might have noticed that a single button press can sometimes register as multiple presses. What’s up with that? It’s all about debouncing.
The term “debouncing” might sound odd, but it’s a fancy name for a simple phenomenon. When you press a button, the physical contacts inside don’t just neatly close once. Instead, they can “bounce” against each other a few times before settling. This bouncing happens incredibly quickly, in just a few milliseconds. However, microcontrollers like the Arduino are even faster and can register each bounce as a separate button press. The same thing happens when the button is released.
So, how do we fix this bouncing issue? There are both hardware and software solutions to implement debouncing.
Hardware Debouncing: This method involves adding components to your circuit to smooth out the bouncing. A common way to do this is using a resistor-capacitor (RC) network. When the button is pressed or released, the capacitor charges or discharges slowly instead of instantly, which smooths the bounce. While effective, this method does add complexity to your circuit.
Software Debouncing: This method uses code to ignore extra button presses within a certain timeframe. When the button state changes, you start a timer. Any further changes that happen before the timer runs out are ignored. This method doesn’t require any additional hardware, and a fantastic Arduino library called Bounce2 makes it easy to implement in your code.
Here’s a quick example of how you might use the Bounce2 library to debounce a button:
#include <Bounce2.h>

const int buttonPin = 2;
Bounce debouncer = Bounce();

void setup() {
  pinMode(buttonPin, INPUT_PULLUP);
  debouncer.attach(buttonPin);
  debouncer.interval(5); // interval in ms
}

void loop() {
  debouncer.update();
  if (debouncer.fell()) {
    // The button state has changed to LOW (pressed)
  }
  if (debouncer.rose()) {
    // The button state has changed to HIGH (released)
  }
}
In this code, the Bounce2 library handles the debouncing. It’s set to ignore any changes to the button state that happen within 5 milliseconds of the previous change.
Whether you opt for a hardware or software solution, debouncing is critical when working with buttons or switches. It’s a small detail, but getting it right can significantly improve the reliability of your projects.
Further Reading
Want to dive deeper into the world of interrupts? Here are some free resources to help you out:
- Timer Interrupts for Non-Blocking Code Execution the Arduino, here on the Tech Explorations website. Learn how to break free from blocking code and make your Arduino projects more efficient by employing timer interrupts.
- Why should I call detachInterrupt at the start of an interrupt service routine?, also on our website.
- The interrupt service routine and volatile variables, on our website. Understand why interrupt service routines (ISR) must be as small as possible and the function of the volatile variable.
- Are you wondering if you can use delay() in an ISR?, a blog post on our website.
- External Interrupts | Multi-tasking the Arduino – Part 2 | Adafruit – This guide explains how external interrupts are triggered by external events, like the push of a button or a pulse from a rotary encoder, and why you don’t need to keep polling the GPIO pins for a change.
- Arduino Interrupts Tutorial & Examples – A comprehensive tutorial that starts from the basic concepts and goes to implementing Arduino interrupt-based systems.
- Create External Interrupt in Arduino: 7 Steps – Instructables – A step-by-step guide on setting up an external interrupt to toggle an LED on pin 13.
-
Processor Interrupts with Arduino – SparkFun Learn – This article explains how to use the
attachInterrupt()function and how it depends on the microcontroller being used. - Button Switch Using An External Interrupt | Arduino Project Hub – An alternative approach to connecting button switches via an external interrupt.
- Arduino Interrupts Tutorial with Example Interrupt Demonstration – This tutorial explains the differences between external interrupts and pin change interrupts.
- How to Use Interrupts on the Arduino – Circuit Basics – A tutorial that explains why interrupts are useful and how external events like the press of a button or a signal from a sensor trigger hardware interrupts.
- Using Interrupts on Arduino – Technical Articles – All About Circuits – This article explains how interrupts ensure that the processor responds quickly to important events and executes some code designed to react to the external stimulus being fed to the Arduino.
External interrupts can be a powerful tool in your Arduino programming arsenal. They can make your projects more responsive, efficient, and elegant. So why not give them a try? You might be surprised at how much they can do.