MICROPYTHON WITH THE ESP32 GUIDE SERIES
Install MicroPython On The ESP32
A new ESP32 board does not (normally) come with the MicroPython firmware installed. Before you can use it, you'll need to install the MicroPython firmware. In this lesson I'll show you how to do it.

At this point, you should already have installed Thorney IDE on your computer. If you haven't done so, you should do it now.
A brand new ESP32 does not normally come with the MicroPython firmware pre-installed. Before you can actually start working with MicroPython on this microcontroller is to install the MicroPython firmware.
Installing the MicroPython firmware
To install the MicroPython firmware to an ESP32, you need two things:
First, you need to download the firmware for the particular device from the Micro Python website.
And second, is to use a appropriate tool to upload the firmware binary file to your ESP32.
Luckily, the newer versions of the Thonny IDE come equiped with the upload tool.
Download the MicroPython firmware
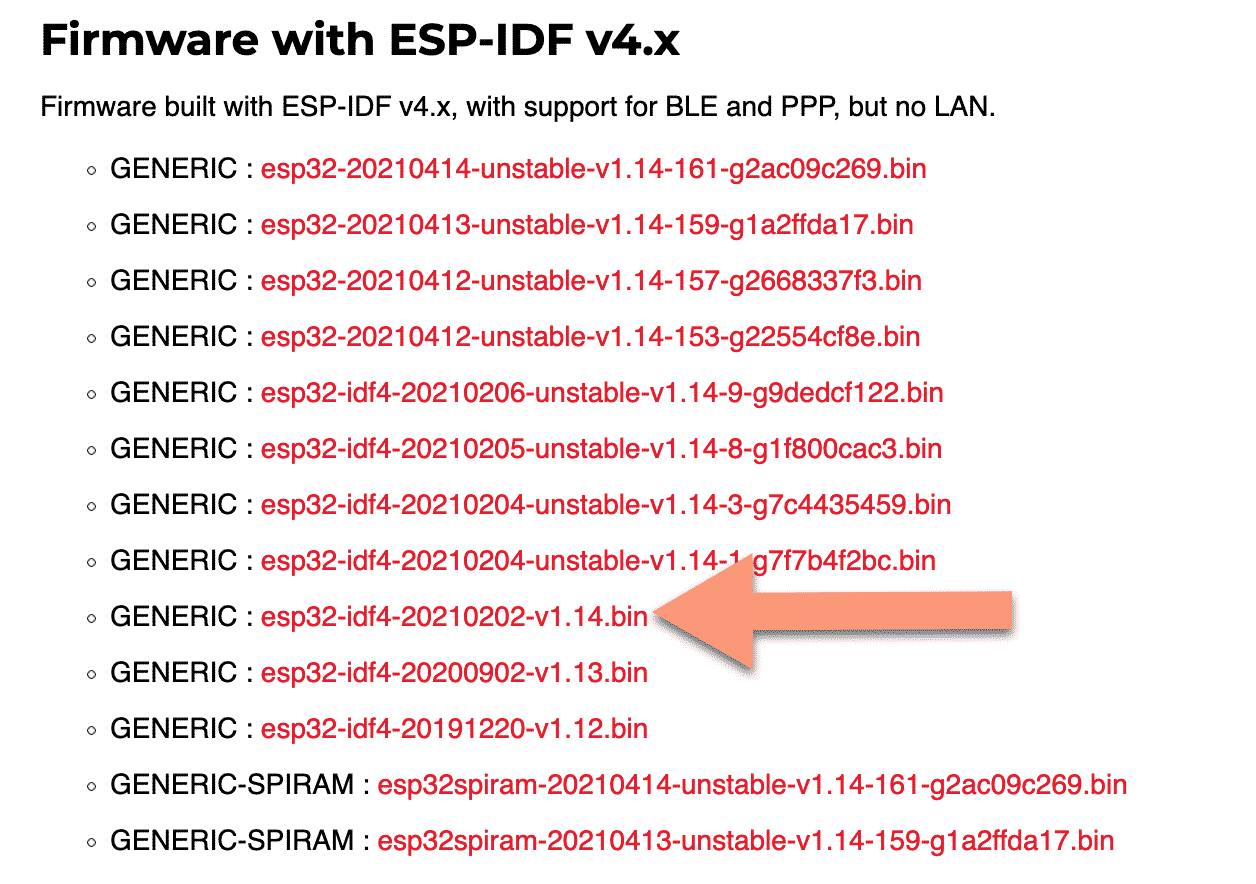
To download the firmware for the ESP32, go to download page on the MicroPython website. Beware, there is a specific firmware file for each supported target board. You can't upload a Micro:bit firmware to an ESP32.

Download the MicroPython firmware for the ESP32 from micropython.org
Once at the download page, find the list with the ESP-IDF v4.x downloads, and select the latest stable firmware. At the time I am writing this, the latest version is 1.14.

Opt for a stable firmware, unless you know what you are doing.
There are unstable versions and there are also versions for ESP32 with the additional SPI RAM chip, which provides additional memory. I don't have that, so I'm going to go with the latest generic version.
Download the file, and continue with Thonny.
Flash the MicroPython firmware to the ESP32
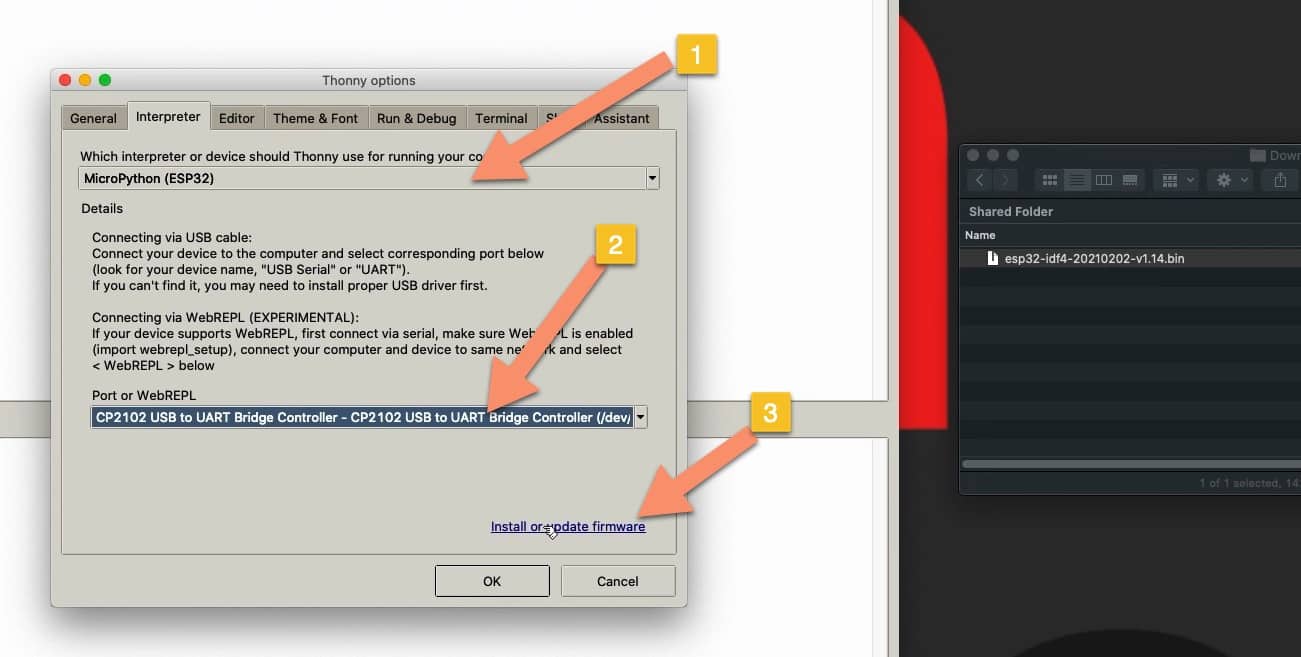
Connect your ESP32 to your computer, then in Thonny select Tools, Options to bring up the Options dialog box.
Click on the Interpreter tab. There are two drop-down menus here.

The firmware upload tool in Thonny IDE.
The top one is the interpreter selector. Select the "MicroPython (ESP32)" from the list.
The second is the port selector. Select the port to which your ESP32 is connected.
Finally, click on the "install or update" hyperlink.

Select the firmware file to flash to your ESP32.
This will take you to the ESP32 firmware installer box. Again, you will need to select the appropriate communications port.
Then, browse for the firmware file that you downloaded earlier.
There are a few options for the installer, which I recommend that you leave in their default states (see my screenshot above).
Finally, click on the Install button to start the flashing process. The process takes around one minute to complete.
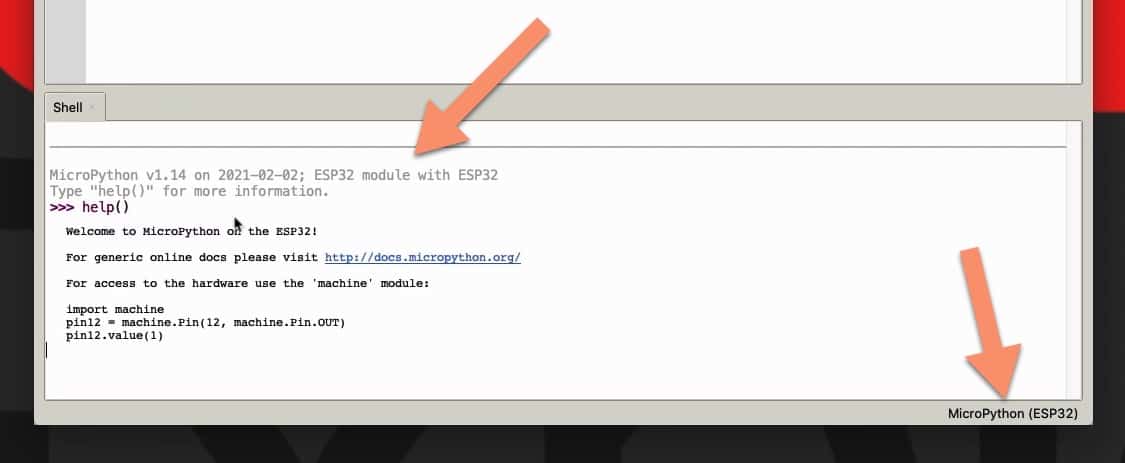
Test your new MicroPython interpreter
Once the flashing is complete, your ESP32 MicroPython interpreter will connect to Thonny, and the REPL prompt will appear.

The REPL prompt from the brand-new MicroPython interpreter on the ESP32.
Type "help()" to see helpful information from the interpreter.
And with this, your ESP32 board can now work with MicroPython.
Learn MicroPython for the ESP32
With this video course, you will learn how to use the
MicroPython programming language with the ESP32 micro-controller.
MicroPython is the perfect language for anyone looking for the easiest (yet still powerful) way to program a micro-controller.
Jump to another article
1. What is MicroPython?
2. MicroPython vs Python
3. MicroPython resources
4. MicroPython compatible boards
5. Getting started with Thonny IDE
6. How to install the MicroPython firmware
7. Setup an interpreter in Thonny IDE
8. How to write and execute a MicroPython program
9. Thonny IDE with the Raspberry Pi Pico
10. Thonny IDE with the BBC Micro:bit
11. Thonny IDE advanced configuration
12. How to find MicroPython packages at PyPi
13. The MicroPython shell
14. MicroPython Programming with files
15. How to interrupt a running program
16. How to run a program at boot
17. How to debug MicroPython program
Last Updated 1 year ago.
We publish fresh content each week. Read how-to's on Arduino, ESP32, KiCad, Node-RED, drones and more. Listen to interviews. Learn about new tech with our comprehensive reviews. Get discount offers for our courses and books. Interact with our community. One email per week, no spam; unsubscribe at any time