MICROPYTHON WITH THE ESP32 GUIDE SERIES
Thonny IDE With The Raspberry Pi Pico
In this lesson, I will demonstrate how to use Thonny IDE and MicroPython on a Raspberry Pi Pico.

In this lesson, I will demonstrate how to use Thonny IDE and MicroPython on a Raspberry Pi Pico to do something simple with the Raspberry Pi Pico, which is, in this case, to make the onboard LED blink.
Setup the experiment

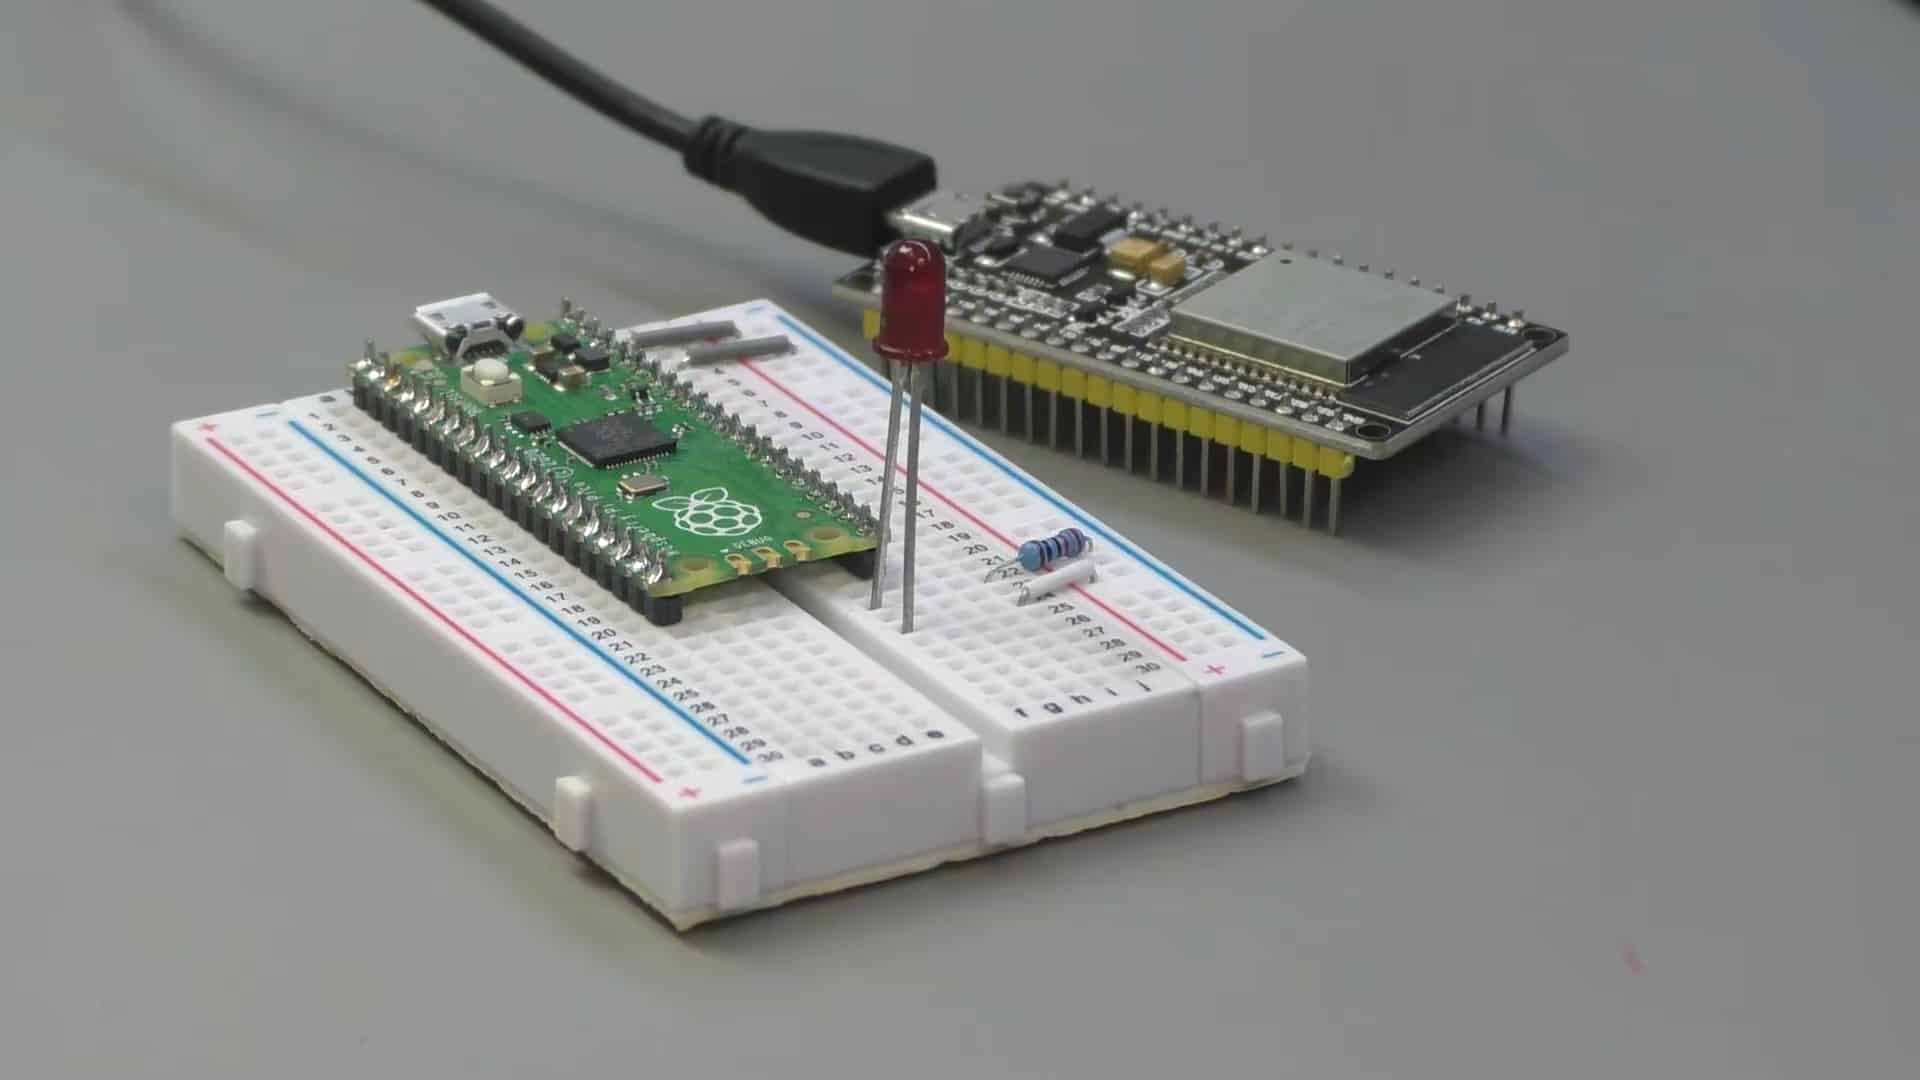
Let's begin be connecting the Raspberry Pi Pico to the computer via the USB cable. Ensure that Thonny is running. Thonny should detect the Raspberry Pi Pico.

In the Thonny Tools menu, select "options", then "interpreter", and change the interpreter to the "MicroPython (Raspberry Pi Pico)" option. Also select the correct connection port for the device.
The Raspberry Pi Pico comes with MicroPython already flashed. This means that it is literally "plug and play"; your don't have to install MicroPython like you did with the ESP32.
Documentation
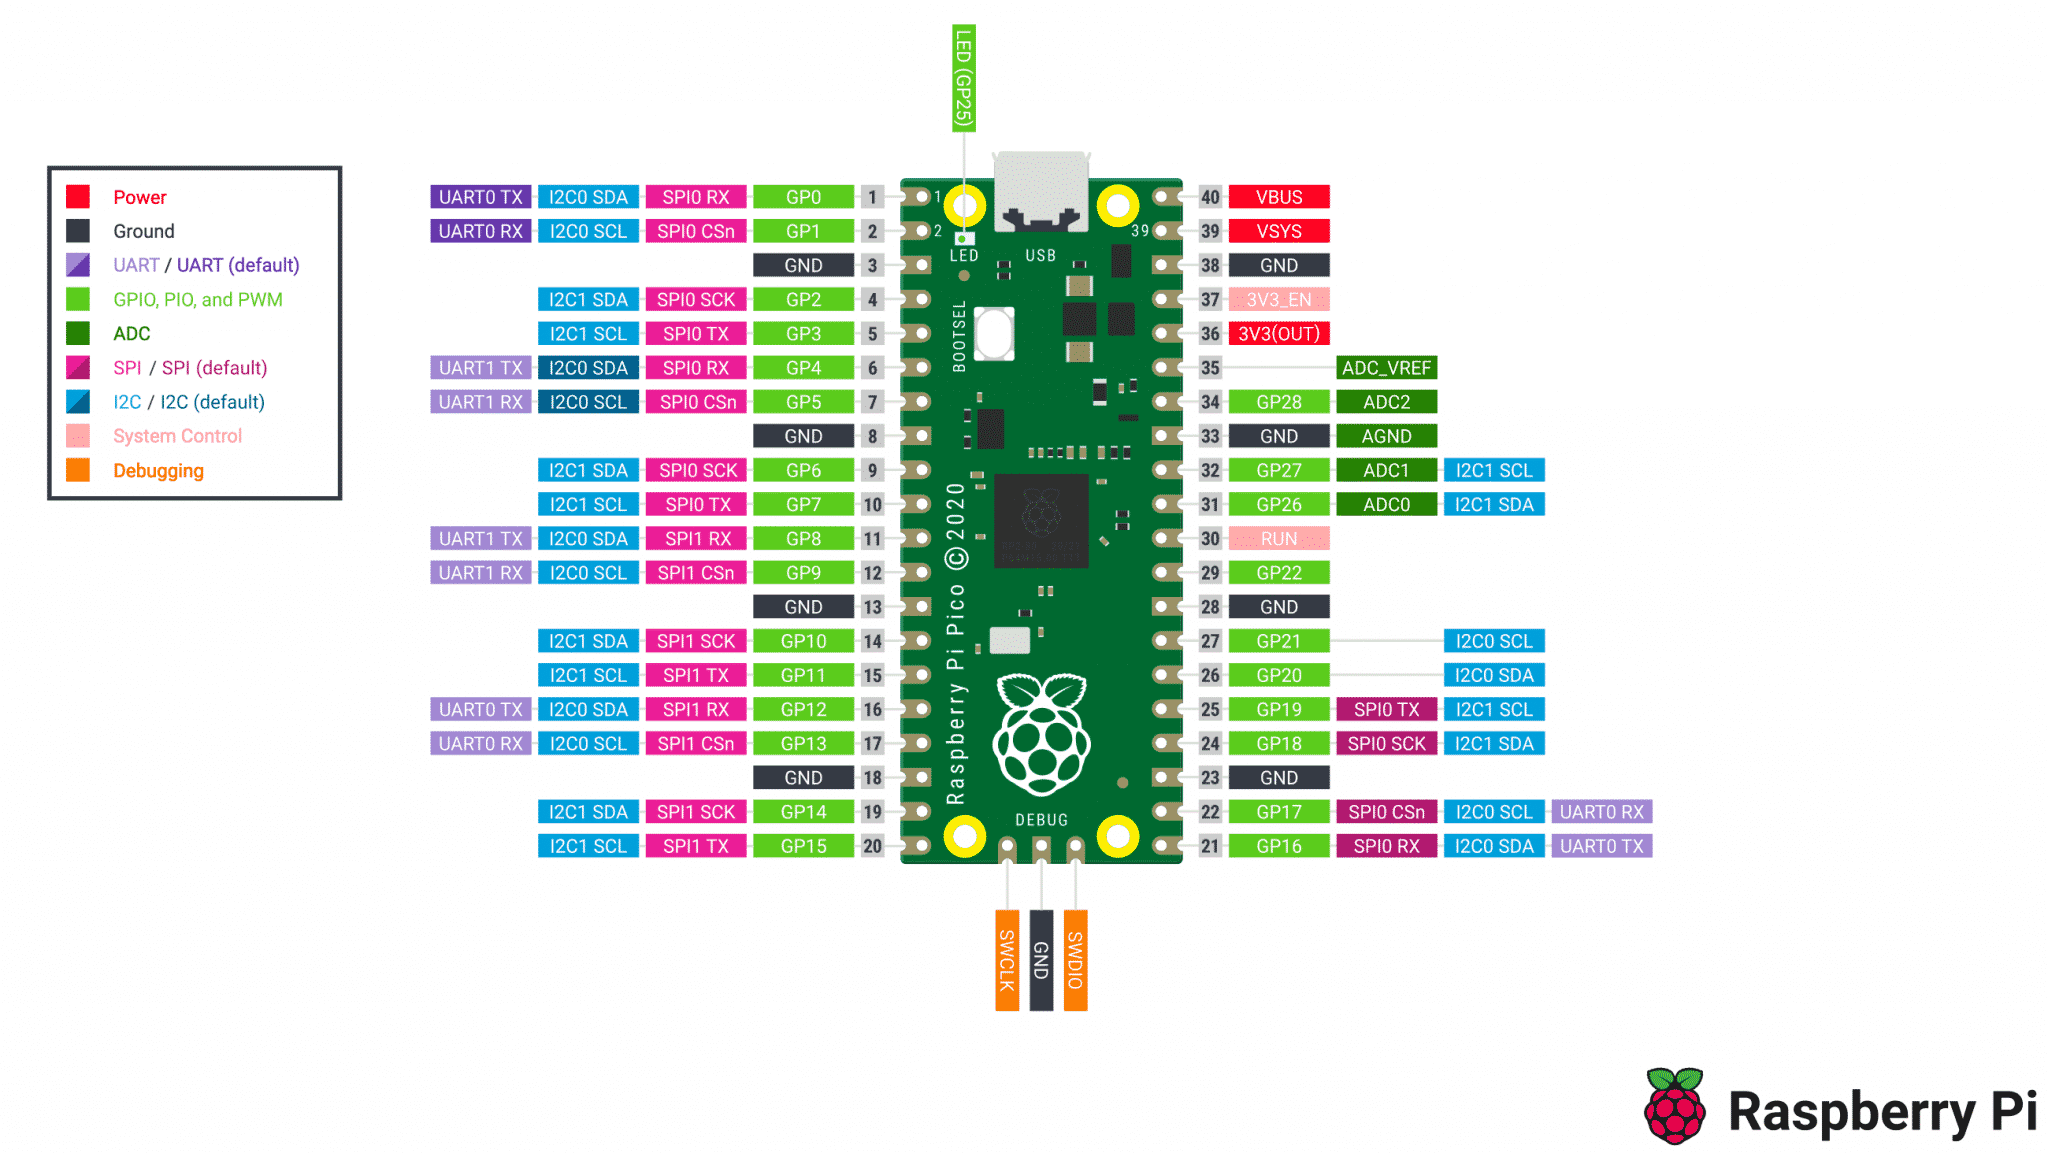
You can find information about the Raspberry Pi Pico on its web page. Scroll down on the board specifications, where you'll see the pin map out.

The Raspberry Pi Pico is well-equipped with all sorts of GPIO and communications capabilities.
One interesting technology that comes with it is a programmable input/output or PIO state machines, which allow you to write programs and execute on specific GPIOs. Because they run directly on the co-processors of the GPIO, they're not occupying any MCU cycles that are very, very fast. This is a fairly advanced topic, though, but I thought I should mention it because it's really a feature that stands out when compared to other microcontroller units. If you are curious about PIO, see the RP2040 documentation (PDF) and browse to pave 338 (section 3.3. PIO Assembler).
Experiment
In this simple example, I will show you how to toggle the state of the built-in LED. Just as you can see in the pin map out, it is connected to GP25 using Thonny IDE.
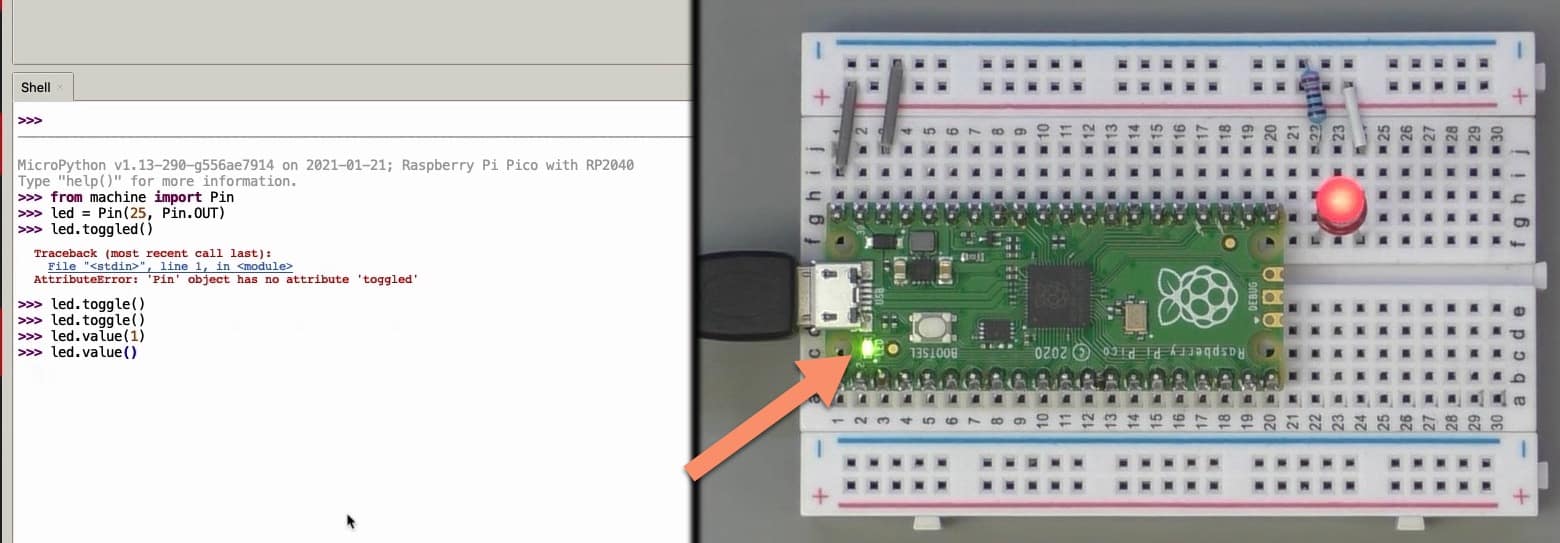
Here what this looks in Thonny IDE, with the resulting lit onboard LED:

Here's the code showing in the Thonny IDE shell:
>>> from machine import Pin
>>> led = Pin(25, Pin.OUT)
>>> led.toggle()
>>> led.toggle()
>>> led.value(0)
>>> led.value(1)
First, import the Pin module from the machine library. The machine library is a library that is available for all microcontroller units that support MicroPython. It contains functions that are specifically created for the microcontroller that you're targeting. In this case, the machine library contains functions that specifically apply to the Raspberry Pi Pico.
So, now, that you have access to the Pin module, you can use the capabilities it provide to do things such as toggle the state of the LED
Next, create the LED object and set pin 25 as an output. are targeting GP25Now, that you have this object, you can use the toggle() function to turn it on or off.
You can also use the "value" function to explicitly control the state of a pin.
You can also check the state of the LED by calling the value, but without a parameter.
In the next lesson I'll show you how to do something similar with the BBC Micro:bit. The purpose of these couple of lessons is to show you how versatile MicroPython. It makes it possible to jump from one kind of hardware to another with some relatively small modifications to your MicroPython program.
Learn MicroPython for the ESP32
With this video course, you will learn how to use the
MicroPython programming language with the ESP32 micro-controller.
MicroPython is the perfect language for anyone looking for the easiest (yet still powerful) way to program a micro-controller.
Jump to another article
1. What is MicroPython?
2. MicroPython vs Python
3. MicroPython resources
4. MicroPython compatible boards
5. Getting started with Thonny IDE
6. How to install the MicroPython firmware
7. Setup an interpreter in Thonny IDE
8. How to write and execute a MicroPython program
9. Thonny IDE with the Raspberry Pi Pico
10. Thonny IDE with the BBC Micro:bit
11. Thonny IDE advanced configuration
12. How to find MicroPython packages at PyPi
13. The MicroPython shell
14. MicroPython Programming with files
15. How to interrupt a running program
16. How to run a program at boot
17. How to debug MicroPython program
Last Updated 6 months ago.
We publish fresh content each week. Read how-to's on Arduino, ESP32, KiCad, Node-RED, drones and more. Listen to interviews. Learn about new tech with our comprehensive reviews. Get discount offers for our courses and books. Interact with our community. One email per week, no spam; unsubscribe at any time