Data Acquisition and Control guide series
08
Device info, LEDs, watchdog
In this lesson, we'll dive into the Device Info tab, the device status LEDs and the watchdog.
-00-00-41-465")
Hi, thanks for stopping by! Just letting you know that we are currently working on this page. You may notice incorrect links and lots of typos. We expect to buff and polish within a few days.
In the previous article, you learned how to find and connect to a LabJack device.
Once you connect Kipling to a LabJack device, you will have access to all of the tabs in Kipling.
In this article, we'll dive into the Device Info tab.
The Device Info tab
-00-00-12-402")
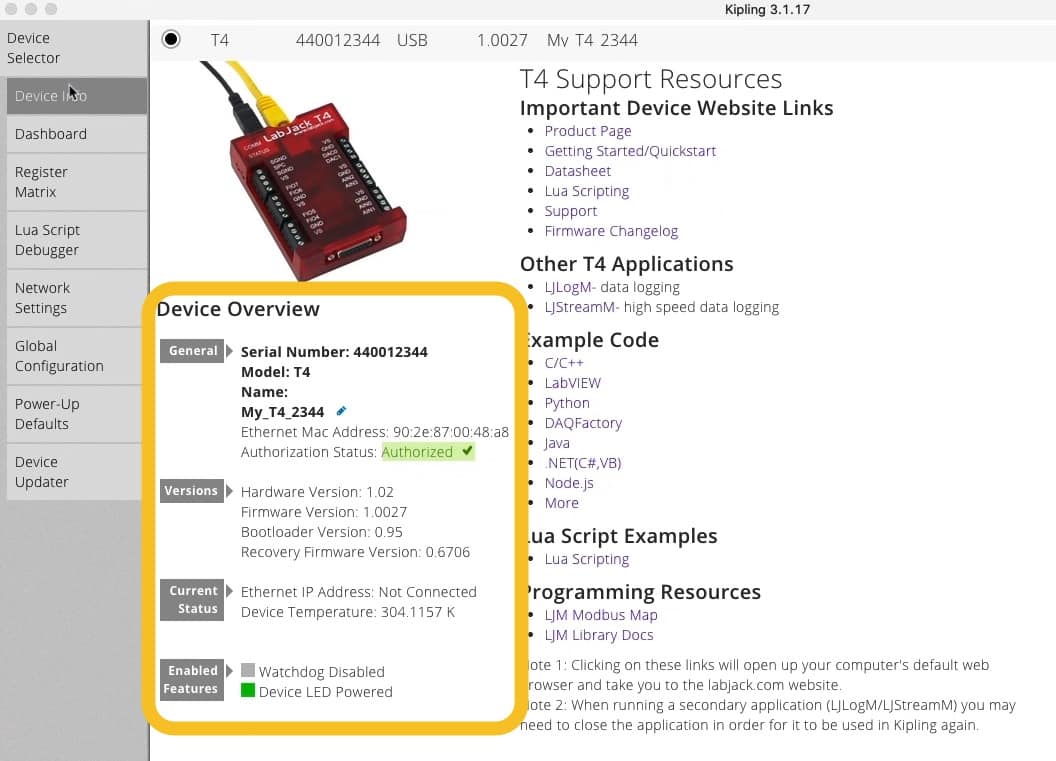
The Device Info tab.
With your LabJack already connected to Kipling, click on the Device Info tab.
On the left side of this page you can see information about the connected LabJack. On the right side you will find links to relevant documentation.
Feel free to play around with those links and we'll open up a browser window and take you to example code documentation and data sheets, etc.
Let's focus on the device information.
At the top, you've got the general information, things such as this serial number, which is what we used earlier here, as an identifier for the Direct Connect option.
There is also information about the model and the name which you can set and also use as a unique identifier. To change a device name, just click on the pen icon and type in a new name.
You can also see the device MAC address, whether the device is authorized to work with Kipling or not.
Device LEDs
-00-02-30-355")
LabJack devices have two status indicator LEDs.
At the bottom of the device information block, there is a mention of a "Device LED Powered" options. This give me the opportunity to mention the two LEDs found on the side of the LabJack T4.
The orange LED is marked as "COMM". It blinks when the device is communicating with Kipling.
The green LED is marked as "STATUS". It flickers when there is activity on the device. For example, when the device is running a Lua script, or when various registers are being accessed then the green LED is going to blink.
Watchdog
Also at the bottom of the device information block, you can see the "Watchdog disabled" feature. I have dedicated a lecture in the course to the watchdog if you want to know about the details.
You can also read about it in the documentation.
You can set a watchdog to reset the device automaticallly if a certain condition is met. For example, if no communication has taken place for a specific amount of time or if there is no activity in one of the DIOs or Digital Input/Outputs, again, during a timeframe that you have defined, the LabJack can automatically restart in an effort to restore its normal operation.
"Data Acquisition and Control" series
Learn Data Acquisition and Control with LabJack
With this video course, you will learn how to use the LabJack device to perform data acquisition and control (DaQ) operations.
LabJack was designed to be robust and reliable, to work autonomously in harsh environments for a long period of time, and to have a lot of input/output ports able to connect to a huge range of sensors and actuators.
Jump to another article
We publish fresh content each week. Read how-to's on Arduino, ESP32, KiCad, Node-RED, drones and more. Listen to interviews. Learn about new tech with our comprehensive reviews. Get discount offers for our courses and books. Interact with our community. One email per week, no spam; unsubscribe at any time