Data Acquisition and Control guide series
07
Device selector
In this lesson, I will discuss the Device Selector, a Kipling view that allows you to find and select one or more LabJack devices.
-00-03-18-060")
Hi, thanks for stopping by! Just letting you know that we are currently working on this page. You may notice incorrect links and lots of typos. We expect to buff and polish within a few days.
The Device Selector is a Kipling view that allows you to find and select one or more LabJack devices. These devices can be connected directly to your computer via USB, or in a Ethernet/Wifi network.
Access the Device Selector
-00-00-13-855")
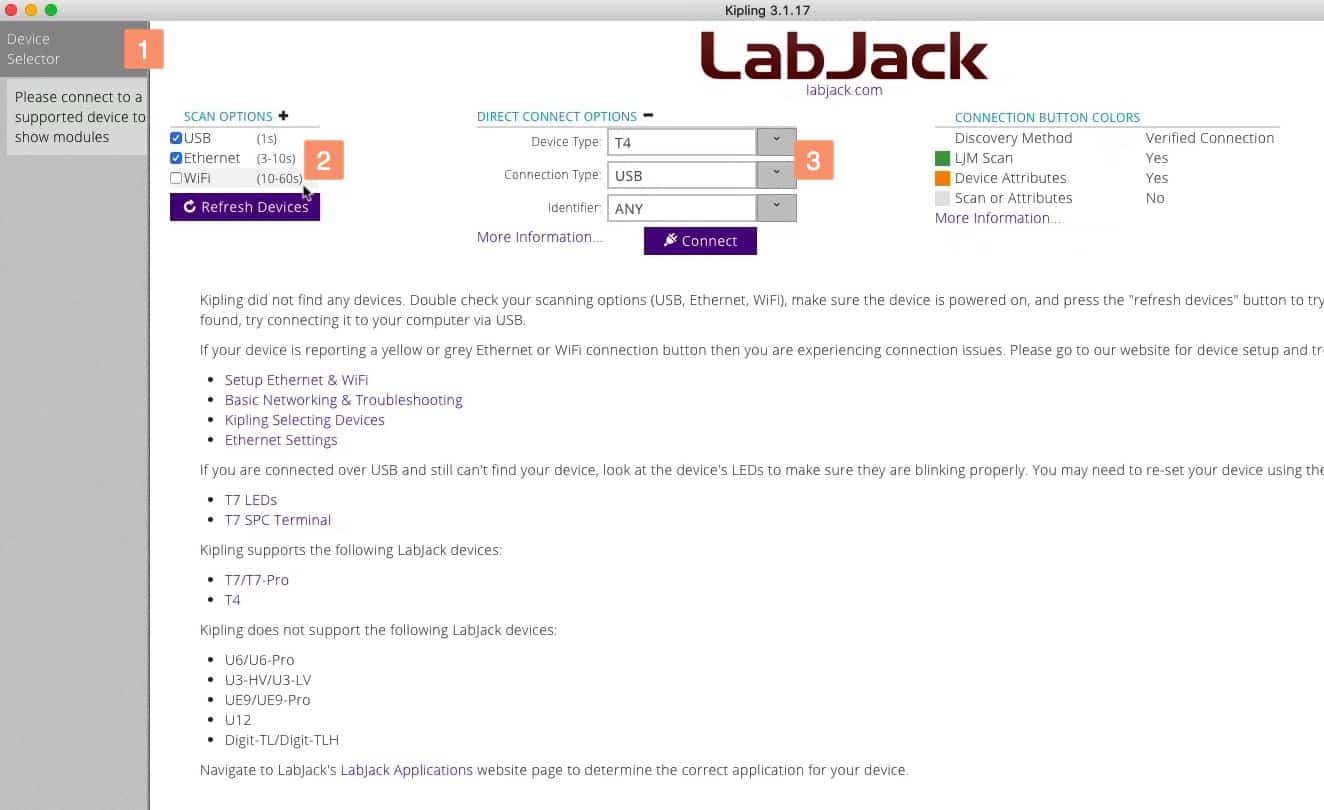
The Device Selector in Kipling.
When you start Kipling for the first time and you haven't connected a T4 or a T7 LabJack device to it, you will be greeted with a screen that looks like the example in the screenshot above.
And this is the Device Selector. You can alway go back to this view by clicking on the "Device Selector" tab (marked "1" above).
The Device Selector gives you a couple of ways to find and connect to a LabJack device.
Device scanner
-00-00-52-301")
The device scanner.
The first and easiest way to find and select a LabJack device is the scanner (marked in the box, above). Click the appropriate interface box for your LabJack, and click on the refresh button.
You don't need to know the model or the serial number of the device or any other identifying information, such as the IP address. All you've got to do is connect the device and click on the refresh device button, and it will go out and search for a connected device.
Direct connect
-00-01-11-984")
The direct connector.
The second method is Direct Connect. To use this method you need to have some identifying information about your LabJack:
1. Device type (such as T4 or T7).
2. The connection type (such as USB or Ethernet)
3. An identifier, which is a customizable unique name for your LabJack.
As long as you know what you have connected to your computer or to your network, you'll be able to connect Kipling directly to the device by selecting the appropriate settings.
There is extensive documentation about the Direct Connect method on the LabJack website. This is where you can find information about things such as the Identifier Parameter and what this can be.
Let's look at an example.
Device scanner example
-00-02-04-530")
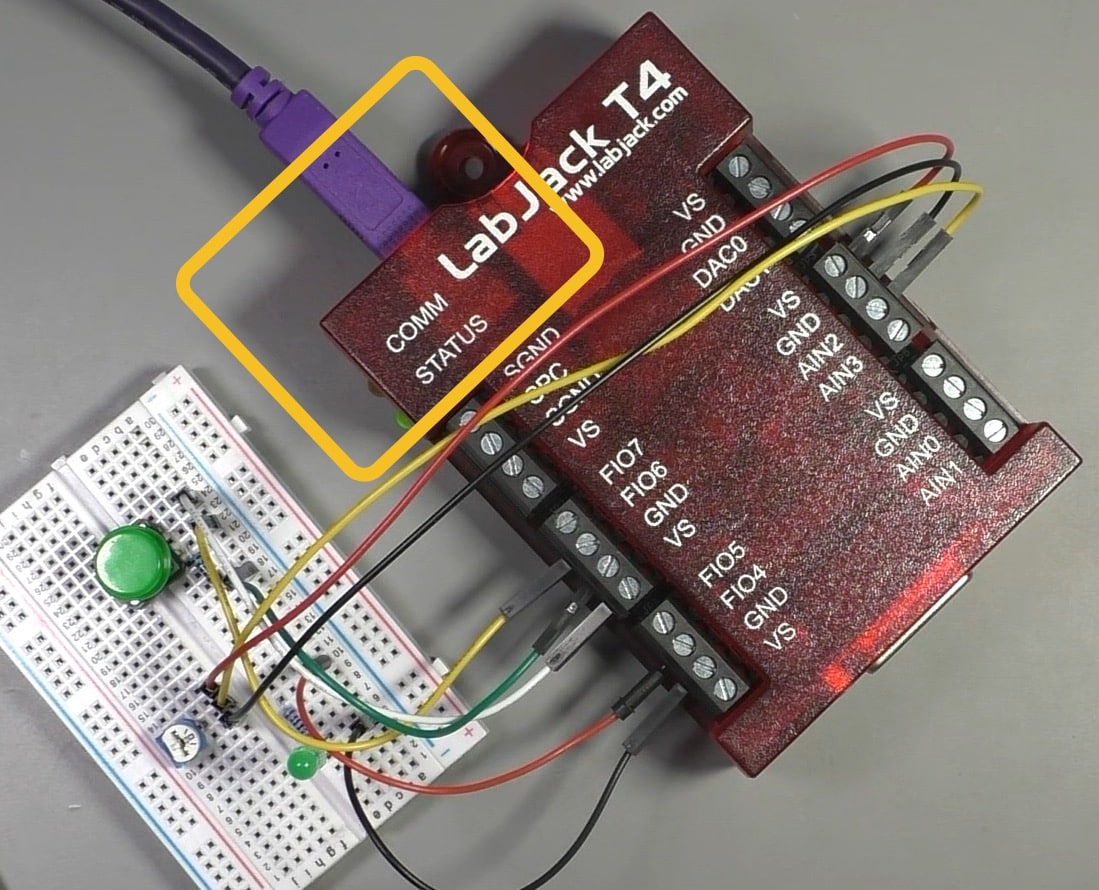
This LabJack is connected to my computer via USB.
In the photo above you can see a LabJack connected to my computer via the USB interface.
Let's try out the scanner option.
-00-02-45-340")
LabJack found, connected via USB
Go to Kipling and click on the Device Selector view. Under Scan Options, check the USB option (1), and then click on the Refresh button (2). Kipling will find yor LabJack and show it under the scanner. Notice the "USB" label (3).
Next, let's try the Ethernet interface.
-00-03-50-742")
This LabJack is connected to my computer via Ethernet. The USB cable is for power only.
I'm going to now plug in Ethernet as well and give it a few seconds to interact with my network and acquire a IP address.
-00-04-21-915")
LabJack found, connected via USB and Ethernet.
In the scanner, select the Ethernet option (1), and click on Refresh Devices (2). The result will now also include the Ethernet label (in addition to the USB interface, which is still connected).
At this point, of course, it doesn't really matter which option (USB or Ethernet) I decide to use to work with the LabJack device. Either one will give you the exact same functionality.
Direct connection example
-00-05-23-458")
Using the Direct Connect option to find a LabJack.
Let's have a look at an example that uses the Direct Connect option. For this to work, you need to know something about the device that you're connecting to.
In my case, I know this about my LabJack:
1. It is T4.
2. It's using the USB interface.
3. It has the serial number 440012344 (see one of the screenshots above)
4. It has a custom name (which I set earlier): "My_T4_2344".
5. It has an IP address.
Some of this information you can find just by looking at the device itself (items 1 and 2 in this list). Other information you can find with the help of the scanner (items 3, 4, 5).
If you have any of this information available, you can use it to configure the connector as in the example of the screenshot above. If the connector find a LabJack, it will list it below the two connection tools.
"Data Acquisition and Control" series
Learn Data Acquisition and Control with LabJack
With this video course, you will learn how to use the LabJack device to perform data acquisition and control (DaQ) operations.
LabJack was designed to be robust and reliable, to work autonomously in harsh environments for a long period of time, and to have a lot of input/output ports able to connect to a huge range of sensors and actuators.
Jump to another article
We publish fresh content each week. Read how-to's on Arduino, ESP32, KiCad, Node-RED, drones and more. Listen to interviews. Learn about new tech with our comprehensive reviews. Get discount offers for our courses and books. Interact with our community. One email per week, no spam; unsubscribe at any time