Motors guide series
Project 2: Servo motor control with VarSpeedServo
Well-crafted libraries allow us to improve the quality of our gadgets with very little additional effort. In this article, you will learn how to use a simple library to improve your servo motor controller sketches with minimal changes in your code.

The build in Servo library is good and very simple to use. However, there’s more we can do with the hardware than it allows us.
For example, how fast should the motor move from one position to the next? What about the ability to define a set of movements for the motor to perform, and then send them with a single instruction?
To achieve functionality like that, we need to use an external library. I am going to show you how to use the VarSpeedServo library, written by Korman and updated by Philip van Allen. Thank you to both for their work and contribution!
Download & install the VarSpeedServo library
First, you will need to get this library. Go to the library Github repository to download it.Click on the green "Code" button to expand the drop-down menu ("1"), and then click on "Download ZIP" ("2") as I show in the screenshot below:

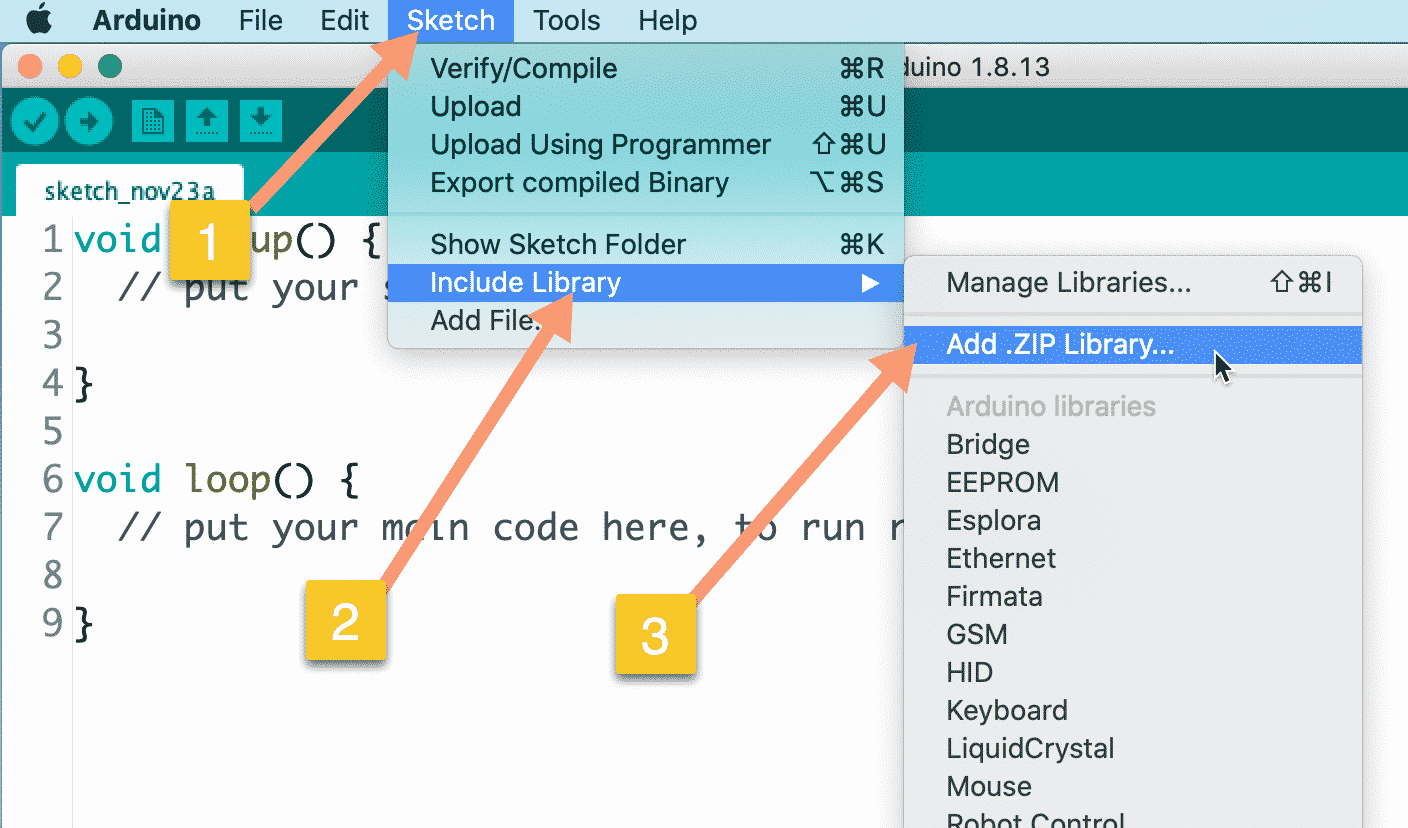
Download it somewhere on your computer, and then import it to your Arduino IDE's libraries folder. The easiest way to do this is to use the Arduino IDE's Include Library option. Start your Arduino IDE, click on Sketch ("1") --> Include Library ("2") --> Add .ZIP Library ("3"), as in the screenshot below:

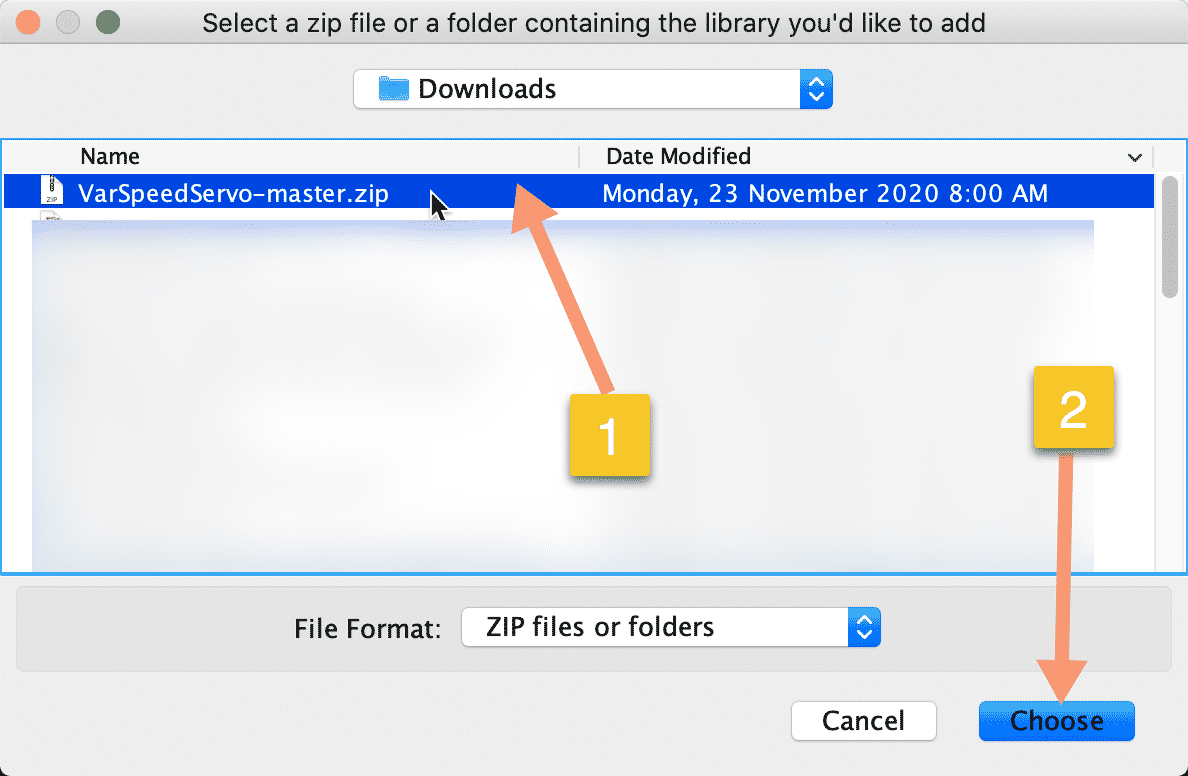
In the dialog box that appears, navigate to the location where the ZIP file is stored on your disk, select it, and click "Choose".

Load the "Sweep" demo sketch
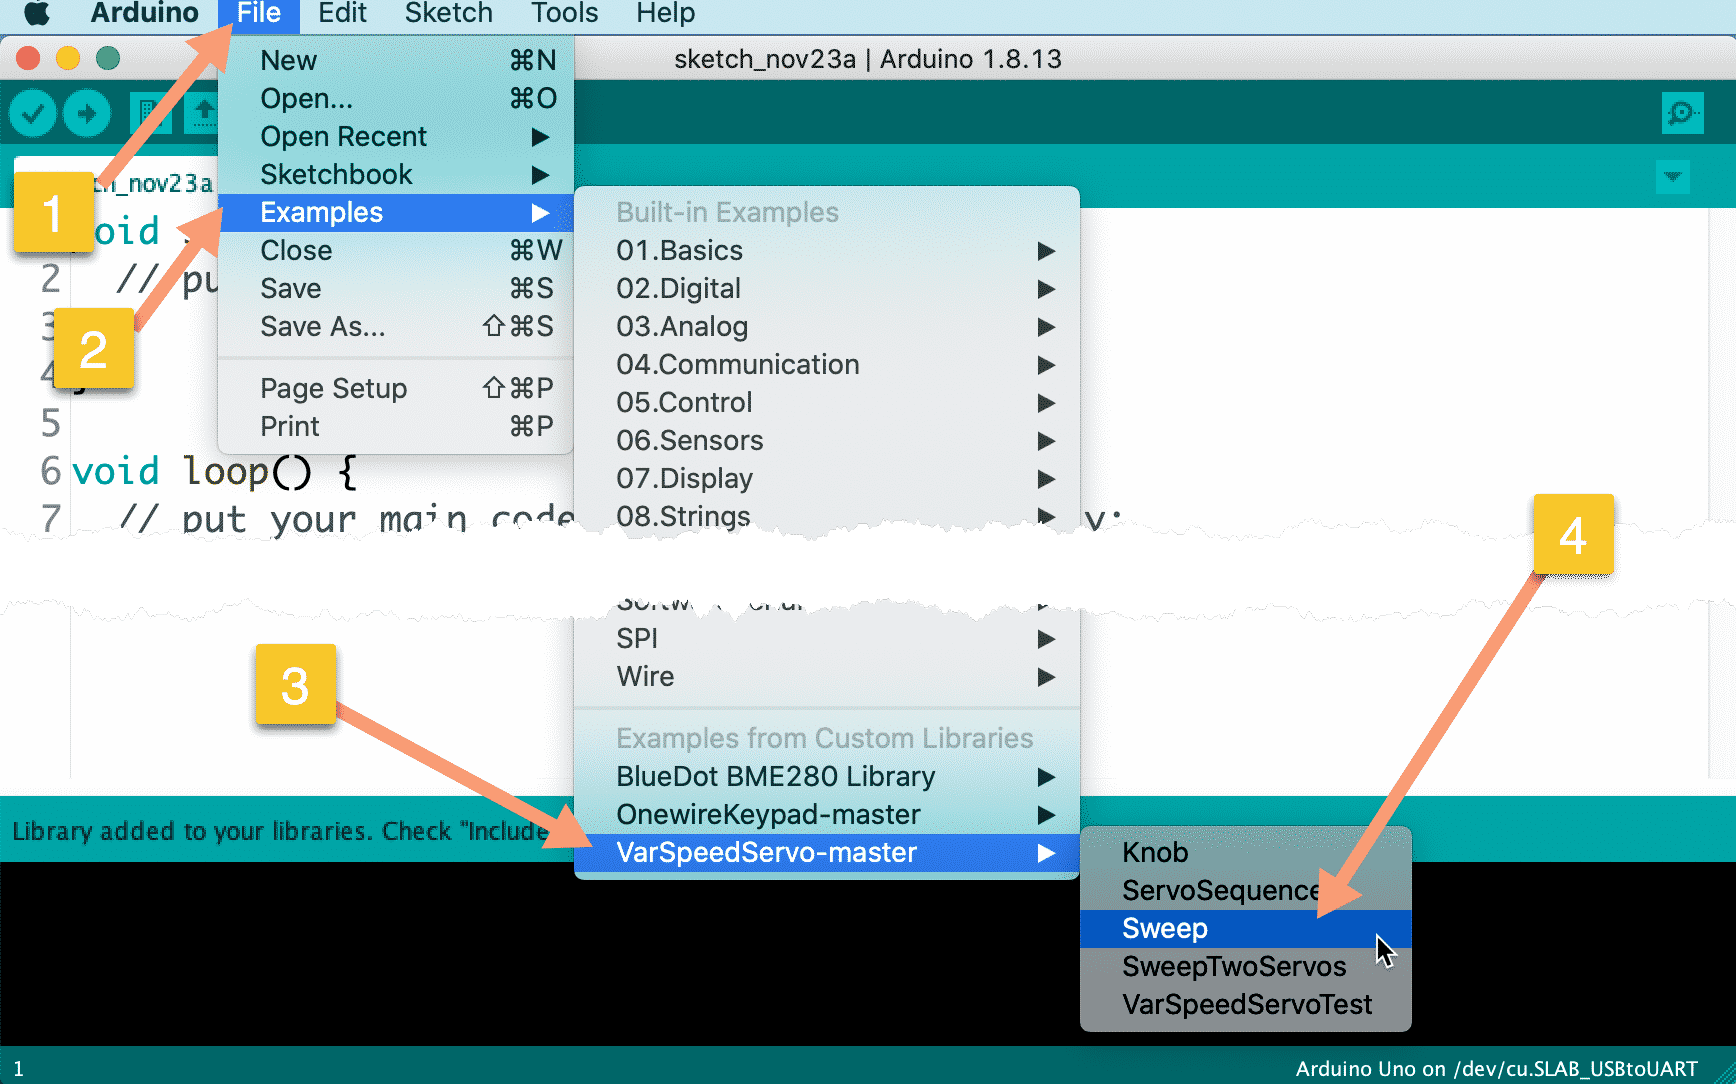
The VarSpeedServo library is now installed and ready to use. The library comes with several examples. One of them is "Sweep", which is perfect for an introduction to the library. Let's open it. Go to the Arduino IDE and click on File ("1") --> Examples ("2") --> VarSpeedServo-master ("3") --> Sweep ("4").

Here’s the Sweep sketch:
#include <VarSpeedServo.h>
// create servo object to control a servo
// a maximum of eight servo objects can be created
VarSpeedServo myservo;
// the digital pin used for the servo
const int servoPin = 9;
void setup() {
// attaches the servo on pin 9 to the servo object
myservo.attach(servoPin);
// set the initial position of the servo, as fast as possible, wait until done
myservo.write(0,255,true);
}
void loop() {
// move the servo to 180, max speed, wait until done
// write(degrees 0-180, speed 1-255, wait to complete true-false)
myservo.write(180,255,true);
// move the servo to 180, slow speed, wait until done
myservo.write(0,30,true);
}
You can probably see the similarities and differences between the original Sweep sketch and this one.
In the header of this sketch, you include the VarSpeedServo library and create the myservo object. You set the servo signal pin to 9.
In the loop() function, you attached the servo at pin 9 to the myservo object.
You then send the first command to the servo by using the myservo.write() function. This looks the same as in the original Sweep sketch, except that is takes three arguments, not just one.
It looks like this: myservo.write(position, speed, wait);
The function accepts three parameters:
- first, an integer which represents the degree we’d like the servo to turn to. For example, 15 degrees.
- Second, the speed argument which controls how fast the movement should be. Top speed is 255, stopped is 0, and anything is between is allowed.
- And third, the wait argument that can block the program at this line and wait for the motor to finish its movement. To enable blocking set this argument to “true”. If you want to allow the sketch continue instead of block and let the servo finish its movement on its own, set this argument to “false”.
Nice, isn’t it?
What do you think happens in the loop() function?
Add a potentiometer
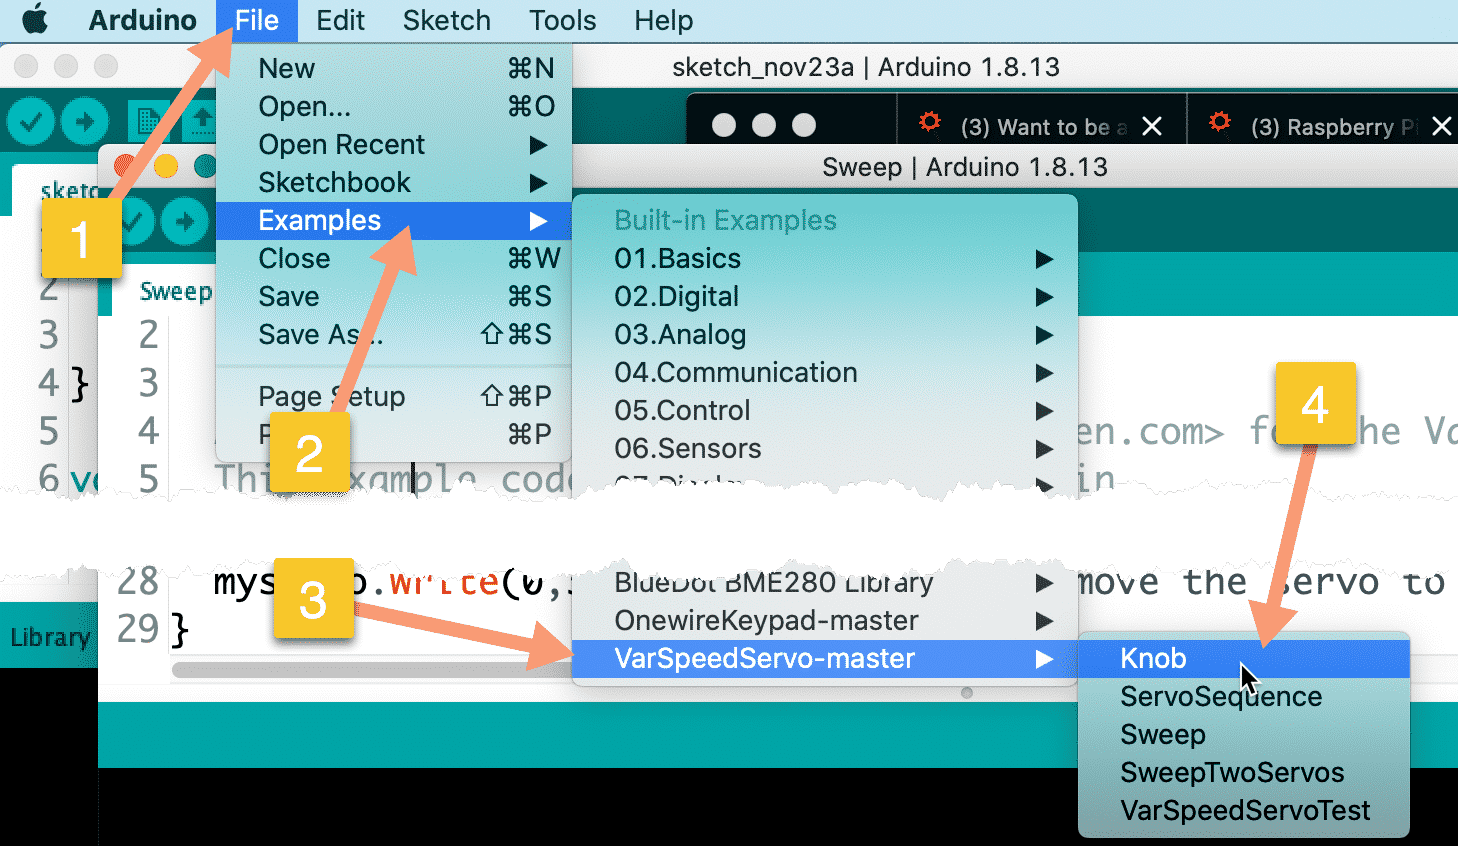
Let’s now connect the potentiometer, like we did in the second part of the first project, and load the VarSpeedServo example sketch titled Knob into the Arduino IDE. You will find this sketch under File ("1") --> Examples ("2") --> VarSpeedServo-master ("3") --> Knob ("4").

Here it is:
#include <VarSpeedServo.h>
// create servo object to control a servo
VarSpeedServo myservo;
// analog pin used to connect the potentiometer
const int potPin = 0;
// the digital pin used for the servo
const int servoPin = 9;
// variable to read the value from the analog pin
int val;
void setup() {
// attaches the servo on pin 9 to the servo object
myservo.attach(servoPin);
}
void loop() {
// reads the value of the potentiometer (0 to 1023)
val = analogRead(potPin);
// scale it to use it with the servo (0 to 180)
val = map(val, 0, 1023, 0, 180);
// sets the servo position according to the scaled value
myservo.write(val);
// waits a bit before the next value is read and written
delay(15);
}
Compare this against the sketch from the second part of the first project.
Isn’t it almost identical?
Notice how the sketch above also makes use of the myservo.write(val) function, with just a single argument? The VarSpeedServo library allows you to use the familiar functions from the build-in Servo library, so that any existing sketches you may have lying around will still work. You get the additional functionality, as we saw in the Sweep sketch, for free!
An exercise
Can you build a circuit that contains a servo motor and three buttons?
- When you press button 1, the motor moves to 60 degrees.
- When you press button 2, it moves to 90 degrees.
- When you press button 3, it moves to 180 degrees.
Learn more
If you would like to learn how to use servo motors with your Arduino, consider enrolling to Arduino Step by Step Getting Serious.
We have a full section (Section 17) with 10 lectures dedicated to this topic.

New to the Arduino?
Arduino Step by Step Getting Started is our most popular course for beginners.
This course is packed with high-quality video, mini-projects, and everything you need to learn Arduino from the ground up. We'll help you get started and at every step with top-notch instruction and our super-helpful course discussion space.
Jump to another article
2. How to drive a DC motor without a motor driver module
3. What is "microstepping"?
4. Direct current motor
5. Project 1: Control two DC motors with your Arduino and the L298N controller
6. Project 2: Control speed and direction with a potentiometer
7. Project 3: DC motor control with a distance sensor
8. Project 1: Control a servo motor with a potentiometer
9. Project 2: Servo motor control with VarSpeedServo

Done with the basics? Looking for more advanced topics?
Arduino Step by Step Getting Serious is our comprehensive Arduino course for people ready to go to the next level.
Learn about Wi-Fi, BLE and radio, motors (servo, DC and stepper motors with various controllers), LCD, OLED and TFT screens with buttons and touch interfaces, control large loads like relays and lights, and much much MUCH more.
Last Updated 1 year ago.
We publish fresh content each week. Read how-to's on Arduino, ESP32, KiCad, Node-RED, drones and more. Listen to interviews. Learn about new tech with our comprehensive reviews. Get discount offers for our courses and books. Interact with our community. One email per week, no spam; unsubscribe at any time