Introduction to the ESP32 guide series
ESP32 Communications options
In this lesson, you will learn about the various communications capabilities of the ESP32, and specifically about communications between sensors and integrated circuits, or other devices such as mobile phones and the Internet.

In this lesson, you will learn about the various communications capabilities of the ESP32, and specifically about communications between sensors and integrated circuits, or other devices such as mobile phones and the Internet.
You can watch the video, or if you are the “reading” type, you can read the text below.
How does the ESP32 communicate with its environment?
Most of the 38 pins of the ESP32 module are broken out in two rows of pins in the ESP32 dev kit, but not all of them.

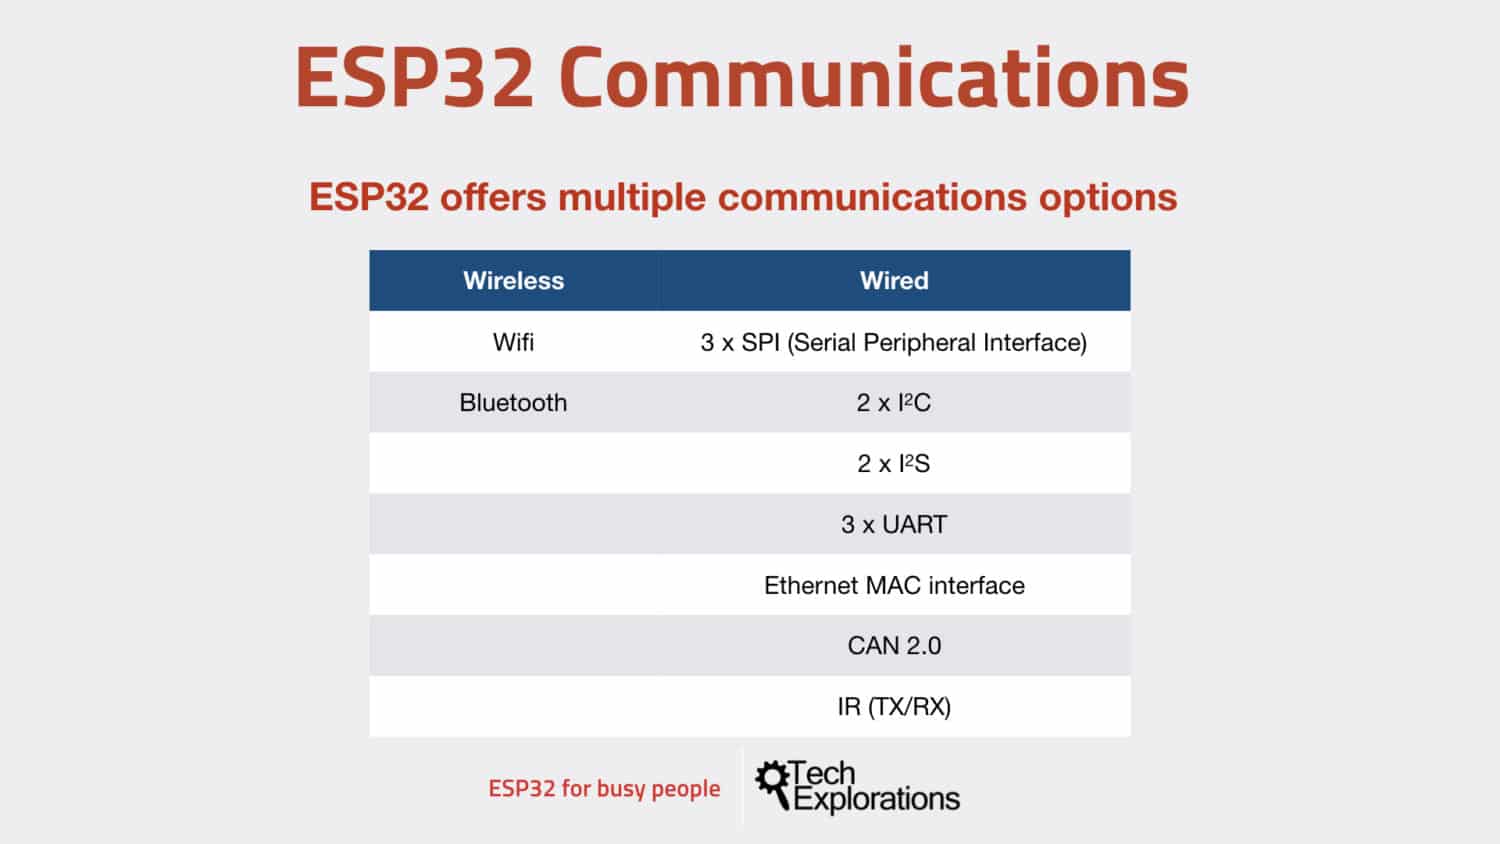
A summary of the communications options of the ESP32.
On the left, you’ve got the main wireless capabilities, namely Wi-Fi and Bluetooth.
And on the right, you’ve got the wired capabilities, which allow the ESP32 to be connected to either other ESP32 and microcontrollers or smaller devices like sensors.
There are three SPI channels.
There are two I2C channels (“Inter-integrated circuit”), and two I2S, which is a lesser-known communications technology. I2S stands for “Inter IC for Sound,” and it’s an electrical serial bus, just like the I2C, but typically used for connecting digital audio devices.
We also have three serial interfaces, an Ethernet MAC interface, a CAN bus (“Controller Area Network bus”), which is typically used in vehicle applications, automotive applications, and allow microcontrollers and devices to communicate with each other in cars.
And finally, there are hardware for infrared (“IR”) serial communications.
Functional block diagram
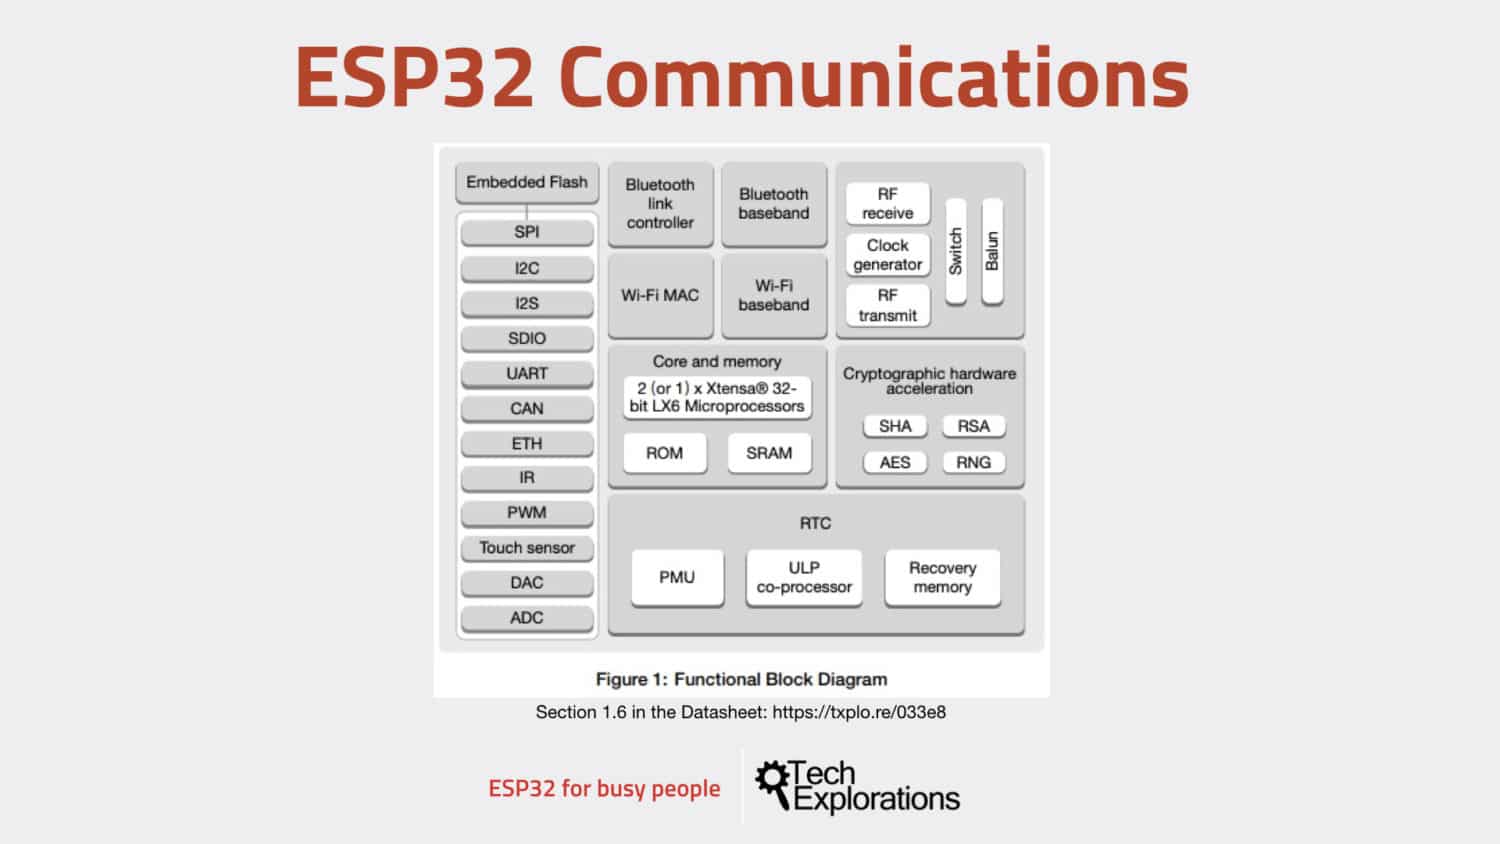
You can see how these capabilities are laid out in the functional block diagram below.

The ESP32 functional block diagram.
Let’s have a closer look at each one of these capabilities.
Wi-Fi is integrated into the module, and you find everything that you need to use to connect to a Wi-Fi network or to create a Wi-Fi hotspot.
There is the antenna circuit with an amplifier, various filters, and power management.
As far as Wi-Fi protocols are concerned, there are 802.11 b, g, and n. The 802.11n networking supposed up to one 150 Mbits/s bandwidth, with support for Wi-Fi multimedia.
You can find more details in the datasheet in Section 3.5.
For Bluetooth, the ESP32 is compliant with classic Bluetooth 4.2, and BLE (Bluetooth Low Energy) specifications.
It contains a Class 1 2 and 3 transmitters, and it can simultaneously advertise and scan.
Again there are more details in the datasheet.
There are three SPI channels, up to 80 MHz in frequency. All of them can go up to 80 MHz.
The ESP32 contains two full I2C bus interfaces, and they can be configured to operate as a master or a slave, standard, or fast mode.
We’ll be using I2C in the video course to connect the ESP32 to things such as sensors, in particular, the BME280 and the LCD screen with the I2C backpack.
There are also two I2S interfaces, which are typically used in audio applications.
And of course, the ubiquitous UART (Universal asynchronous receiver transmitter). Three of those interfaces are present. We can use them with any serial device.
In addition to the above, there’s also the infrared receive and transmit communication capability, and an Ethernet MAC adapter so we can connect to a local ethernet network.
As you can see, the ESP32 is quite a lot of capabilities to communicate with devices, near or far away via the Internet.
And we’ll be demonstrating most of these capabilities in this course.
Now, let’s turn our attention to power. You will need to provide power to your ESP32 somehow, and in the next lesson, you will learn of three ways to do just that.
Ready for some serious learning?
Enrol to
ESP32 for Busy People
This is our comprehensive ESP32 course for Arduino Makers.
It's packed with high-quality video, mini-projects, and everything you need to learn Arduino from the ground up.
Just click on the big red button to learn more.
Jump to another article
Lessons
1: The ESP32 module
2: The ESP32 Devkit
3: The ESP32 vs Arduino
4: The ESP32 GPIOs
5: The ESP32 communications
6: The ESP32 devkit power supply
7: Setting up ESP32 in the Arduino IDE on Mac OS
8: Setting up ESP32 in the Arduino IDE on Windows 10
9: Install the drivers CP2102 for the USB bridge chip
10: Digital output LED
11: Digital output PWM
Last Updated 2 years ago.
We publish fresh content each week. Read how-to's on Arduino, ESP32, KiCad, Node-RED, drones and more. Listen to interviews. Learn about new tech with our comprehensive reviews. Get discount offers for our courses and books. Interact with our community. One email per week, no spam; unsubscribe at any time
