Circuits guide series
Optoisolator: a simple way to electrically separate parts of a circuit
An optoisolator is a device that allows two parts of a circuit to communicate using photon instead of electrons. This way, you can electrically isolate two parts of a circuit.

For those cases where you need complete isolation between two circuits, while provisioning for basic on/off type interaction, you can use an optoisolator (also known as "optocoupler").
Disadvantages of the relay
As an example, consider the relay. With a relay, you can control a high voltage/current circuit using a low-power signal generated from a low-power circuit.
A relay works well, but it is a noisy, electro-mechanical component. Apart from the clicking sound that is the result of the solenoid's mechanical motion that connects two of the relay's conductive pads, you also have to consider the short finite lifetime of the component.
All this means that any gadget that contains an electro-mechanical relay is subject to the wear and tear of the mechanical parts, the relatively low on/off switching speed, and the electrical noise created by the coil every time the current changes.
Relays are also bulky when compared to most other parts of an electronic device.
Advantages of the optoisolator
The optoisolator deals with all of these problems.
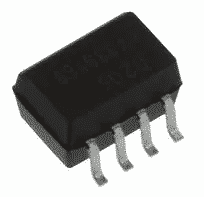
Typically, an optoisolator comes in the form of a small integrated circuit that looks like any other IC on your PCB.
Below is an example: the ILD205T from Vishay.

The ILD205T optocoupler from Vishay
Optoisolator integrated circuits often contain multiple channels. This means that you can drive more than one high-powered circuits from the same optoisolator. They provide complete electrical isolation between the two circuits since the operating principle is light, rather than electromagnetism through a coil.
Anatomy of the optoisolator
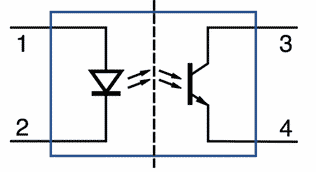
Inside an optoisolator IC you will find an LED that generates light at near-infrared, and a photosensor that is sensitive to this light. In between those two components is a closed optical channel that routes the light from the LED to the sensor. There are also electronics that are used to electrically interface the LED and sensor with their respective sides of the external circuits.
In the diagram below (from Wikipedia), you can see the input pins 1 and two which drive the integrated LED, and the output pins 3 and 4 that are driven by a photodiode or similar photo-sensitive component.

Image courtesy of Wikipedia
Concerning tolerances, optoisolators can be impressive. A small, cheap (~$4), common optoisolator like the ILD205T comes in an SMD SOIC-8 package, contains two channels, require just 10mA (and can tolerate up to 100mA) to turn the embedded LED on at 6V. At the output side, it can drive loads up to 70V. The opto-isolator can deal with differential voltages of up to 4000V.
Here is the datasheet for the ILD205T, a commonly used optoisolator.
Optoisolator applications
What can you do with an optoisolator that you can't do efficiently (or at all) with a relay? Driving a DC motor without a motor driver, PWD of high-powered LEDs are a couple of examples. Another good use of this device is for protecting your Arduino. Anything that involves motors, mains power, and often radios, could benefit from optoisolators.
The Tech Explorations Subscription program
Subscribe and access all of our video courses immediately.
With a catalog of 25+ premium video courses (and growing), this subscription gives you an amazing resource to boost your learning.
Jump to another article
1. Pull-up & pull-down resistors
2. What is a bypass/decoupling capacitor?
3. What is the purpose of the diodes in a keypad circuit?
4. Logic level shifting
5. Why should you use a diode in a relay driver circuit?
6. Why use a voltage divider with a photoresistor?
7. Optoisolator: a simple way to electrically separate parts of a circuit
8. Use MOSFETs to drive large(ish) loads
New to the Arduino?
Arduino Step by Step Getting Started is our most popular course for beginners.
This course is packed with high-quality video, mini-projects, and everything you need to learn Arduino from the ground up. We'll help you get started and at every step with top-notch instruction and our super-helpful course discussion space.

Done with the basics? Looking for more advanced topics?
Arduino Step by Step Getting Serious is our comprehensive Arduino course for people ready to go to the next level.
Learn about Wi-Fi, BLE and radio, motors (servo, DC and stepper motors with various controllers), LCD, OLED and TFT screens with buttons and touch interfaces, control large loads like relays and lights, and much much MUCH more.
Last Updated 1 year ago.
We publish fresh content each week. Read how-to's on Arduino, ESP32, KiCad, Node-RED, drones and more. Listen to interviews. Learn about new tech with our comprehensive reviews. Get discount offers for our courses and books. Interact with our community. One email per week, no spam; unsubscribe at any time

