Arduino peripherals guide series
How to find your device I2C address
How do you find out the address of an I2C device that is poorly documented?

The I2C bus is shared so that a single data line can deliver communications between a single master (like an Arduino) and several slave devices (like LCD screens and real-time clocks).
How to find the I2C address of a device
So, how do you know which address belongs to a device, especially since in most cases, the manufacturer will not tell you?
The easiest way is to use an I2C address scanner.
The scanner is a small sketch that you can upload on your Arduino.
Connect the device you want to probe to the Arduino (preferably without connecting other I2C devices at the same time), and run the sketch.
The scanner will cycle through all possible I2C addresses, and once it receives a response from the device, it will inform you of the address that worked.
Then, repeat the process for other I2C devices.
How to deal with I2C address conflict
What if there is a conflict? What if you have two devices that "listen" on the same address?
In that case, you must select an alternate address for one of the devices.
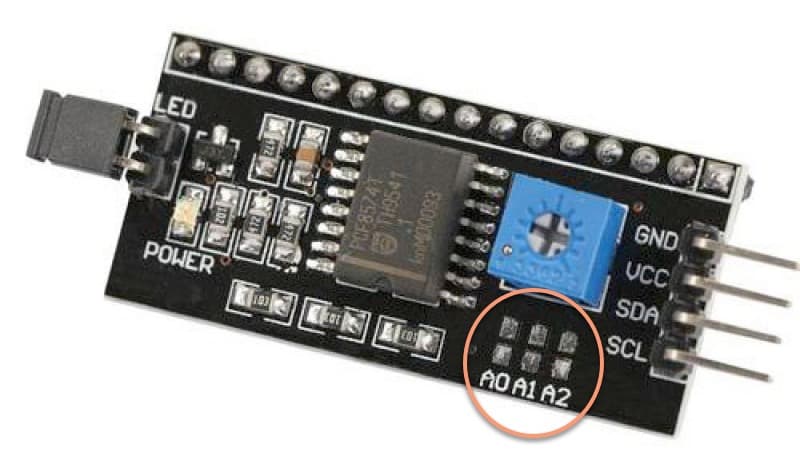
Let's take, for example, the common parallel to I2C LCD adapter. In most cases, it has a default address of 0x27. You can choose to change this address to something else.

An I2C LCD display adaptor. The red circle shows the position of the I2C address configuration pads.
On this board, there are three pairs of pads, titled A0, A1, and A2.
You can change the address by creating shorts between these pads with a soldering iron and some solder.
If there is no documentation to tell you which short combination creates which address, then repeat the probing process I described at the start of this email to determine the new I2C of the device.
Many I2C devices offer a similar method of configuring an alternate address. While solder pads are most common, you can also find versions that use jumpers or switches.
New to the Arduino?
Arduino Step by Step Getting Started is our most popular course for beginners.
This course is packed with high-quality video, mini-projects, and everything you need to learn Arduino from the ground up. We'll help you get started and at every step with top-notch instruction and our super-helpful course discussion space.
Jump to another article
2. Basics of the TimerOne library
3. How to find device I2C address
4. Getting started with I2C on the Arduino
5. Using I2C: True digital to analog conversion on the Arduino Uno
6. How accurate are thermometer sensors?
7. MCP9808: an accurate thermometer module for your Arduino
8. Getting useful motion data from the MPU-6050 device
9. What to do with unused pins on an Atmega328P or Attiny85?

Done with the basics? Looking for more advanced topics?
Arduino Step by Step Getting Serious is our comprehensive Arduino course for people ready to go to the next level.
Learn about Wi-Fi, BLE and radio, motors (servo, DC and stepper motors with various controllers), LCD, OLED and TFT screens with buttons and touch interfaces, control large loads like relays and lights, and much much MUCH more.
Last Updated 2 years ago.
We publish fresh content each week. Read how-to's on Arduino, ESP32, KiCad, Node-RED, drones and more. Listen to interviews. Learn about new tech with our comprehensive reviews. Get discount offers for our courses and books. Interact with our community. One email per week, no spam; unsubscribe at any time

