Arduino Sensors & Actuators guide series
Temperature and barometric sensor BME280
Atmospheric pressure is defined as the weight of a column of air above an object. Measuring the atmospheric pressure has several applications. We will be measuring atmospheric pressure by using the BME280 sensor.

Measuring the atmospheric pressure has several applications.
Obviously, if you are a meteorologist, knowing the pressure at a geographical location helps forecasting the weather. But there's more.
Atmospheric pressure is defined as the weight of a column of air above an object.
As the height of a column of air above an object changes depending on its altitude, so does the weight of that column.
Atmospheric pressure at the surface of the sea is higher than that on the top of a tall mountain because the column of air above it is higher. Therefore, measuring the atmospheric pressure is also a simple way of figuring out your altitude, or the altitude of one of your flying gadgets.
The standard unit for measuring atmospheric pressure is "Pa", or "Pascals". At sea level, the standard pressure is defined to be 101.325 kPa, or 101,325 Pa.
The BME280 sensor
We will be measuring atmospheric pressure by using the BME280 sensor. This sensor costs around $8 on eBay. It can measure pressure from 300hPa to 1100hPa, which converts to around 500 meters below sea level to 9,000 meters above sea level.
It's accuracy is also excellent, around 0.03hPa. "hPa" is pronounced "hectoPascal".
Another nice thing about this sensor is that it also measures the temperature.
The BME280 talks to other devices via the I2C interface, a digital serial communications interface that only needs two wires for communication, and two for power.
One communication wire is called SDA, and it transmits data, while the second, SCL, is for the clock signal.
A clock signal is needed because I2C is a synchronous interface.
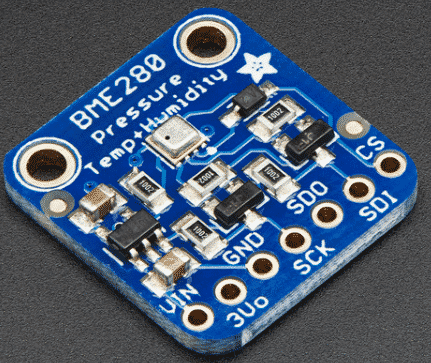
The sensor uses 3.3V or 5V, which the Arduino conveniently provides. Here's what this sensor looks like (below).

The BME280 measures pressure by taking advantage of the piezo-resistive property that silicon and germanium have.
This property involves the change in resistance in those materials depending on the amount of mechanical load that is put on them.
Assembly
Let's puts together this circuit and try out the sensor.
We will need:
- An Arduino
- Four jumper wires
- A BME280 sensor device
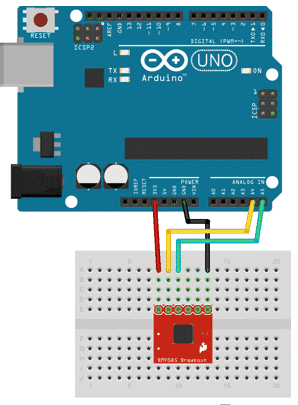
This is very simple wiring using the I2C protocol:
- Connect Vin to the power supply, 3-5V is fine. Use the same voltage that the microcontroller logic is based off of. For most Arduinos, that is 5V
- Connect GND to common power/data ground
- Connect the SCK pin to the I2C clock SCL pin on your Arduino. On an UNO, this is also known as A5,
- Connect the SDI pin to the I2C data SDA pin on your Arduino. On an UNO, this is also known as A4.

Sketch
Done with the assembly, lets work on the sketch now.
To begin reading sensor data, we need to install the Adafruit_BME280 library. It is available from the Arduino library manager so we recommend using that.
From the IDE open up the library manager following the menu Sketch/Include Library/ Manage Libraries And type in adafruit bme280 to locate the library. Click Install and wait until it is finished.
Also add the Adafruit Unified Sensor library the same way.
Here's the sketch, it comes straight of the examples that are included with the Arduino IDE. I have added some comments to help you understand what is going on (here is the sketch on Github):
#include  //*Include the Wire library which allows to use the I2C interface*
#include
#include  //*library to easily take readings from the sensor*

#define SEALEVELPRESSURE_HPA (1013.25)

Adafruit_BME280 bme; //*Declare the bpm variable, an easy to remember reference for the device*

unsigned long delayTime;

void setup() {
    Serial.begin(9600); //*Setup serial communication and speed*
    Serial.println(F("BME280 test"));

    bool status;

    status = bme.begin();  //*Try to start the device*
    if (!status) { //*If it is not starting, print message*
        Serial.println("Could not find a valid BME280 sensor, check wiring!");
        while (1); //* Go in an endless loop. This prevents the Arduino from calling the loop function*
    }

    Serial.println("-- Default Test --");
    delayTime = 1000;

    Serial.println();
}

void loop() {
    printValues();
    delay(delayTime);
}

void printValues() {
    Serial.print("Temperature = "); //*Read and print temperature*
    Serial.print(bme.readTemperature());
    Serial.println(" *C");

    Serial.print("Pressure = "); //*Read and print pressure*
    Serial.print(bme.readPressure() / 100.0F);
    Serial.println(" hPa"); // Calculate altitude assuming 'standard' barometric pressure of 1013.25 millibar = 101325 Pascal

    Serial.print("Approx. Altitude = ");
    Serial.print(bme.readAltitude(SEALEVELPRESSURE_HPA)); //*Read and print altitude*
// you can get a more precise measurement of altitude if you know the current sea level pressure which willvvary with weather and such. If it is 1015 millibars that is equal to 101500 Pascals.


    Serial.println(" m");

    Serial.print("Humidity = ");
    Serial.print(bme.readHumidity()); //*Read and print humidity*
    Serial.println(" %");

    Serial.println();
}
Now we'll run this sketch and look at the monitor output:
And that is how you connect and use the BME280 barometric sensor with the Arduino!
Ready for some serious Arduino learning?
Start right now with Arduino Step by Step Getting Started
This is our most popular Arduino course, packed with high-quality video, mini-projects, and everything you need to learn Arduino from the ground up.
Jump to another article
1: Introduction
2: How to make an LED blink
3: How to make an LED fade
4: How to use a button
5: How to use a potentiometer
6: Infrared line sensor
7: Measuring light
8: Detect tilt and impact
9: Measuring acceleration
10: Detect motion with the ultrasonic sensor
11: Detect motion with PIR sensor
12: Temperature and barometric sensor BME280
13: Measuring Temperature And Humidity
Last Updated 2 years ago.
We publish fresh content each week. Read how-to's on Arduino, ESP32, KiCad, Node-RED, drones and more. Listen to interviews. Learn about new tech with our comprehensive reviews. Get discount offers for our courses and books. Interact with our community. One email per week, no spam; unsubscribe at any time
