Arduino Sensors & Actuators guide series
Measuring temperature and humidity
The DHT22 is a versatile, affordable, and reliable sensor that is widely used for measuring temperature and humidity in various projects. This guide provides information on the sensor's operational parameters, wiring instructions, and a sketch for extracting temperature and humidity readings.
Introduction
In this article, we will explore the DHT22 (or DHT11) sensor, which is widely used for measuring temperature and humidity. This versatile digital sensor provides accurate readings without the need for additional calculations or conversions. Let's dive into the details and learn how to use this sensor effectively.
The DHT22 sensor
Understanding the DHT22 Sensor
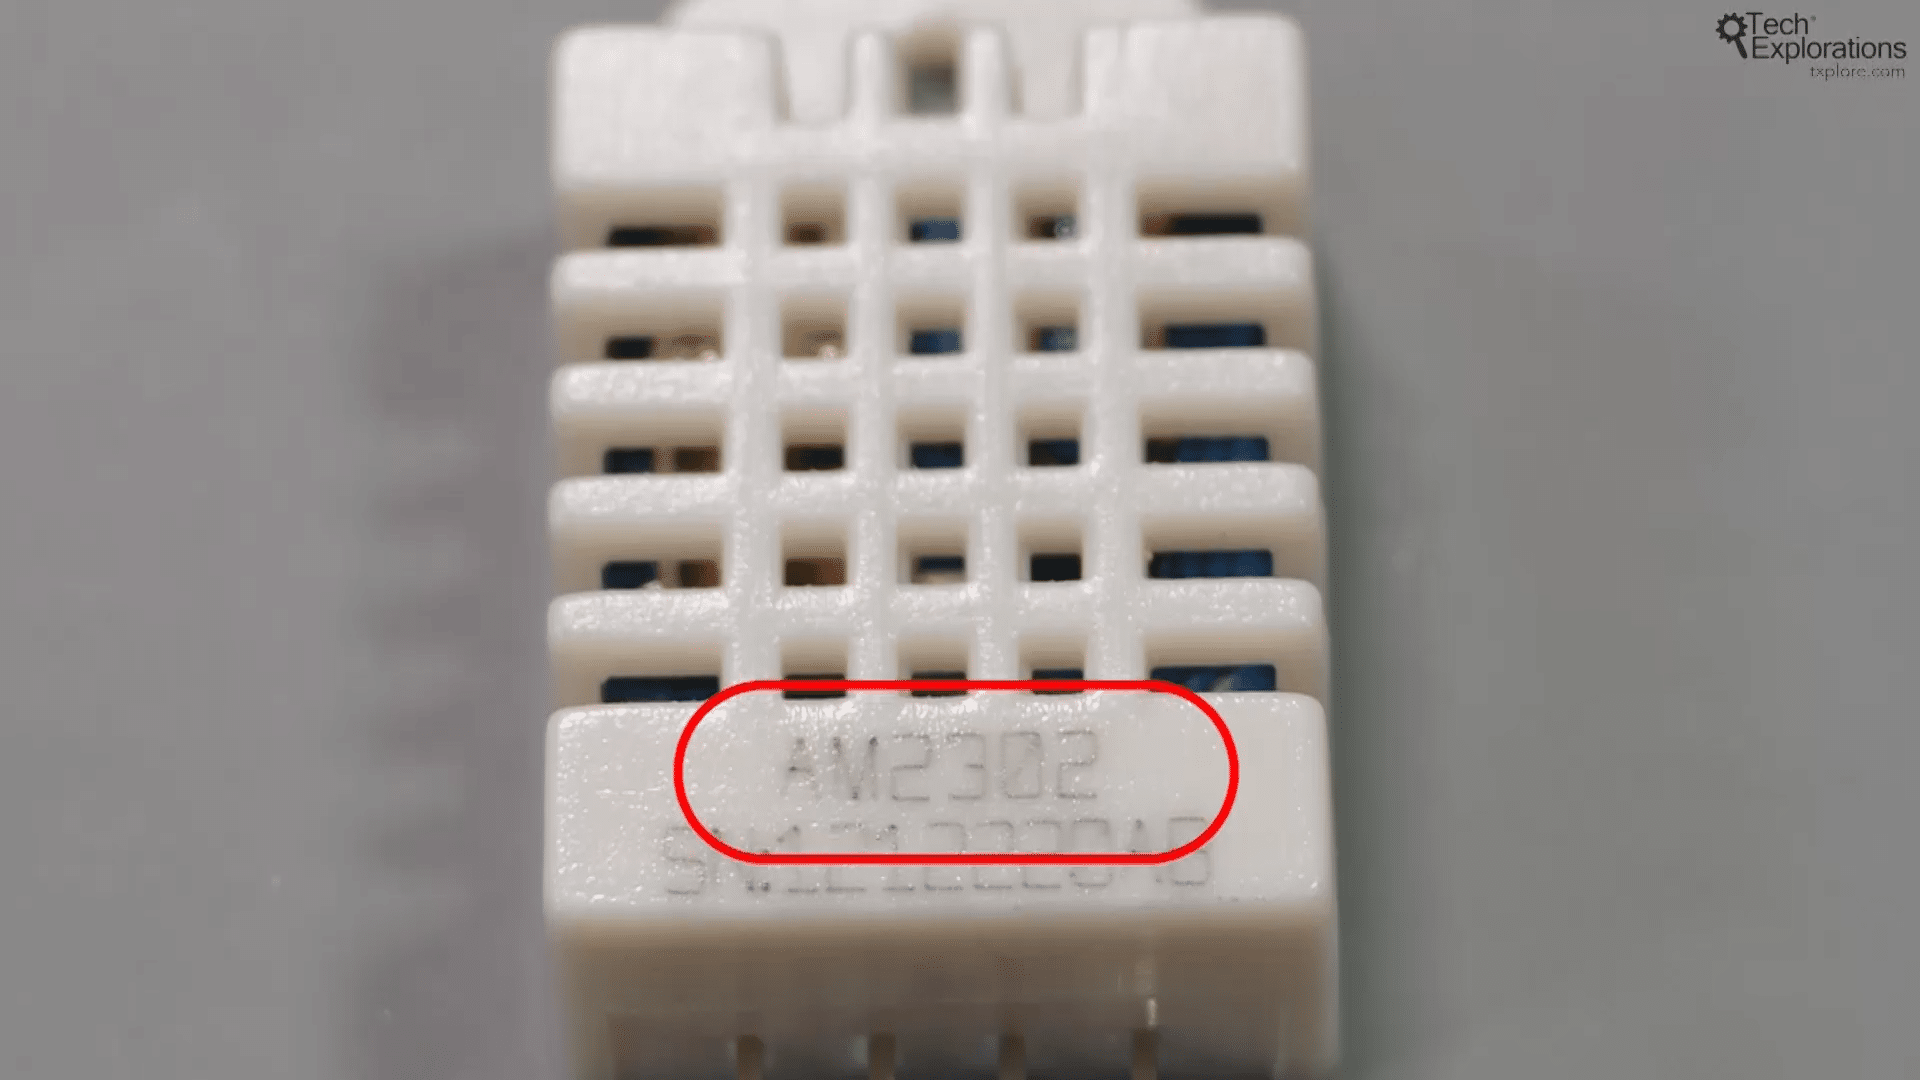
The DHT22 sensor, also known as the AM2302, operates within a power supply range of 3.3 to 6 volts DC. This flexibility allows it to be used with various Arduino boards. It can be used with 3.3V Arduino boards like the Arduino Due or Arduino Pro Mini. Just connect it to the 3.3V pin. If you're using it with the 5V Arduino Uno, connect it to the 5V pin.
The DHT22 sensor, also known as the AM2302
The sensor's operational parameters indicate that it can measure temperatures ranging from -40 to 80 degrees Celsius and relative humidity from 0 to 100 percent. With an accuracy of ±0.5 degrees Celsius for temperature and ±2 percent for relative humidity, the DHT22 provides reliable results for most applications. In case you require higher precision, I have another article that introduces the BMP180, a more accurate environmental sensor for temperature and humidity. Additionally, the DHT22 offers a resolution of 0.1 percent for relative humidity and 0.1 degrees Celsius for temperature.
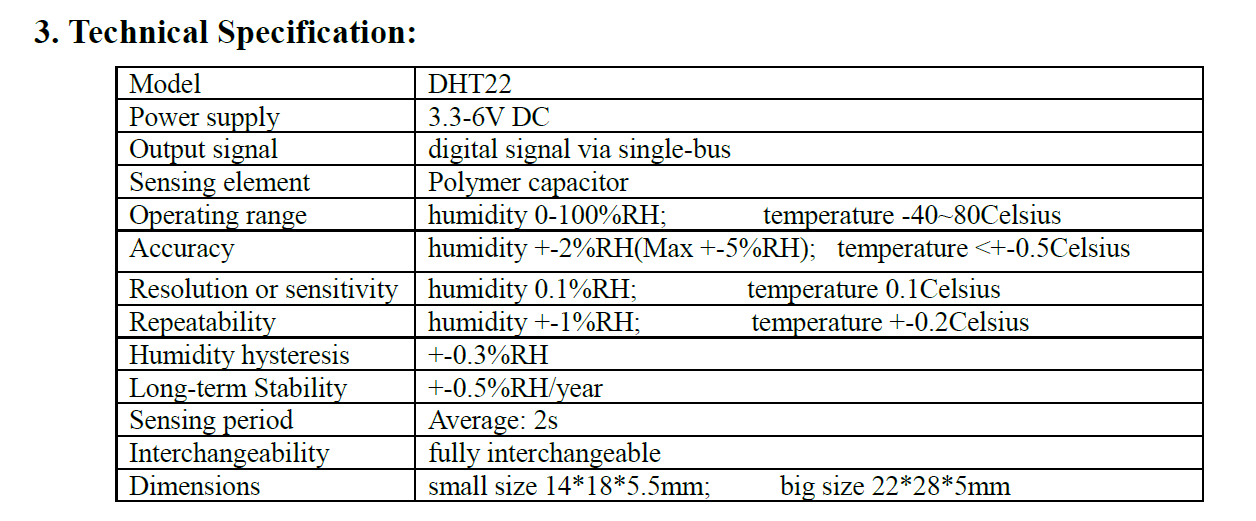
The sensor's datasheet provides information about its operational parameters.
It is important to note that the DHT22 sensor operates at a slow speed, taking about two seconds to provide a reliable reading to the microcontroller. Therefore, avoid making frequent calls to the sensor for new values.
Wiring
Wiring Diagram
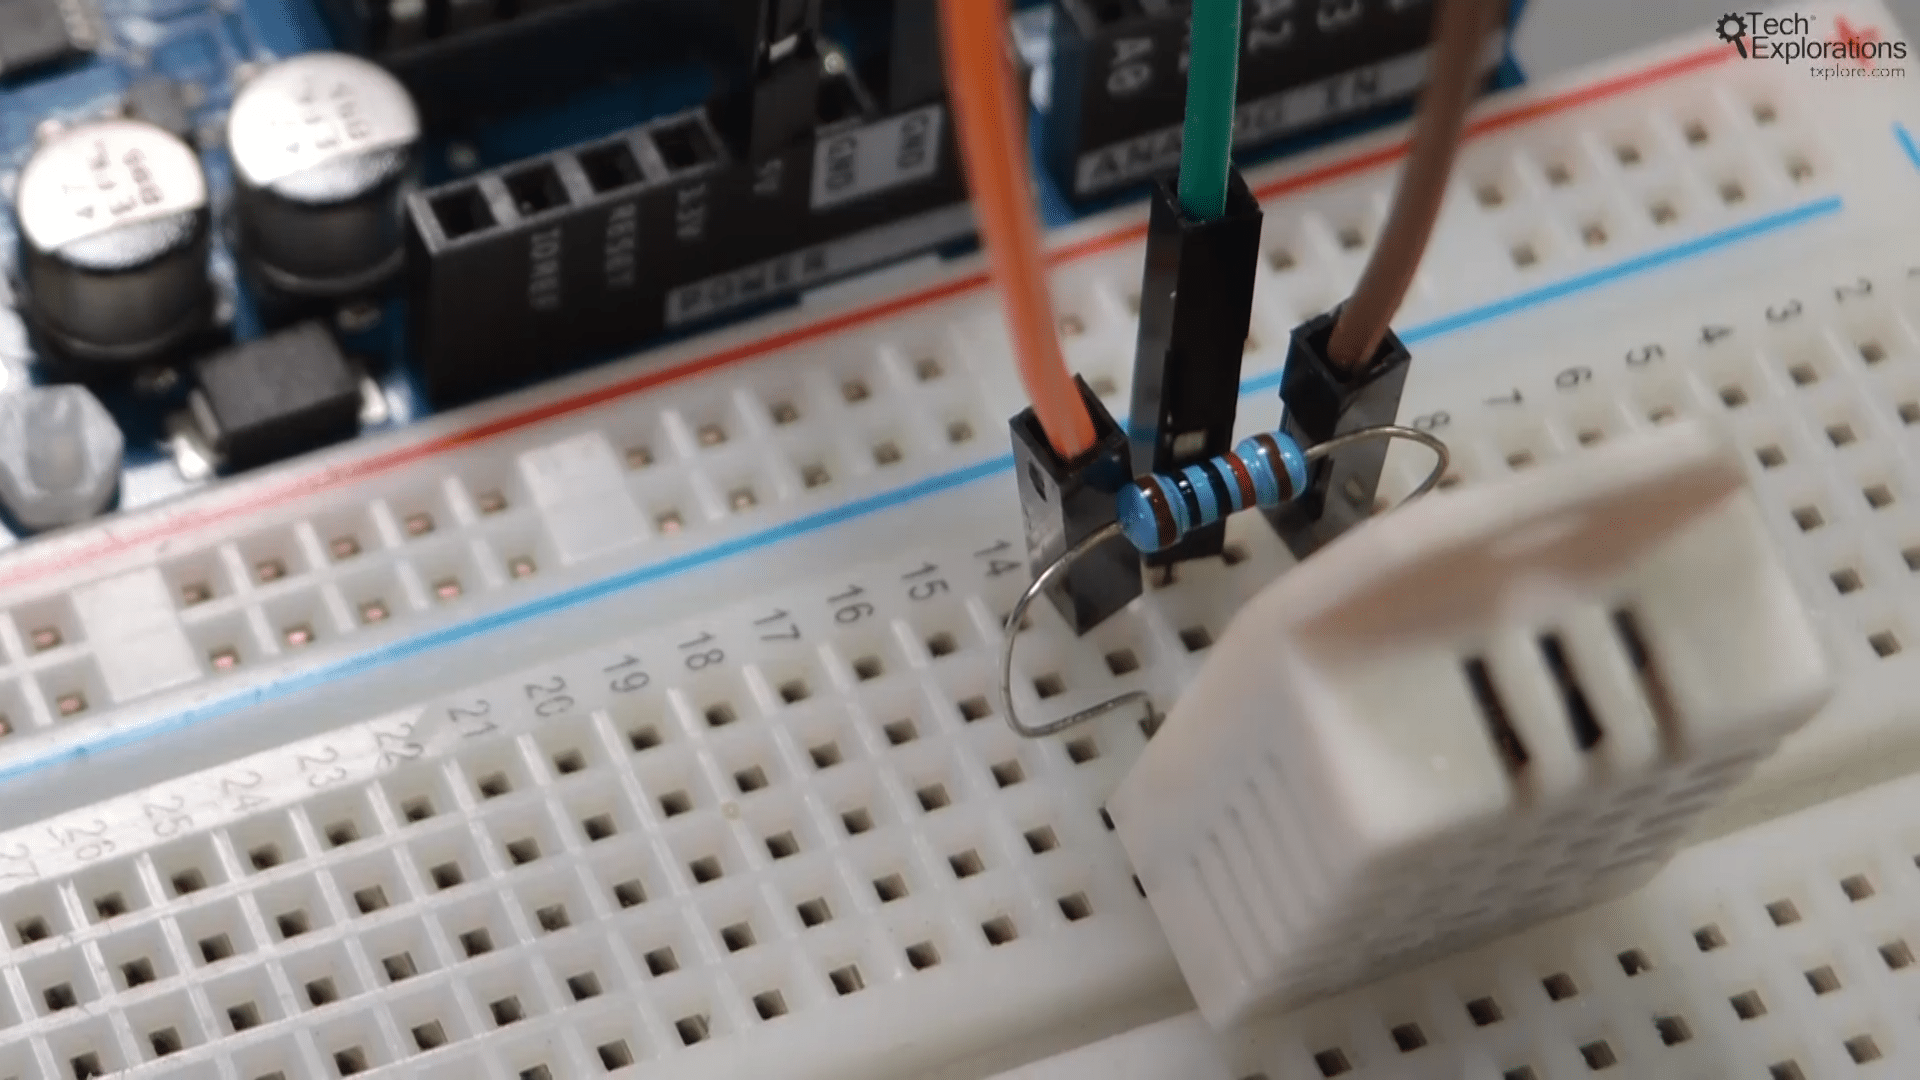
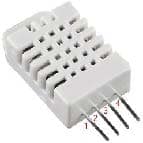
Below you can see the wiring diagram. Make sure to orient the sensor with the grill facing you, not the back, to ensure the correct pin numbering.
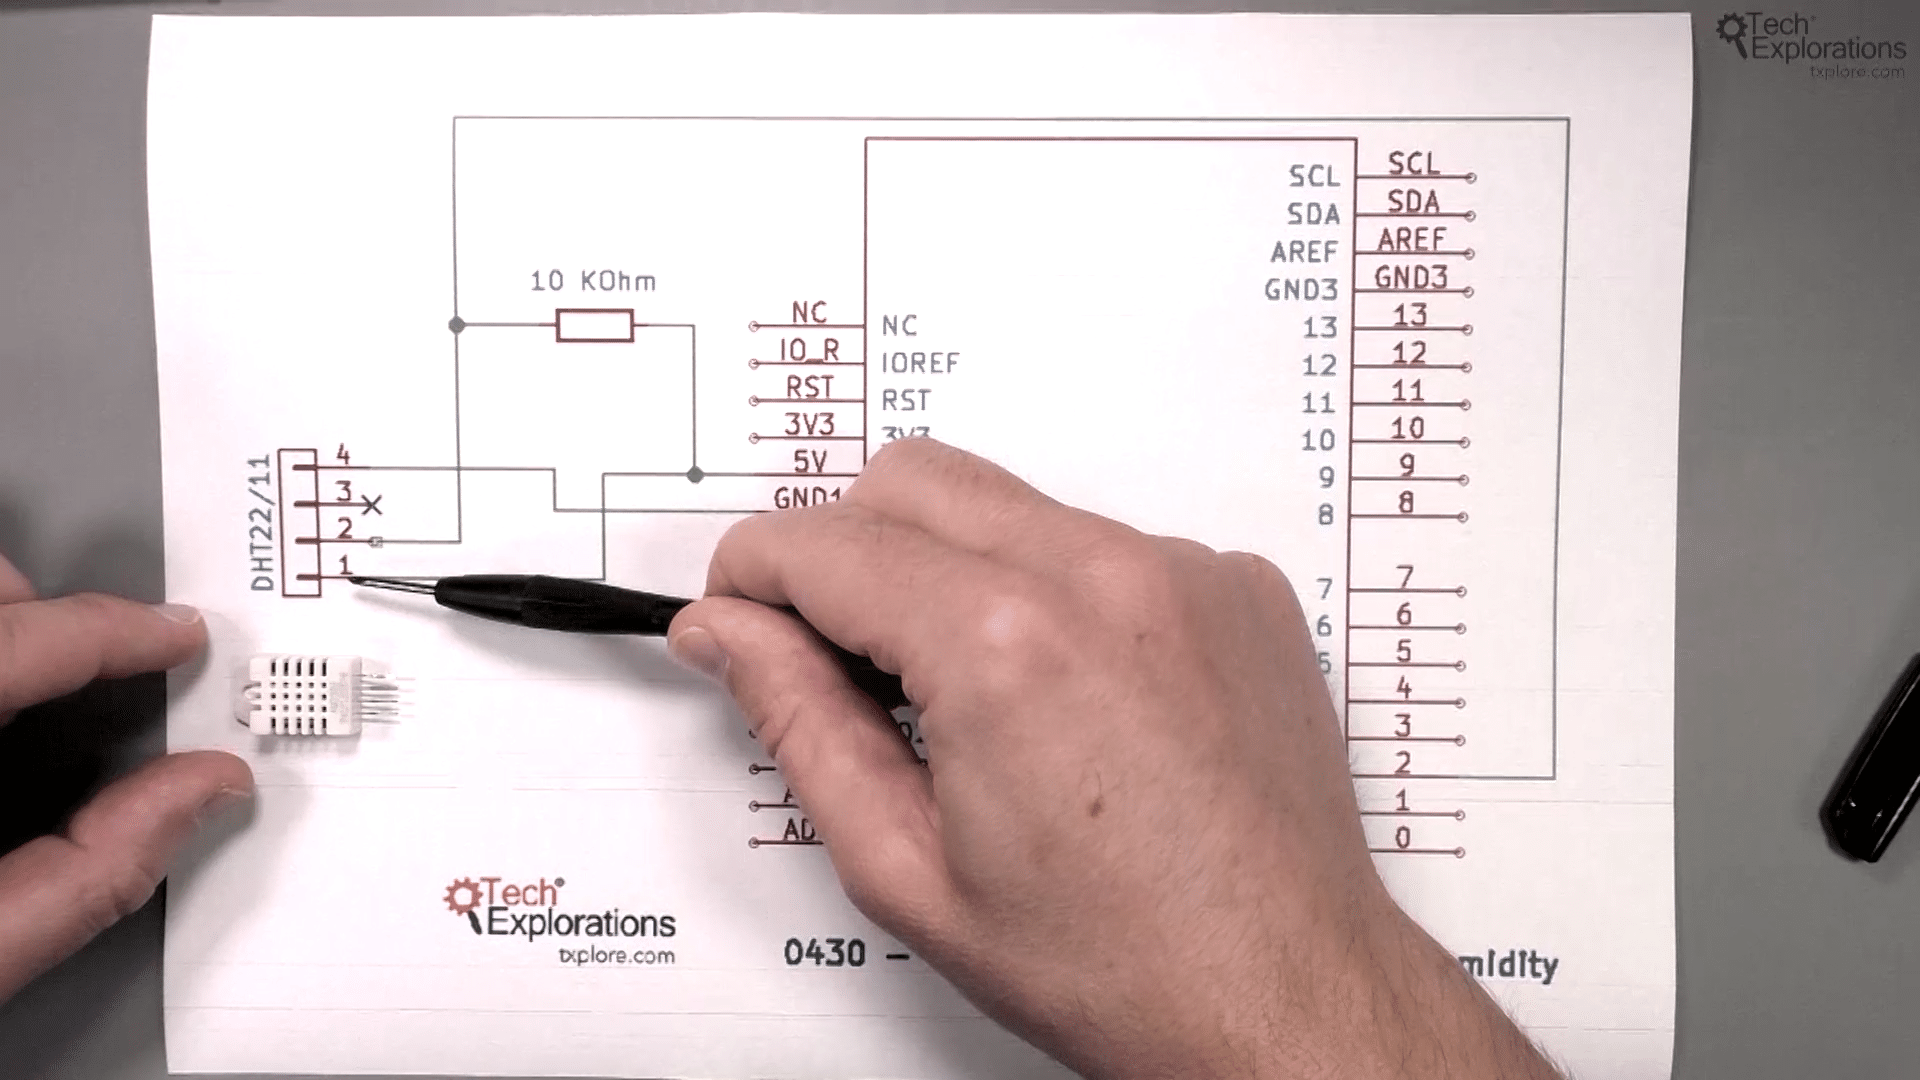
Pin number one is located on the leftmost end of the sensor, while pin number four is on the rightmost end. In some cases, you may come across DHT22 sensors with only three pins. These are typically sold as part of a breakout for the sensor. In these cases, the number three pin is left unconnected. You can simply push it up and set it aside.
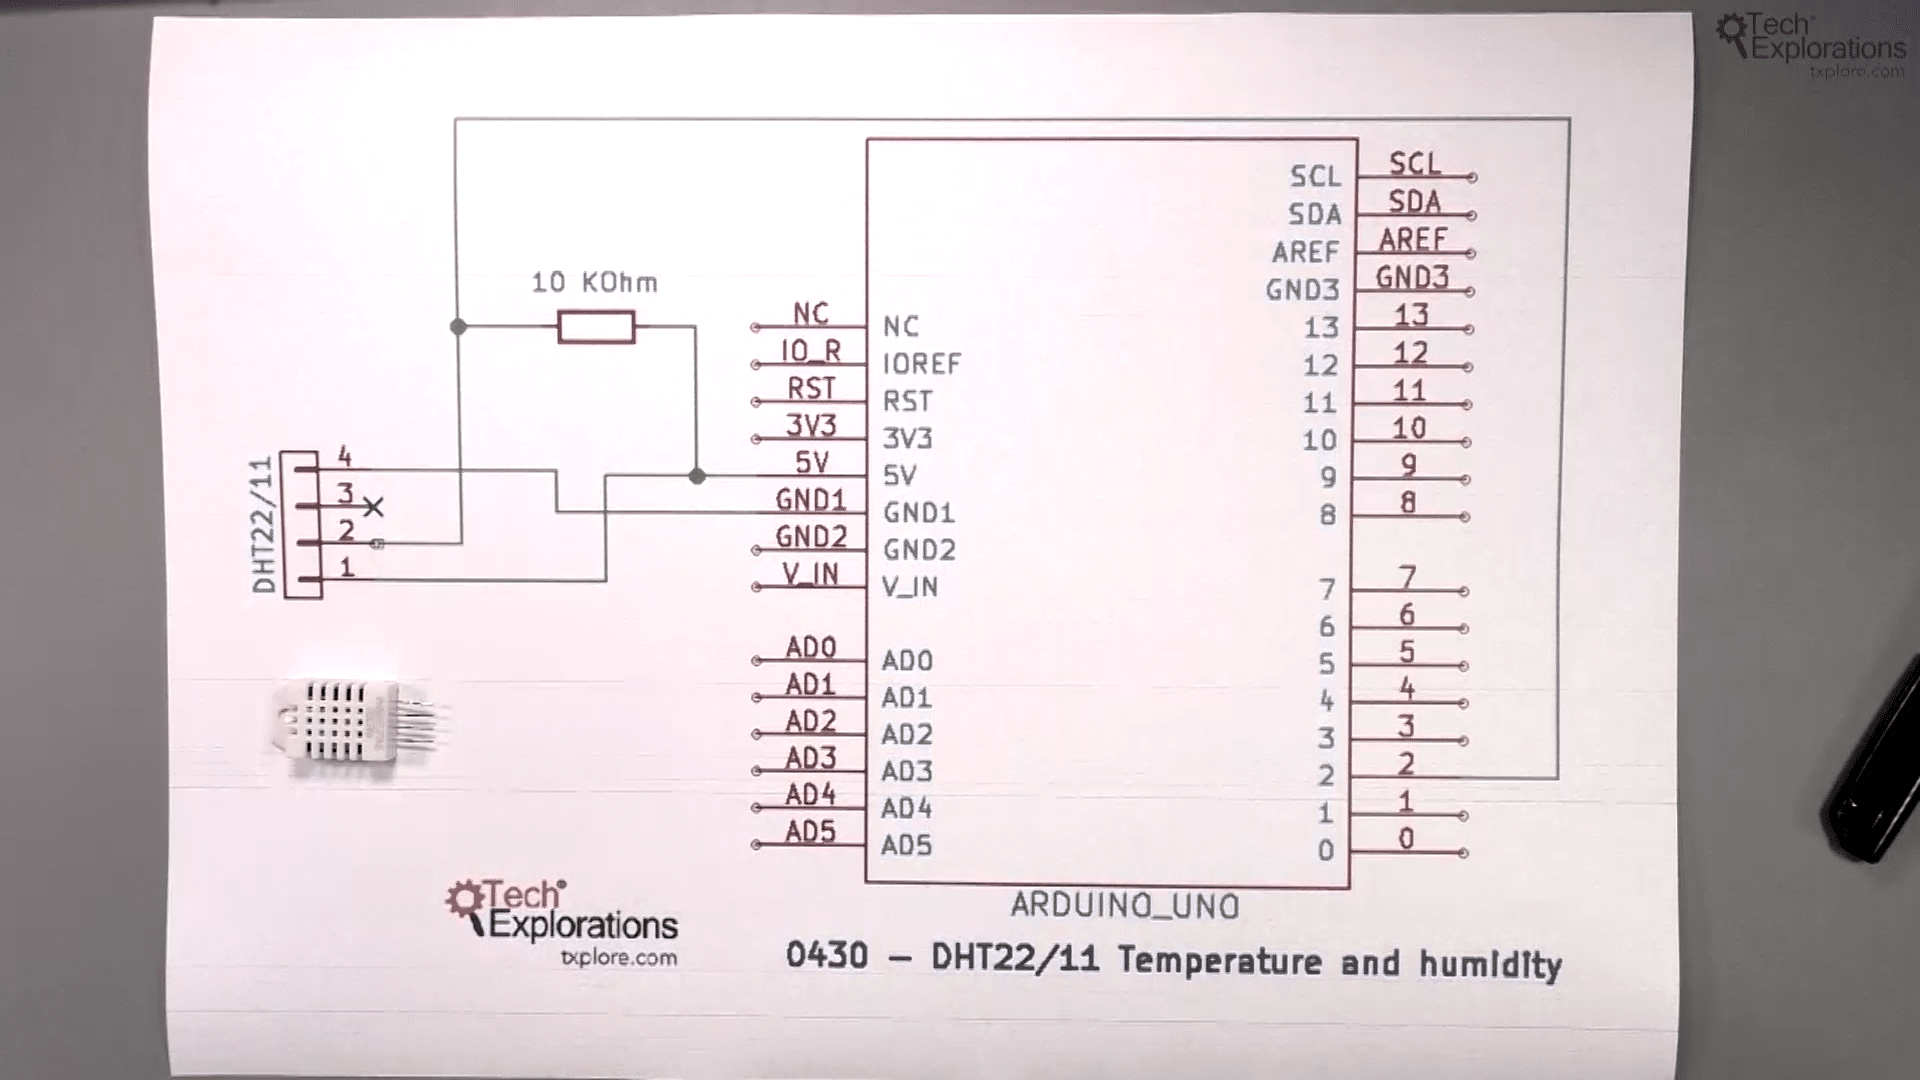
Wiring the DHT22 Sensor
To wire the DHT22 sensor to an Arduino board, follow these simple steps:
- Connect pin number 1 of the sensor to the 5-volt pin on the Arduino (or the 3.3-volt pin for a 3.3-volt Arduino).
- Connect pin number 4 of the sensor to the ground pin on the Arduino.
- Connect pin number 2 of the sensor (the data pin) to a digital pin on the Arduino (e.g., digital pin number 2). You can configure it to use any of the available digital pins on your Arduino.
- Include a 10 kiloohm pull-up resistor between pin number 2 and the 5-volt pin. This resistor ensures a stable voltage when the sensor is not transmitting data.
Pull-Up Resistors
A pull-up resistor is used to pull up the voltage at pin number two to five volts. This ensures a defined voltage when the DHT sensor is not transmitting any data, preventing a condition called floating. In this case, a strong pull-up resistor with a value of 10 kiloohms is used, but pull-up resistors can range from 10 kiloohms to 50 or 100 kiloohms, or even higher.
To better understand the concept of pull-up and pull-down resistors, you can refer to my article here. It provides background information and a deeper understanding of the role of this resistor.
Sketch
Below is the sketch that provides some information about the connections as well.
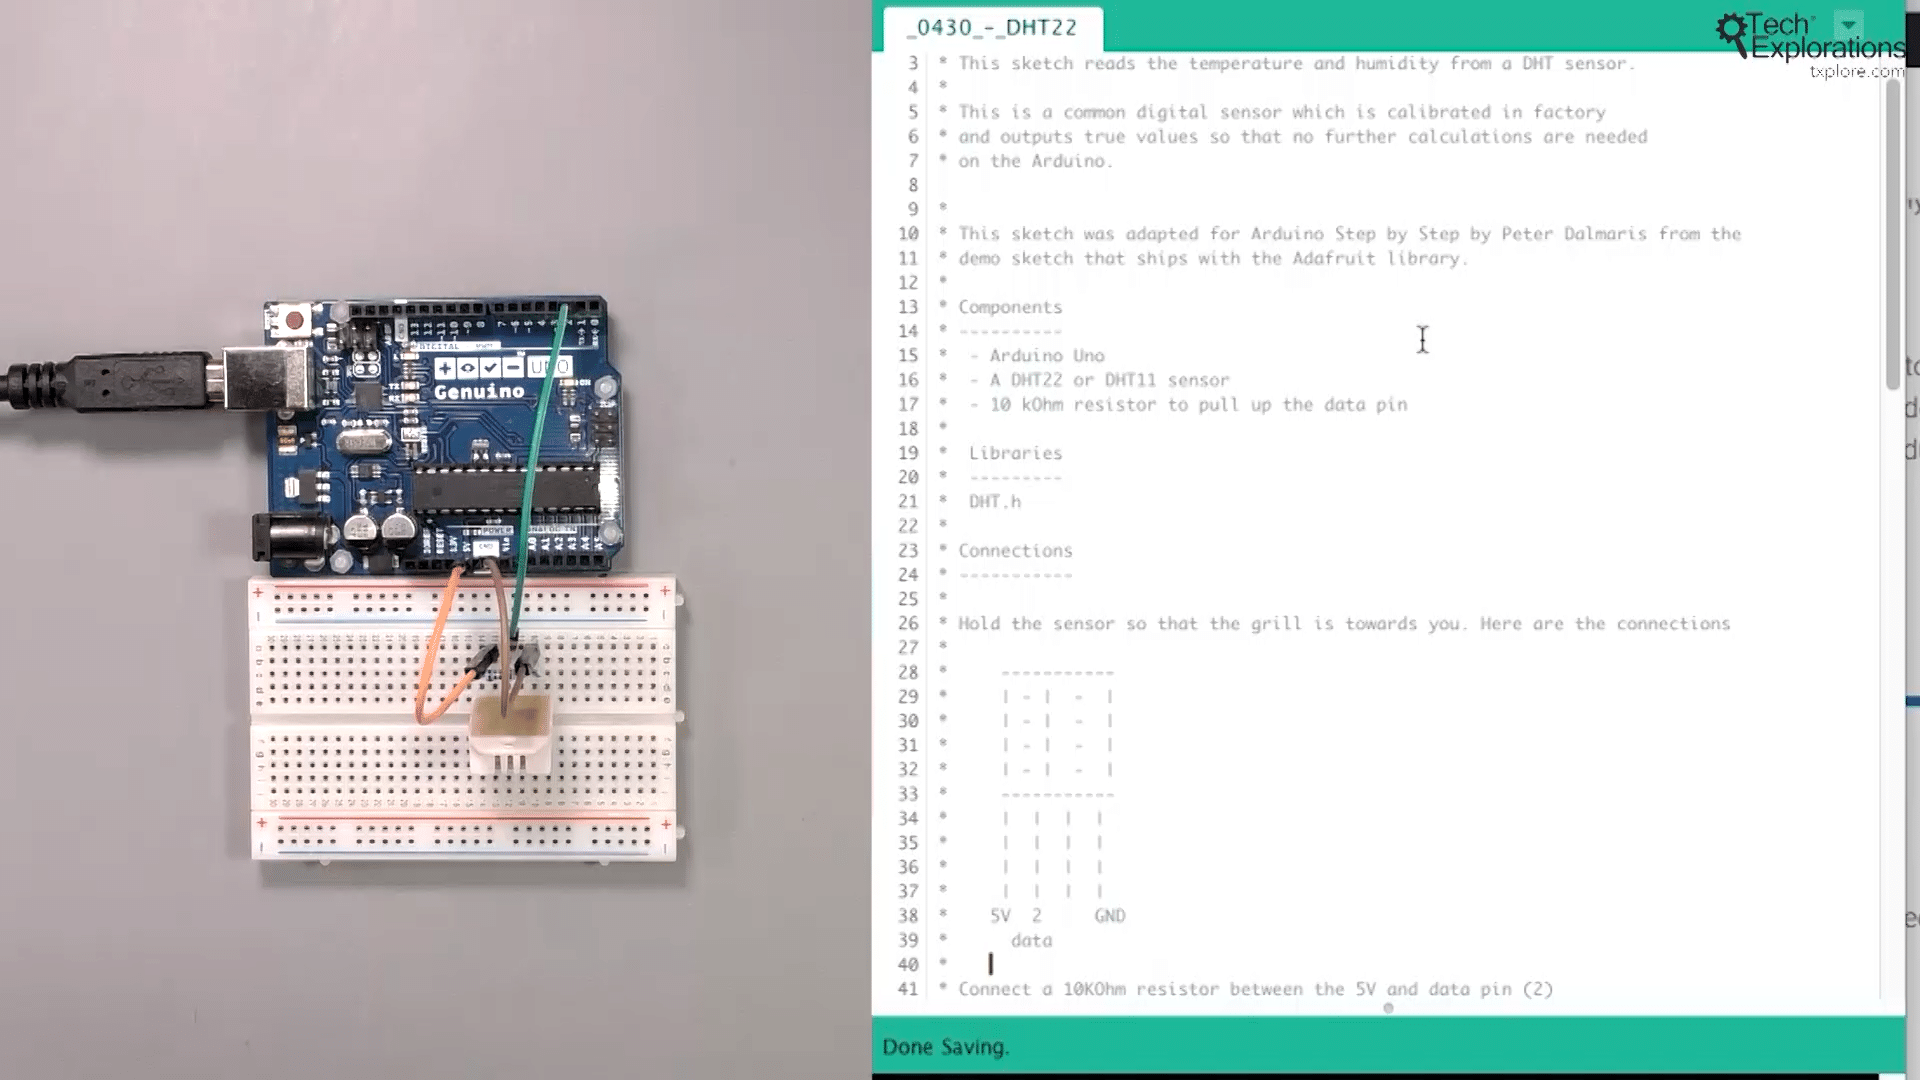
Extracting Temperature and Humidity Readings
To extract temperature and humidity readings from the DHT22 sensor, we use the Adafruit DHT library. This library supports various DHT sensors, including the DHT22, and provides functions for reading the temperature and humidity values from the sensor.
#include "DHT.h"
Within the Arduino sketch, specify the sensor type (DHT22) and the data pin connected to the sensor (e.g., digital pin number two, or you can adjust it to whichever digital pin you have available).
#define DHTTYPE DHT22
#define DHTPIN 2
In line 76 of the sketch, the C language dht object is created. The parameters for the data pin and type are passed in.
#define DHTPIN 2
In the setup() method, the serial monitor is started and a message is printed to begin. Then, the sensor is started.
In the loop(), there is a two-second delay between subsequent measurements, as stated in the datasheet.
Remember to include a two-second delay between subsequent measurements to allow the sensor to provide accurate readings.
After the two-second delay, the humidity measurement is obtained by calling the readHumidity() function on the dht object, and the result is stored in a floating-point variable called h. The same process is repeated for temperature with the dht.readTemperature() function.
By default, the library provides temperature readings in Celsius. To get readings in Fahrenheit, the true parameter must be passed into the readTemperature() function. This eliminates the need to create a custom function for Celsius to Fahrenheit conversion.
Next, a check is performed to ensure that the sensor is functioning properly. If the sensor is malfunctioning, the values obtained may not be actual numbers and could be something like "not available" or garbage. The function isnan() is used to check if the values are valid numbers before printing them on the serial monitor.
The results for humidity and temperature in Fahrenheit or Celsius are printed with Serial.print(). The computeHeatIndex() function calculates the heat index, which is the perceived temperature based on the combination of actual temperature and humidity. The library internally calculates the heat index using the humidity and temperature readings. If you want to learn more about the heat index, you can refer to the relevant Wikipedia article. The table in the article shows examples of how the perceived temperature differs from the measured temperature based on relative humidity.
Uploading the Sketch
All right, let's upload the sketch and see the hardware in action. Currently, the humidity in my lab is around 30 percent, the temperature is 21 degrees Celsius, and the heat index is 19 percent. Due to the low humidity, the apparent temperature is slightly lower than the actual temperature.
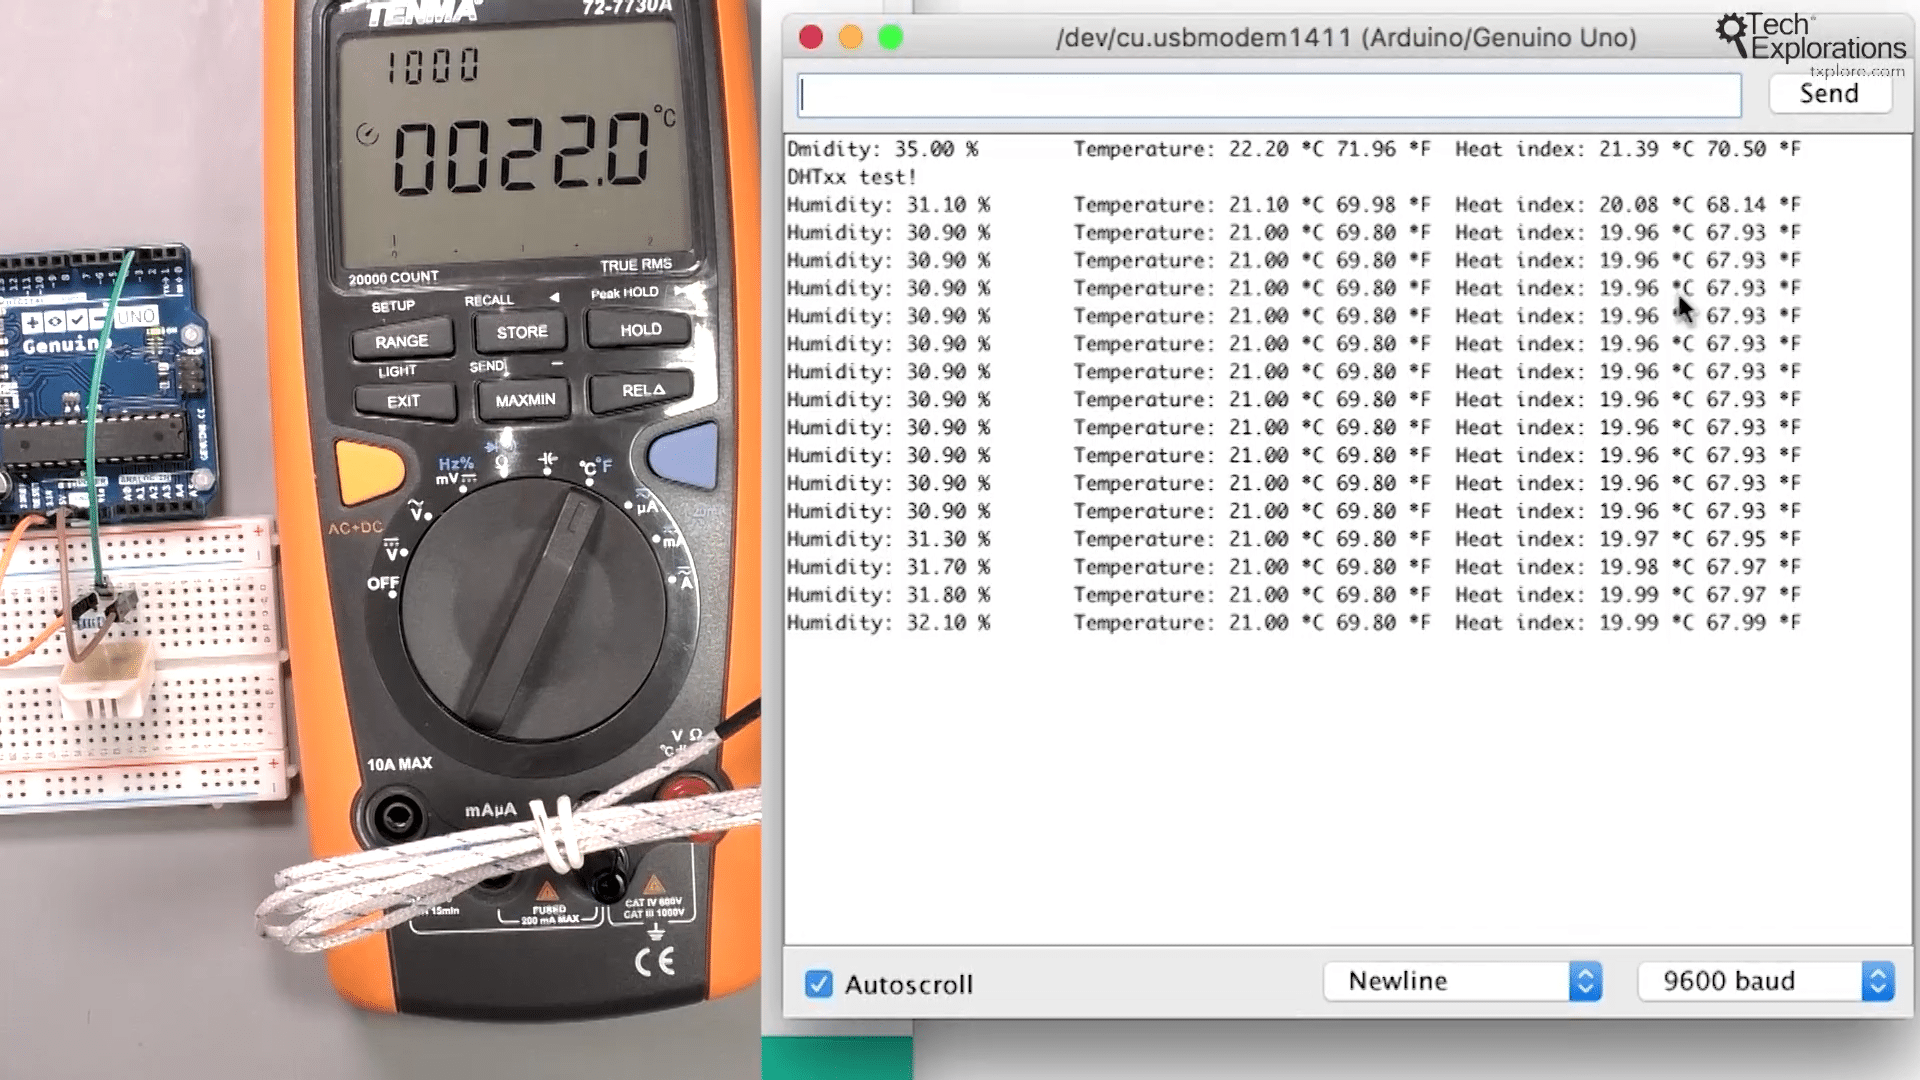
Testing the accuracy of the DHT22 with a multimeter
To test the accuracy of the DHT22, I can use my multimeter. According to my multimeter, the current temperature is 22 degrees Celsius, while the DHT22 is giving me a reading of 21 degrees Celsius. However, it's important to note that my multimeter is not perfect either. I don't have a calibrated temperature meter or thermometer specifically for lab use, so I can't determine which reading is more accurate. Nevertheless, for most users, a slight difference of 21 to 22 degrees Celsius is not significant.
Interpreting the Results
Once you have obtained the temperature and humidity readings, you can use them for various purposes. If desired, you can calculate the heat index, which is particularly useful for understanding how humans perceive the temperature in a given environment. Keep in mind that the DHT22 sensor might not be as fast as other sensors, as it takes about two seconds to provide a reliable reading. Therefore, avoid querying the sensor too frequently to allow for accurate data collection.
Conclusion
The DHT22 sensor is an excellent choice for measuring temperature and humidity in various projects. Its simplicity, affordability, accuracy, and reliability make it a popular option among hobbyists and professionals alike.
Whether you are building an environmental monitoring system or simply curious about the weather conditions, the DHT22 sensor is a valuable tool to have in your electronics toolkit/highly recommended sensor for anyone who is developing an environment gadget.
If you have any questions or need further assistance, feel free to reach out. Happy sensing!
Ready for some serious Arduino learning?
Start right now with Arduino Step by Step Getting Started
This is our most popular Arduino course, packed with high-quality video, mini-projects, and everything you need to learn Arduino from the ground up.
Jump to another article
1: Introduction
2: How to make an LED blink
3: How to make an LED fade
4: How to use a button
5: How to use a potentiometer
6: Infrared line sensor
7: Measuring light
8: Detect tilt and impact
9: Measuring acceleration
10: Detect motion with the ultrasonic sensor
11: Detect motion with PIR sensor
12: Temperature and barometric sensor BME280
13: Measuring Temperature And Humidity
Last Updated 2 years ago.
We publish fresh content each week. Read how-to's on Arduino, ESP32, KiCad, Node-RED, drones and more. Listen to interviews. Learn about new tech with our comprehensive reviews. Get discount offers for our courses and books. Interact with our community. One email per week, no spam; unsubscribe at any time
