Arduino Sensors & Actuators guide series
How to use a momentary button
In this article, I will show you how to use a momentary button with the Arduino.

A button is a simple on-off switch. There are many kinds of buttons, distinguished by the mechanism used to close or open a circuit, but essentially all buttons belong to one of two families: those that keep the connection in either an open or a closed state, and those that return to their original (default) state.
In the image below you can see some examples of switches.

Three types of switches: (1) Toggle switch, (2) On/off switch, (3) momentary button
In this image you can see:
- A toggle switch. It stays open or closed after pushing it.
- An on/off switch that also remains open or closed.
- A momentary button that remains closed while pressure is applied to it, then returns to the open position.
A keyboard key or a door bell button are both momentary buttons. Momentary buttons are also known as "biased" because they have a tendency to return to their original position. A light switch, on the other hand, stays at the position it was put in, so it is often called "un-biased".
Simulation
I have recorded a short video to show you how to run this experiment inside a simulator. This is the best way to experiment with the Arduino if you don't have the real thing. Be sure to read the complete tutorial to understand the details of the circuit and the sketch.
But if you are in a hurry, watch this video.
Experiment
Let's create a simple circuit to demonstrate a button.
We don't really need the Arduino for this. A battery, an LED, a resistor and the button itself would suffice.
But, using the Arduino is simple enough, and it's already got an LED in pin 13 we can use anyway, and no need to worry about a battery pack.
Plus, we can use the monitor to actually see a message when the button is pressed.
So, we'll setup this circuit:

A simple button circuit. When you press the button, the LED turns on.
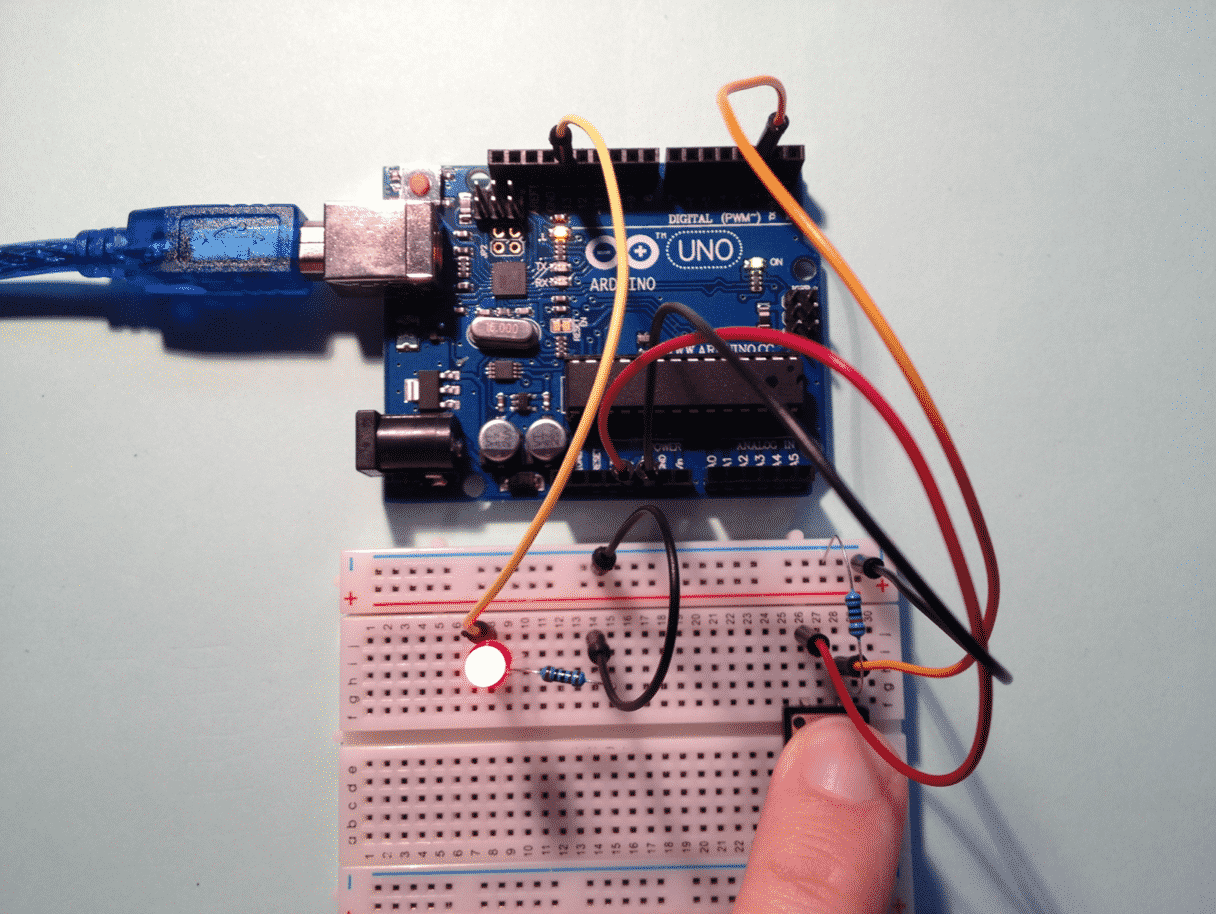
Once assembled, your circuit will look like this:

The button circuit on a breadboard.
The sketch
The sketch is simply taking a reading from digital pin 2, where one of the pins of the button is connected, and writing a value to digital pin 13, where the LED is connected.
I could have written this script to be even smaller, but I will leave that for you to do as an exercise.
/*
    Pushbutton sketch a switch connected to pin 2 lights the LED on pin 13
*/

const int ledPin = 13;    // choose the pin for the LED
const int inputPin = 2;   // choose the input pin (for a
                          // pushbutton)
void setup() {
	pinMode(ledPin, OUTPUT); // declare LED as output
	pinMode(inputPin, INPUT); // declare pushbutton as input
}

void loop(){
	int val = digitalRead(inputPin); // read input value
	if (val == HIGH)
		{
			digitalWrite(ledPin,HIGH);
		} else
		{
			digitalWrite(ledPin,LOW);
		}
}
And that's how you can use a momentary button with the Arduino!
Ready for some serious Arduino learning?
Start right now with Arduino Step by Step Getting Started
This is our most popular Arduino course, packed with high-quality video, mini-projects, and everything you need to learn Arduino from the ground up.
Jump to another article
1: Introduction
2: How to make an LED blink
3: How to make an LED fade
4: How to use a button
5: How to use a potentiometer
6: Infrared line sensor
7: Measuring light
8: Detect tilt and impact
9: Measuring acceleration
10: Detect motion with the ultrasonic sensor
11: Detect motion with PIR sensor
12: Temperature and barometric sensor BME280
13: Measuring Temperature And Humidity
Last Updated 1 year ago.
We publish fresh content each week. Read how-to's on Arduino, ESP32, KiCad, Node-RED, drones and more. Listen to interviews. Learn about new tech with our comprehensive reviews. Get discount offers for our courses and books. Interact with our community. One email per week, no spam; unsubscribe at any time