Arduino Sensors & Actuators guide series
Measure the distance to another object with the ultrasonic sensor
There are many types of technologies that can be used to make a proximity sensor. In this article, we focus on the ultrasonic sensor, which is essentially a "land sonar": it emits a high frequency sound, far beyond what the human ear can hear, and waits for the echo.

There are lots of applications where we not only need to know that an object, or a person, in nearby, but also how far they are.
Imagine a robot moving around in a room. The robot can use a distance (or proximity) sensor to detect that it is approaching a wall or another object. Or, you could use a proximity sensor to automatically open a door if a person is within a meter of the sensor.
You find such sensors in cars (to help with parking and to avoid small accidents), and in smart phones where the smartphone can detect, for example, that the phone is held against the user's head, useful so that the screen is turned off to avoid accidental touchscreen input.
The ultrasonic sensor
There are many types of technologies that can be used to make a proximity sensor.
In this lecture we will focus on the ultrasonic sensor, which is essentially a "land sonar": it emits a high frequency sound, far beyond what the human ear can hear, and waits for the echo.
Once it captures the echo, it counts the time that elapsed between the emission of the ultrasound signal and the capture of its echo, and based on that it calculates the approximate distance of the object that produced the echo.

Ultrasonic sensors are solid-state devices, very reliable and cheap. Especially in indoor environments, and for small spaces (or measuring small distances), these sensors represent a good choice. Anything that is solid enough to allow sounds to bounce will work with these sensors.
If you want to measure or detect things like smoke and clouds, you will need to use something else, perhaps a microwave doppler radar.
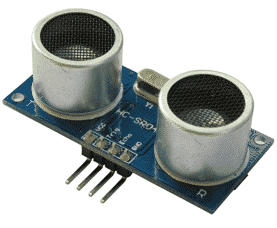
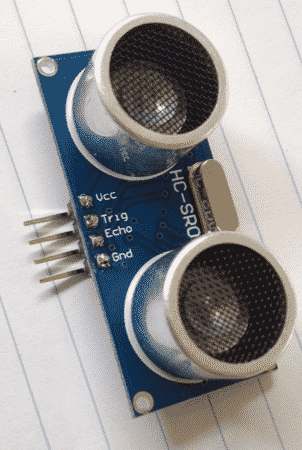
For the Arduino, a commonly used proximity sensor is the HC-SR04. You can find them on Ebay for less than $2 each.
They are very easy to use, let's have a look.
Assembly
Let's puts together this circuit and test out the motion sensor.
We will need:
- The Arduino
- Six jumper wires
- An ultrasonic sensor, like the HC-SR04
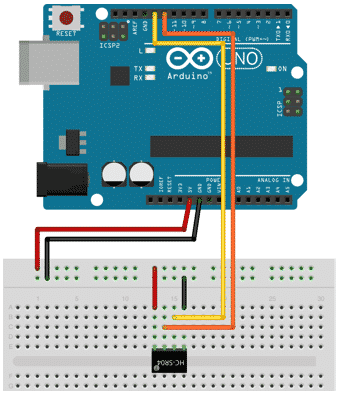
Here's what we are going to build (as shown in the schematic below):

The sensor will constantly take distance measurements of whatever happens to be in front of it: your hand, books etc. The Arduino will receive these readings and print them to the Serial monitor. Very simple.
Sketch
Done with the assembly, let work on the sketch now (here is the sketch on Github).
#define trigPin 13
#define echoPin 12

void setup() {
	Serial.begin (9600);
	pinMode(trigPin, OUTPUT);
	pinMode(echoPin, INPUT);
}

void loop() {
	long duration, distance;
	digitalWrite(trigPin, LOW);
	delayMicroseconds(2);
	digitalWrite(trigPin, HIGH);
	delayMicroseconds(10);
	digitalWrite(trigPin, LOW);
	duration = pulseIn(echoPin, HIGH);
	distance = (duration/2) / 29.1;

	if (distance >= 200 || distance <= 0)
		{
			Serial.println("Out of range”);
		}
	else {
			Serial.print(distance);
			Serial.println(" cm");
		}
	delay(500);
}
There's quite a lot happening in this small amount of code.
We define the sensor's trigger and echo pins to be 13 and 12 respectively. In the setup() function, we initialize the Serial monitor, and set pin 13 to be the output and pin 12 to be the input.
Through pin 13, the Arduino will ask the sensor to trigger a ping, similar to the "boing" noise that submarines emit when they use their sonar. This ping, assuming it bounces of an object in range, will come back and will be picked up by the sensor's receiver. The Arduino will know when that happens because it is monitoring pin 12, which is connected to the sensor's echo pin.
In the loop() function, we first setup two variables of type long. Long numbers are 4 bytes in size, a total of 32 bits, and can hold very large numbers: -2,147,483,648 to 2,147,483,647. The variable duration will hold the total number of microseconds that it took for the ping to reach the object and return to the sensor. The variable distance will contain the distance to that object in centimeters.

The Arduino is triggering a ping by writing to the trigger pin three pulses: first, a digital LOW for 2 microseconds, then a digital HIGH for 10 microseconds and finally a digital LOW which stays low until the next iteration of the loop.
It then uses the function pulseIn() to get the number of microseconds in takes of the ping to come back. PulseIn() accepts two parameters: a pin number (in our case it is 12, stored in variable echoPin), and the pulse level we want to detect, in our case it is HIGH because we want to detect the 10 microsecond ping we just emitted. As soon as the Arduino calls the pulseIn() function, it starts timing. It returns the number of microseconds from the time the function was called until it detects the ping echo.
How Arduino calculates the distance
The distance is calculated by the Arduino. It divides by two the duration that the pulseIn() function returned, since the ping travels a total of twice the distance to the object (going there and its echo coming back). It then divides again by the "magic number" 29.1. This number derives from this calculation:
The speed of sound at 0 degrees celsius is measured to be 331.5 meters per second. At different temperatures, the speed of sound is calculated by adjusting 331.5m/s for the temperature by multiplying by 0.6:
SpeedOfSound(Temperature) = 331.5 + 0.6 * Temperature
At 20 degrees, this works out to be 343.5 m/s.
We need to convert the seconds to microseconds and the length from meters to centimetres:
SpeedOfSound = 343.5 * 100 / 1,000,000 = 0.03435 cm/microseconds
This means that sound, at 20 degrees, can travel a distance of 0.03435 centimetres in one microsecond. If a signal and its echo take X microseconds to do the round trip, then the total distance covered is:
Total_distance = X * 0.03435 = X / 29.1
We adjust this so that we only include the duration of the one-way trip to the target (instead of the return trip), and the formula becomes:
distance = ( X / 2) * 0.03435 = ( X / 2 ) / 29.1
Wikipedia has a very good article on how to calculate the speed of sound, for the curious.
Limitations
If the distance to a target is over 200 centimeters, the Arduino reports that the target is out of range, since at that distance measurements are not reliable.
The same happens if the distance is negative
Question to consider: why do we need to test for negative distance?
Any other distance condition is valid, so the monitor will print out the distance in centimeters.
Ready for some serious Arduino learning?
Start right now with Arduino Step by Step Getting Started
This is our most popular Arduino course, packed with high-quality video, mini-projects, and everything you need to learn Arduino from the ground up.
Jump to another article
1: Introduction
2: How to make an LED blink
3: How to make an LED fade
4: How to use a button
5: How to use a potentiometer
6: Infrared line sensor
7: Measuring light
8: Detect tilt and impact
9: Measuring acceleration
10: Detect motion with the ultrasonic sensor
11: Detect motion with PIR sensor
12: Temperature and barometric sensor BME280
13: Measuring Temperature And Humidity
Last Updated 1 year ago.
We publish fresh content each week. Read how-to's on Arduino, ESP32, KiCad, Node-RED, drones and more. Listen to interviews. Learn about new tech with our comprehensive reviews. Get discount offers for our courses and books. Interact with our community. One email per week, no spam; unsubscribe at any time
