An IoT Mastery Project guide series
How to create a Git repository
In this article, I want to show you how to keep track of your progress using source control. My favorite source control system is Git, and it works great, out of the box, in Code.
In the previous two articles, I showed you how to set up a new PlatformIO project, add working code in it, and then upload and test it on your ESP32 board.
The full project in ESP32 Unleashed will span across several files with a lot of inter-dependencies. It will get complex.
Before doing any more work in the code, I want to show you how to keep track of your progress using source control.
My favorite source control system is Git, and it works great, out of the box, in Code.
That’s what we’ll do in this article.
Source-controlling all your non-trivial work is a good habit to have.
I suggest that when you are working on an important project, create a Git repository as soon as you set up the project. With your project tracked and committed in a Git repository, you will be able to back-track if you need to recover from a stubborn problem to a point in the project where everything worked. You will be able to do experiments in a new branch without risking your main (good) branch. You will be able to share the history of your project with others, on Github or Bitbucket, and even work in teams.
As I show in ESP32 Unleashed, Git is very flexible to support almost any development workflow, from the simplest (which is how I use it) to the most complex, distributed-team and large project ones (like the Linux kernel team).
A basic concept in Git source control is the branch. Think of a branch as a copy of your code, that lives in an independent “parallel universe”. Other branches of your code can live in their own universes. You can work on a branch knowing that the code in other branches is safe. You can keep one branch, known and “master” in Git, as the one that always contains good, working, bug-free code.
When you want to develop a new feature, you can clone master into a new branch, and develop and test the new feature. When the work in the new branch is complete, and your new feature works, you can merge the new branch with master. Now, master will contain the new feature.
Let’s go ahead and set up Git for this project.
Of course, you will first need to install Git on your computer.
I'm not going to show you how to do that because the instructions on the Git website are very clear.
If you haven't got Git installed in your computer stop this video now and go to git-scm.com.
Have a look at the guide on how to install Git for Linux, Mac OS, and Windows.
And once you have Git installed, continue from here.
Git is a command line application, so to interact with it we will use (mostly) the terminal. Code also allows us to interact with Git using the GUI. However, I find the terminal much more powerful and convenient.
Click on the Terminal button to open the terminal.
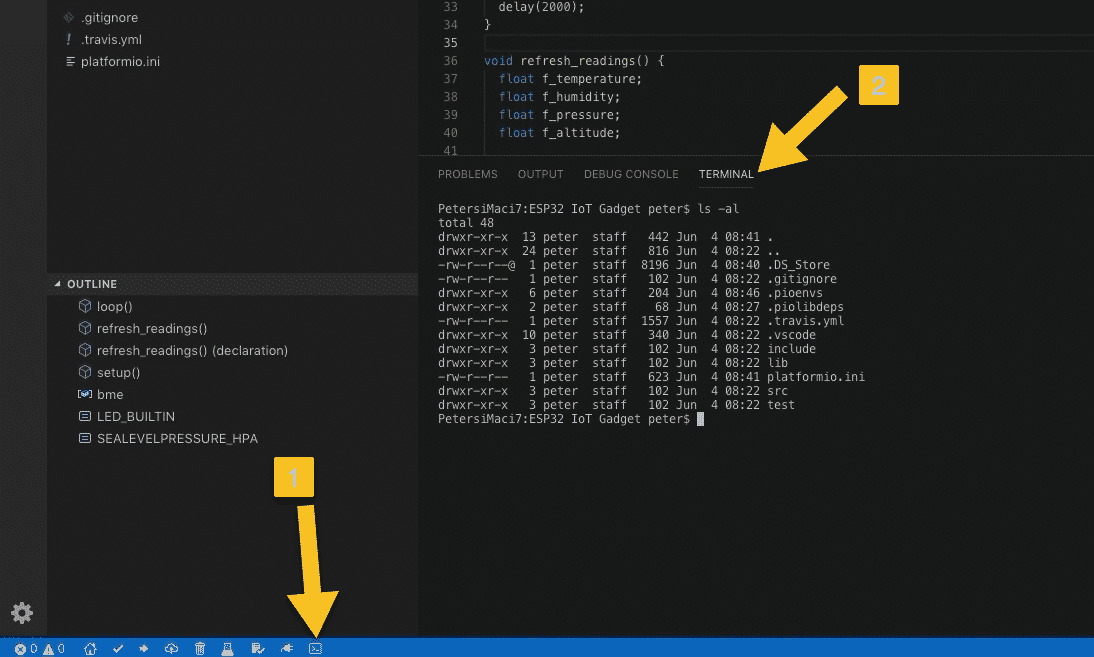
Open the terminal and try out a command, like "ls -al" (Mac OS, Linux), or "dir" (Windows)
You can use this terminal just like you use any other terminal. When you start it, your working directory is automatically set to the root directory of your project.
On Mac OS and Linux, you can type "ls -al" command to see a listing of the contents of your project directory. On Windows, type “dir”.
This command will show you the contents of the current directory. It is the exact same thing you would see in a regular terminal.
In ESP32 Unleashed, I will only use the terminal that is integrated into Code.
Let's clear the terminal with the “clear” command.
To create a new repository, and initialize it with the master branch type this in the terminal:
git init
Git will respond with a confirmation that the new empty repository is ready.

With "git init" you can create a new Git repository
MS Code will detect the presence of the new repository and will populate the contents of the source control pane.
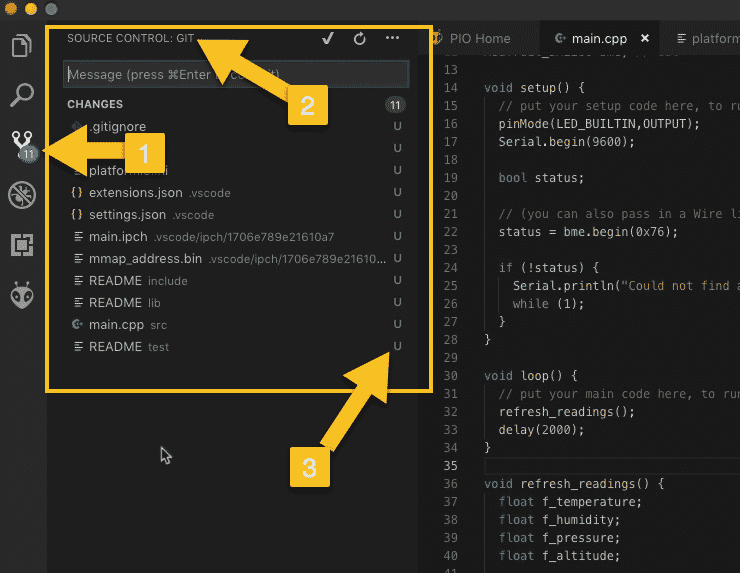
Click on the repository button (1) to show the source control pane (2).
In the source control pane, you will see the files that are part of your project but currently not being tracked by Git. This is indicated by the “U” letter (3).

The source control pane contains information about the status of the Git repository
"U" stands for Un-tracked.
Git knows about them but I haven't told it that I wanted these files to be tracked.
To track those files, type this command in the terminal:
git add .
The full stop tells Git to add all of the contents of the present working directory into the repository.
Hit enter.
Git will do a bit of work in the background. A few seconds later, you will see that the files in the source control pane are marked with an "A" instead of a "U". This indicates that these files and directories have been added into the repository index.
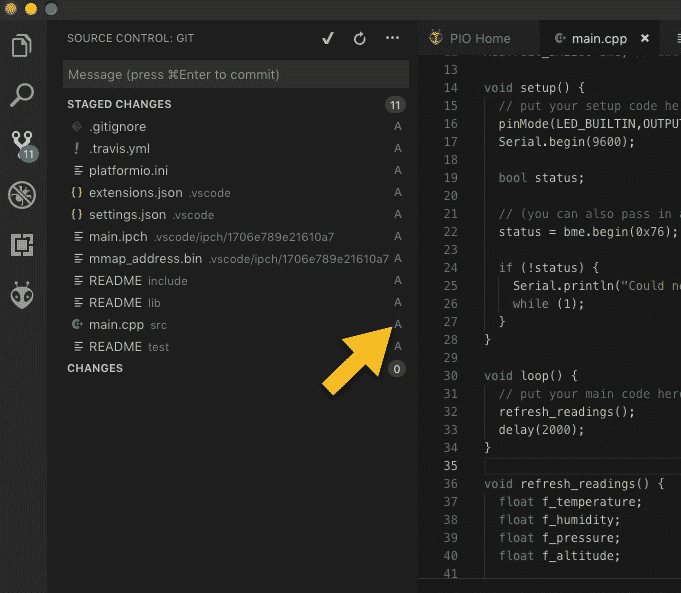
Files marked with "A" are tracked by Git
These files are now tracked by Git, but they're not committed into the master branch yet.
This means that any changes you make to those files, will not be saved in Git.
To preserve history, you must commit these files to the current working branch with the commit command. It goes like this:
git commit -am “This is the first commit”
The "-am" switch allows you to add a message to this commit, that describes the changes they contain from the previous commit.
Since this is the very first commit in the project, I'm just going to write that "This is the first commit".
The terminal will look like this:
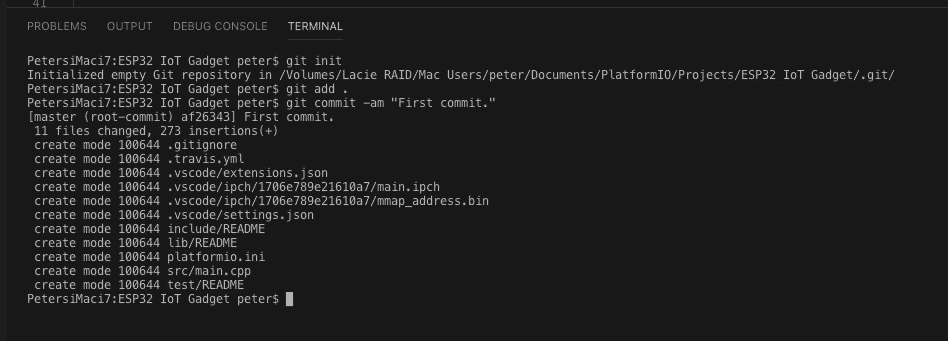
This first commit is now part of repository history
And the source control pane will now be empty since there are no untracked or uncommitted files.
From this point, every time to make a change to your code, you can commit this change to the current working branch using the “git commit” command. If you add new files that you want to preserve in the repository, you need to add them using “git add”.
In later lectures in ESP32 Unleashed, I will show you how to interact with commits, create branches and merge branches. These skills will cover 80% of all common programming workflows that involve source control
In the next article, I’ll show you how to split the main.cpp file into multiple files.
Of course, each time I make a change, I will commit the change to git in order to preserve project history.
Ready for some serious learning?
Enrol to
ESP32 Unleashed
A new learning adventure awaits you.
Create an application that will stretch your existing knowledge and skills.
ESP32 Unleashed is a project course
This course is perfect for people familiar with the ESP32, especially graduates of ESP32 For Busy People.
It is a guided project, designed to teach you how to use modern tools to create modern embedded applications based on the ESP32.
Just click on the big red button to learn more.
Jump to another article
Lessons
1: Why use PlatformIO to program the ESP32?
2: How to install PlatformIO and MS Code (Mac OS)
3: How to install PlatformIO and MS Code (Windows 10)
4: Set up an ESP32 project in PlatformIO
5: Upload and test the new project
6: Create the Git repository
7: Split the program into two files
8: Test the multi-file project
9: How to use Git version control
Last Updated 2 years ago.
We publish fresh content each week. Read how-to's on Arduino, ESP32, KiCad, Node-RED, drones and more. Listen to interviews. Learn about new tech with our comprehensive reviews. Get discount offers for our courses and books. Interact with our community. One email per week, no spam; unsubscribe at any time
