Arduino Sensors & Actuators guide series
Measuring acceleration
Acceleration is defined as the rate by which the velocity of an object changes. Having the ability to measure acceleration is very useful. For this purpose, we use an accelerometer.

Acceleration is defined as the rate by which the velocity of an object changes. The velocity of an object changes when a force is applied to it. Acceleration is quantified by a direction and a magnitude. Direction is the way to which a force is directing the object, and magnitude relates to the strength of the applied force. Acceleration is described by Newton's Second Law.
How can we measure acceleration?
Having the ability to measure acceleration is very useful. For this purpose, we use an accelerometer. An accelerometer measures the force that is applied to a small test mass. This test mass is placed inside the device and is held in place by one or more springs (or something equivalent). As gravity, or other forces, are applied on the test mass, they make it move towards a particular direction. The device measures the distance this mass travels from its resting position. The longer the distance, the stronger the force.
Imagine the accelerometer (or your self) in free fall, the test mass, as it is falling, is "feeling" no force being applied upon it. In a free-fall situation, the accelerometer would report no acceleration at all.
Accelerometers are everywhere
We use accelerometers in cars to detect collisions (and deploy airbags), or to gather performance statistics.
Accelerometers are embedded in smart phones to provide orientation information, and for making games that are played by moving a controller device.
You could use one in a toy car so that the car's wheels stop spinning if it has turned over, or to make toys that react to the movement of a controller in 3-D space.
Accelerometers are also part of Inertial Navigation Systems (INS) that help vehicles (ships, planes, cars, submarines etc.) maintain knowledge of their location when other positioning systems, like GPS, are not available.
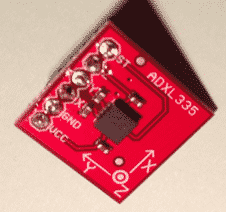
In our experiment, we will use a common 3-axis accelerometer, the ADXL335. It is very cheap at around $7 on eBay, and very easy to connect to the Arduino through any of the analog pins. It reports acceleration in 3 dimensions, X, Y and Z. It is very robust as it can detect forces of up to 10,000 Gs (1 G is equivalent to the Earth's gravity at the surface).

Assembly
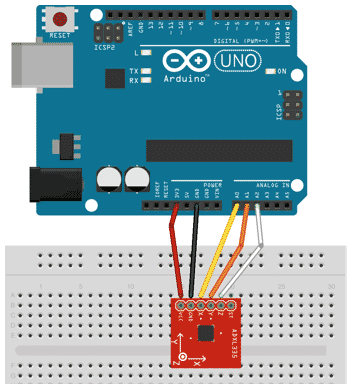
Let's puts together this circuit and test out the motion sensor.
We will need:
- An Arduino
- Five jumper wires
- An ADXL335 3-axis accelerometer
The sensor takes three acceleration measurements, X, Y, and Z. The Arduino reads the analog outputs 0, 1, and 2, acquires the measurements, and prints them to the monitor.
Also, be very mindful of the power limits of this device. It needs 3.3V input, not 5V! If you provide 5V you may actually damage it!

Sketch
Done with the assembly, let work on the sketch now (here is the sketch on Github).
int x, y, z;

void setup()
{
	Serial.begin(9600); // sets the serial port to 9600
}

void loop()
{
	x = analogRead(0); // read analog input pin 0
	y = analogRead(1); // read analog input pin 1
	z = analogRead(2); // read analog input pin 1
	Serial.print("accelerations are x, y, z: ");
	Serial.print(x, DEC); // print acceleration in the X axis
	Serial.print(" "); // prints a space between the numbers
	Serial.print(y, DEC); // print acceleration in the Y axis
	Serial.print(" "); // prints a space between the numbers
	Serial.println(z, DEC); // print acceleration in the Z axis
	delay(100); // wait 100ms for next reading
}
Lets see how it works. analogRead() reads the voltage present at one of the analog pins. The accelerometer outputs voltage to its three outputs relevant to the forces applied to it.
For example, at rest, the reading on the Z axis is around 410. If I push the device upwards, I apply force along the Z axis which makes the test weight inside the accelerometer "feel" heavier, and the voltage on the Z pin increases, causing the reading to increase (i.e. to ~470, in my experiment). If I push the device downwards, the opposite happens.
By taking and evaluating measurements in all three axis, you could make it possible for your device to know the precise direction of its movement and the force applied to it.
Ready for some serious Arduino learning?
Start right now with Arduino Step by Step Getting Started
This is our most popular Arduino course, packed with high-quality video, mini-projects, and everything you need to learn Arduino from the ground up.
Jump to another article
1: Introduction
2: How to make an LED blink
3: How to make an LED fade
4: How to use a button
5: How to use a potentiometer
6: Infrared line sensor
7: Measuring light
8: Detect tilt and impact
9: Measuring acceleration
10: Detect motion with the ultrasonic sensor
11: Detect motion with PIR sensor
12: Temperature and barometric sensor BME280
13: Measuring Temperature And Humidity
Last Updated 2 years ago.
We publish fresh content each week. Read how-to's on Arduino, ESP32, KiCad, Node-RED, drones and more. Listen to interviews. Learn about new tech with our comprehensive reviews. Get discount offers for our courses and books. Interact with our community. One email per week, no spam; unsubscribe at any time
