RASPBERRY PI GETTING STARTED SERIES
Basic Configuration
In this lesson you will learn how to setup basic configurations on the Raspberry Pi.

All the network-related configurations are complete, so now you can go ahead with some basic and essential configurations on the Raspberry Pi itself.
Start by logging in:
$ ssh [email protected]
$ ssh [email protected]
$ ssh [email protected]
Raspbian comes with a configuration utility called “raspbi-config”.
This utility allows you to easily turn on or off components like the SPI and I2C interfaces, set how much RAM to dedicate to video, and even to turn on overclocking so that your Raspberry Pi can operate faster (I do not recommend doing this).
Start raspi-config like this:
$ sudo raspi-config
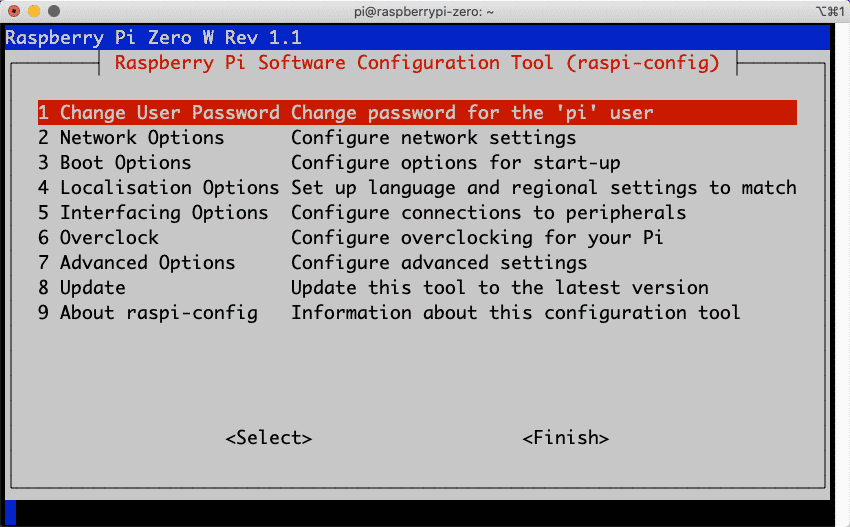
You will see the utility home page, from where you can access the subcategories:

The home screen of the raspi-config utility.
You can navigate the utility pages with the arrow keys (up, down) and the TAB (change to next button) and Return (accept selection) keys.
These are the changes that you want to make (remember that some options, such as SSH and the hostname, are already enabled):
- Under Interfacing Options:
- SPI: Enable
- SPI: Enable
- Under Advanced Options:
- Expand Filesystem: this will ensure that you are using the full available space on the SD card.
- Memory Split: Make this 8MB (perhaps 0MB is possible, however I prefer allow some memory to the GPU to avoid potential instability).
- Expand Filesystem: this will ensure that you are using the full available space on the SD card.
Select “Finish” and allow your Raspberry Pi to reboot.
Give it a couple of minutes to reboot, and try to login again to ensure we can continue:
$ ssh [email protected]
Great, we are almost done with the operating system setup. In the next lesson, I’ll show you how to setup the root user.
By default, the root user is disabled, but we need to use it with our SFTP client later in the project.
Ready for some serious learning?
Start right now with Raspberry Pi Full Stack - Raspbian
This is our most popular Raspberry Pi course & eBook.
This course is a hands-on project designed to teach you how to build an Internet-of-Things application based on the world’s most popular embedded computer.
You will learn how to build this application from the ground up, and gain experience and knowledge with technologies such as...
Jump to another article
1: What is the Raspberry Pi?
2: Raspberry Pi vs Arduino
3: Raspberry Pi operating systems
4: Headless and graphical (GUI) operating systems
5: How to install Raspbian Lite
6: SSH and headless configuration
7: How to set a host name
8: Booting for the first time
9: How to set a fixed IP address for your Raspberry Pi
10: Basic configuration
11: Working as the 'root' user
12: Raspberry Pi pins, roles, and numbers
13: A taste of Python on the Raspberry Pi
14: Python functions
15: A simple Python program
16: A simple circuit
17: Control an LED with GPIOZERO
18: Read a button with GPIOZERO
19: Setup the DHT22 sensor with Git
20: Use the DHT22 sensor
21: Raspberry Pi OS 64-bit vs 32-bit
Last Updated 1 year ago.
We publish fresh content each week. Read how-to's on Arduino, ESP32, KiCad, Node-RED, drones and more. Listen to interviews. Learn about new tech with our comprehensive reviews. Get discount offers for our courses and books. Interact with our community. One email per week, no spam; unsubscribe at any time
