RASPBERRY PI GETTING STARTED SERIES
Wire A Simple Circuit
In this lesson, you will assemble a simple circuit that contains an LED and a button. Once you have your circuit ready, you’ll learn how to work with it through several simple Python scripts.

You may not feel like it, but you know enough Python to be able to manipulate simple hardware connected to your Raspberry Pi. In this lesson, you will assemble a simple circuit that contains an LED and a button. Once you have your circuit ready, you’ll learn how to work with it through several simple Python scripts.
Before you plug anything to your Raspberry Pi’s header pins, you must shut it down and remove the USB power cable. Unlike the Arduino, the Raspberry Pi is much more sensitive to things like static electricity and short circuits. It is easy to damage it. By turning off power, you protect your Raspberry Pi
At the command line, type this:
pi@raspberrypi-zero:~ $ sudo shutdown -h now
Connection to raspberrypi-zero.local closed by remote host.
Connection to raspberrypi-zero.local closed.
Peters-iMac:~ peter$
The shutdown command must be given as a super user, hence the “sudo” infront of it. The “-h” switch instructs Raspbian to “halt”, ie. not restart. And “now” will cause the shutdown to take place immediately.
You can also schedule the shutdown for sometime in the future.
Once the green activity LED shows no activity, remove the power USB cable. Now you can safely plug external wires into the header pins.
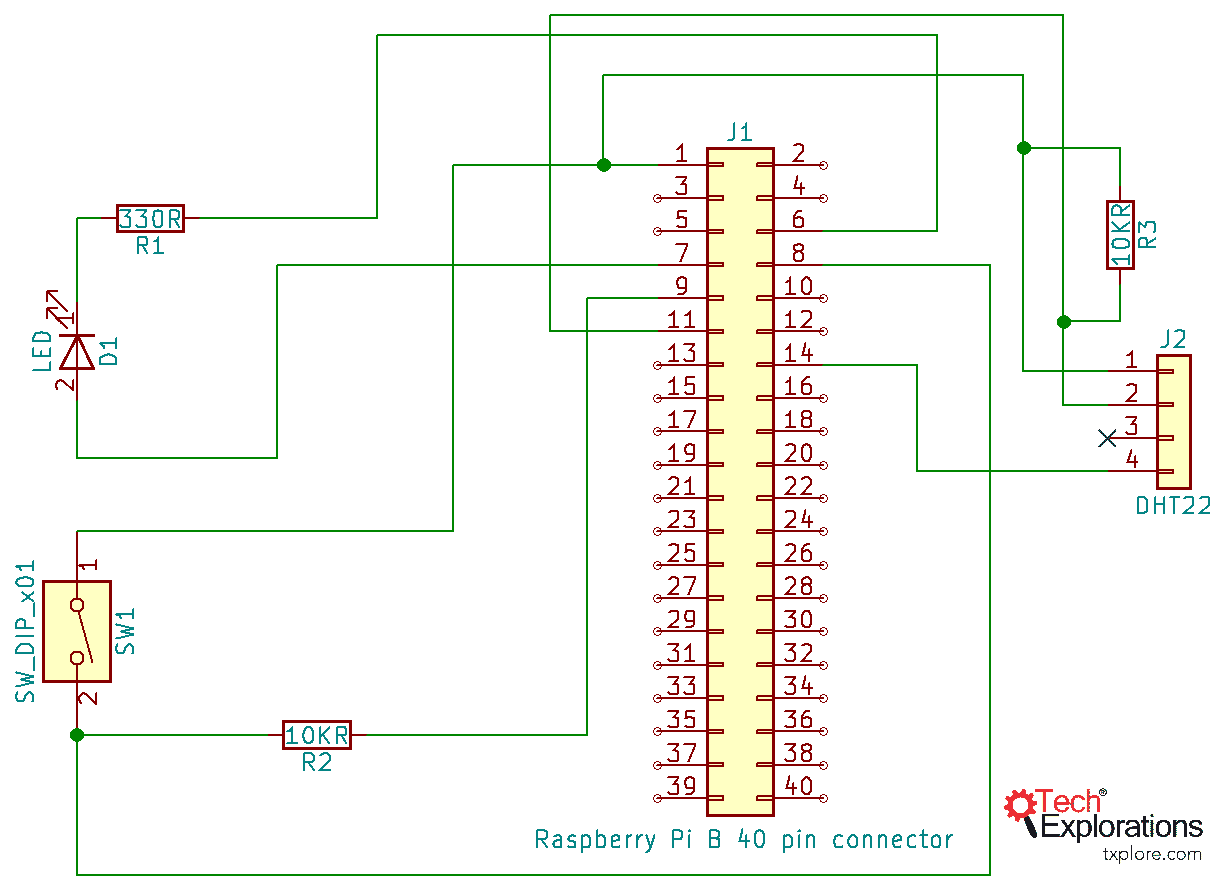
Use the circuit depicted in image below to assemble a simple circuit that contains a button, an LED, and two resistors. Don’t worry about the two components on the right side of the schematic (marked J2 and R3); you will implement this part in a later chapter.

This schematic will guide you in the assembly of a simple circuit
Start with the LED and its 330 Ω current-limiting resistor. The anode (long pin) of the LED is connected to GPIO 4, which is physical pin 7.
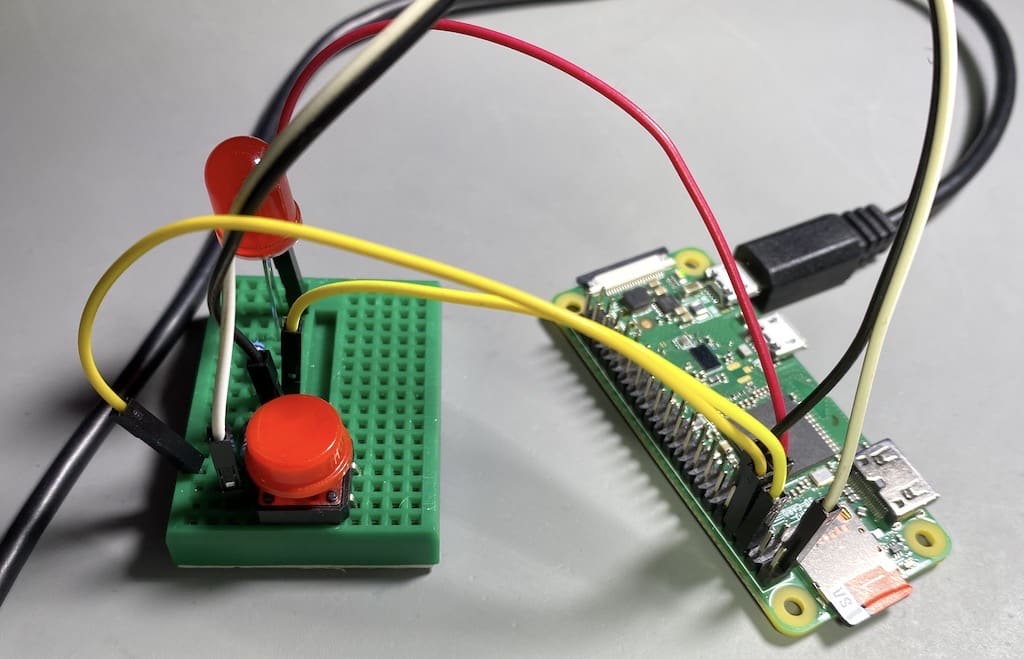
For the button, be careful to connect one side to physical pin 1 (which provides 3.3V power), and the other side to physical pin 9 (GND) via a 10 kΩ pull-down resistor and to GPIO14 (physical pin 8). You can see my assembled LED-button circuit in the photograph below. It isn’t easy to copy the circuit from this photograph, so I advise you to work from the schematic above.

This is my assembled LED-button circuit.
If, in the testing you will do later, you find that the button presses are not reliably detected by the Raspberry Pi, try switching the 10KΩ pull-up resistor for a larger one, such as a 50KΩ resistor. In my testing, the larger pull-up makes the button press detection more reliable.
When you are ready, do a final check to ensure that the wiring is correct, and connect the power USB cable. Give your Raspberry Pi a couple of minutes to boot and connect to your Wifi network, and continue in the next chapter.
Ready for some serious learning?
Start right now with Raspberry Pi Full Stack - Raspbian
This is our most popular Raspberry Pi course & eBook.
This course is a hands-on project designed to teach you how to build an Internet-of-Things application based on the world’s most popular embedded computer.
You will learn how to build this application from the ground up, and gain experience and knowledge with technologies such as...
Jump to another article
1: What is the Raspberry Pi?
2: Raspberry Pi vs Arduino
3: Raspberry Pi operating systems
4: Headless and graphical (GUI) operating systems
5: How to install Raspbian Lite
6: SSH and headless configuration
7: How to set a host name
8: Booting for the first time
9: How to set a fixed IP address for your Raspberry Pi
10: Basic configuration
11: Working as the 'root' user
12: Raspberry Pi pins, roles, and numbers
13: A taste of Python on the Raspberry Pi
14: Python functions
15: A simple Python program
16: A simple circuit
17: Control an LED with GPIOZERO
18: Read a button with GPIOZERO
19: Setup the DHT22 sensor with Git
20: Use the DHT22 sensor
21: Raspberry Pi OS 64-bit vs 32-bit
Last Updated 1 year ago.
We publish fresh content each week. Read how-to's on Arduino, ESP32, KiCad, Node-RED, drones and more. Listen to interviews. Learn about new tech with our comprehensive reviews. Get discount offers for our courses and books. Interact with our community. One email per week, no spam; unsubscribe at any time