RASPBERRY PI GETTING STARTED SERIES
Working As The 'Root' User
In this lesson you will learn how to work on your Raspberry Pi as the "root" user.

By default, the root user is disabled, but we need to use it with our SFTP client later in the project. An SFTP client is a program that allows us to transfer files between two computers using the same secure protocol used in SSH.
When we are working on the Raspberry Pi using the terminal emulator and SSH, we can simple switch to the root user with the “sudo” command:
$ sudo su
This means that the root (or “super user”, hence “su”) user is available, but is only accessible via the “sudo” command. It is not enabled for remote access, such as SSH or SFTP.
Once you become “super user” with “sudo”, you can work as if you were logged in as “root”, and access parts of the file system that are only permitted to the root user, or edit files owned by root.
To exit the super user and go back to the normal “pi” user, type:
$ exit
Let’s enable external login to the root account to make our life a bit easier.
First, login to your Raspberry Pi as “pi”:
$ ssh [email protected]
Then, change into the super user:
pi@raspberrypi-zero:~ $ sudo su
And finally, use the nano text editor to edit the sshd_config file:
root@raspberrypi-zero:/home/pi# nano /etc/ssh/sshd_config
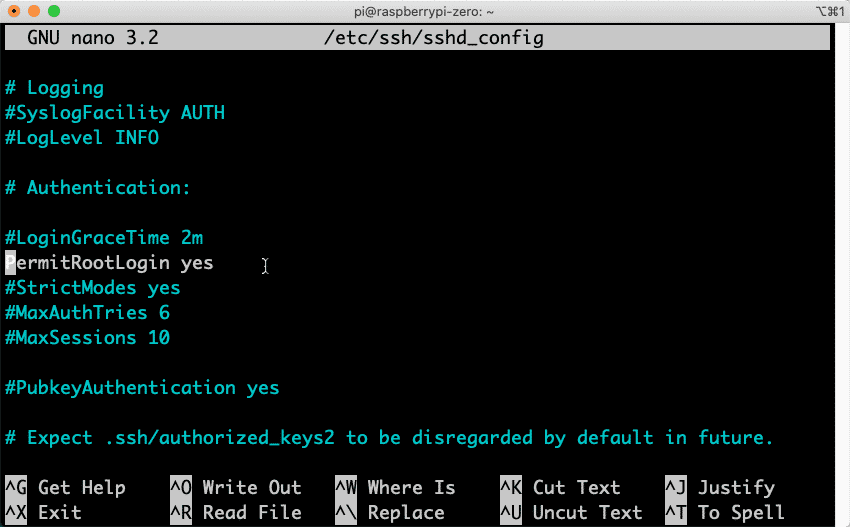
Scroll down the sshd_config file to find the PermitRootLogin directive. Its argument should be “yes”. Remove the “#” to un-comment it.

The sshd_config file.
Type Control-X to exit and save the changes in the file.
Next, restart the SSH daemon so that the changes become effective:
root@raspberrypi-zero:/home/pi# /etc/init.d/ssh restart
You are now almost ready to be able to login to your Raspberry Pi using the root user. The last thing to do is to set a password for the root user.
Do this with the “passwd” command:
root@raspberrypi-zero:/home/pi# passwd root
New password:
Retype new password:
passwd: password updated successfully
The utility will ask you for the new password for the root user. I use “raspberry”, since I have no security concerns. If I was working to create a security-sensitive application, I would only enable the root user during development, and disable it for production.
Time to test your “new” root user. Exit super user, then exit the pi user, and then login to your Raspberry Pi using “root”:
root@raspberrypi-zero:/home/pi# exit
exit
pi@raspberrypi-zero:~ $ exit
logout
Connection to raspberrypi-zero.local closed.
Peters-iMac:~ peter$ ssh [email protected]
[email protected]'s password:
Linux raspberrypi-zero.local 4.19.97+ #1294 Thu Jan 30 13:10:54 GMT 2020 armv6l
The programs included with the Debian GNU/Linux system are free software;
the exact distribution terms for each program are described in the
individual files in /usr/share/doc/*/copyright.
Debian GNU/Linux comes with ABSOLUTELY NO WARRANTY, to the extent
permitted by applicable law.
SSH is enabled and the default password for the 'pi' user has not been changed.
This is a security risk - please login as the 'pi' user and type 'passwd' to set a new password.
root@raspberrypi-zero:~#
In the command line session above, I have marked in bold the “root” user in my new SSH command. As you can see, I was able to login to my Raspberry Pi using “root”.
Good work so far.
You can log out from root.
Your Raspberry Pi is now ready for development, but there’s one more critical set of operations I’d like to show you: backing up and restoring your Raspberry Pi SD Card. This will save you countless hours and frustration when things go wrong, and give you a reliable way to recover from disaster.
Ready for some serious learning?
Start right now with Raspberry Pi Full Stack - Raspbian
This is our most popular Raspberry Pi course & eBook.
This course is a hands-on project designed to teach you how to build an Internet-of-Things application based on the world’s most popular embedded computer.
You will learn how to build this application from the ground up, and gain experience and knowledge with technologies such as...
Jump to another article
1: What is the Raspberry Pi?
2: Raspberry Pi vs Arduino
3: Raspberry Pi operating systems
4: Headless and graphical (GUI) operating systems
5: How to install Raspbian Lite
6: SSH and headless configuration
7: How to set a host name
8: Booting for the first time
9: How to set a fixed IP address for your Raspberry Pi
10: Basic configuration
11: Working as the 'root' user
12: Raspberry Pi pins, roles, and numbers
13: A taste of Python on the Raspberry Pi
14: Python functions
15: A simple Python program
16: A simple circuit
17: Control an LED with GPIOZERO
18: Read a button with GPIOZERO
19: Setup the DHT22 sensor with Git
20: Use the DHT22 sensor
21: Raspberry Pi OS 64-bit vs 32-bit
We publish fresh content each week. Read how-to's on Arduino, ESP32, KiCad, Node-RED, drones and more. Listen to interviews. Learn about new tech with our comprehensive reviews. Get discount offers for our courses and books. Interact with our community. One email per week, no spam; unsubscribe at any time
