RASPBERRY PI GETTING STARTED SERIES
Setup The DHT22 Sensor With Git
In this and the next lesson I’ll show you how to setup and use a common environment sensor, the DHT22. With the DHT22 you can measure temperature and humidity. This is an integrated digital sensor that uses a communication protocol to “talk” to its host.

You should now be more comfortable working on the command line and writing small Python programs.
You know how to control an LED and read the status of a button. Both a simple devices with only two possible states each: either on or off, or pressed/not-pressed.
Sensors are sophisticated integrated devices that you can use to measure a range of environment factors, such as temperature and humidity, the strength of the Earth’s magnetic field (or a small magnet), various forces and acceleration, even the concentration of various chemicals in the air.
In this and the next lesson I’ll show you how to setup and use a common environment sensor, the DHT22. With the DHT22 you can measure temperature and humidity. This is an integrated digital sensor that uses a communication protocol to “talk” to its host. The host can be a microcontroller, like the Arduino, or a computer, like the Raspberry Pi.
The protocol is a language that the two devices use to communicate. The DHT22 will respond to a request for a reading from the Raspberry Pi with the raw numbers that represent the temperature and humidity. Unlike the button, which only has two states, a sensor like the DHT22 is a real “chat box” that sends several bytes of data, encoded according to its protocol, that the host has to decipher.
As you can see from this description, using a sensor is a bit more involved then using a button. As the programmer, you will need to understand the intricacies of the communications protocol, which include things like register addresses, specific timings for requests and events, and a deeper understanding of computer concepts like "Big-endian" and "Little-endian" and checksums.
That’s too much if you just want to measure a temperature.
Luckily, all this low-level functionality is packaged nicely inside libraries that we can easily integrate with our programs. We can then extract the information we need from the sensor with a simple command.
This is what we’ll do with the DHT22. The process involves to install one of the many DHT22 libraries for Python and the Raspberry Pi, and then to run one of the example programs.
First, let’s add the DHT22 sensor on the breadboard and connect it to the Raspberry Pi.
Go ahead and wire the right part of this schematic, that includes the DHT22 sensor and the 10 kΩ resistor (see schematic below).

This schematic will guide you in the assembly of a simple circuit
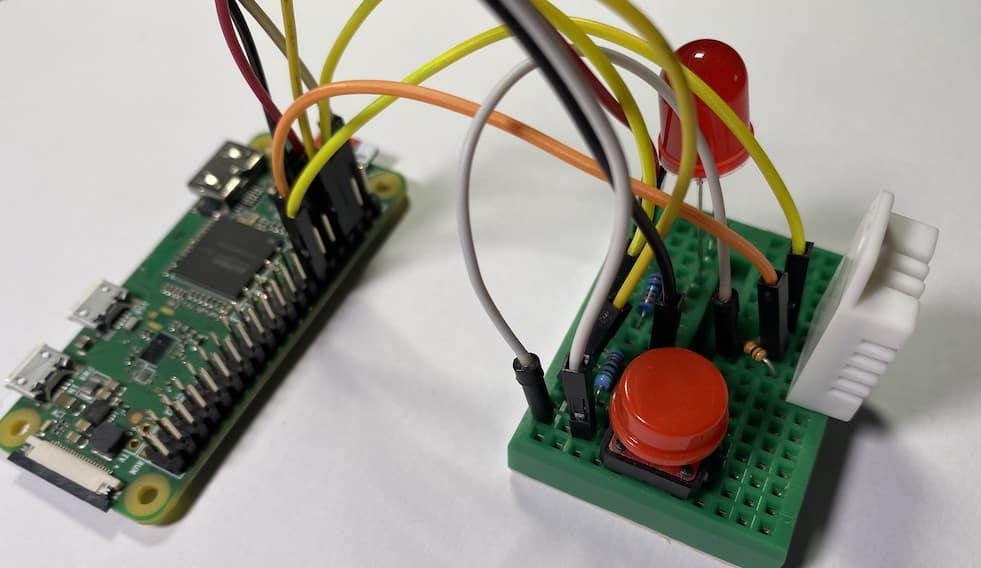
In the photograph below you can see my assembly of the circuit on a mini breadboard.

The circuit, assembled on a mini breadboard.
Don’t forget to turn off your Raspberry Pi before you connect the sensor. Do that like this:
$ sudo shutdown -h now
Wait for the shutdown to complete, and then remove the power cable.
Once you have assembled and confirmed the circuit, apply power and wait for a couple of minutes, then login to your Raspberry Pi as “pi”.
You will install the Adafruit DHT library for the Raspberry Pi. This library is hosted on Github. There are a few ways by which you can transfer the library (or any file) to your Raspberry Pi, but for now, and because this library is hosted on Github, the easiest is to use Git. With Git, you can clone (copy) a repository from Github to your Raspberry Pi.
But first, you need to install Git on your Raspberry Pi.
That is easy. Assuming you are logged in as Pi, copy this command:
$ sudo apt-get install git-core
This will install the Git tool on your Raspberry Pi. Wait for the installation to complete, and then configure the tool for use:
pi@raspberrypi-zero:~ $ git config --global user.email [email protected]
pi@raspberrypi-zero:~ $ git config --global user.name "Peter"
Of course, use your own email address and name.
Now you can go ahead and clone the repository into your pi user home folder. Copy this into the command line:
pi@raspberrypi-zero:~ $ git clone https://github.com/adafruit/Adafruit_Python_DHT.git
Cloning into 'Adafruit_Python_DHT'...
remote: Enumerating objects: 325, done.
remote: Total 325 (delta 0), reused 0 (delta 0), pack-reused 325
Receiving objects: 100% (325/325), 98.35 KiB | 234.00 KiB/s, done.
Resolving deltas: 100% (176/176), done.
That’s it, you now have a copy of the DHT22 library repository in your local folder.
The repository contains a few example programs that you can play with, as well as the library itself.
Before you can play with the examples, you must install the library.
Follow this process:
1. Go in the repository directory:
$ cd Adafruit_Python_DHT/
2. Run the setup utility:
$ sudo python3 setup.py install
The setup utility will produce a lot of output in the console, and eventually show you something like “Finished processing dependencies for Adafruit-DHT==1.4.0”.
The library is now installed.
Let’s play with it in the next lecture.
Ready for some serious learning?
Start right now with Raspberry Pi Full Stack - Raspbian
This is our most popular Raspberry Pi course & eBook.
This course is a hands-on project designed to teach you how to build an Internet-of-Things application based on the world’s most popular embedded computer.
You will learn how to build this application from the ground up, and gain experience and knowledge with technologies such as...
Jump to another article
1: What is the Raspberry Pi?
2: Raspberry Pi vs Arduino
3: Raspberry Pi operating systems
4: Headless and graphical (GUI) operating systems
5: How to install Raspbian Lite
6: SSH and headless configuration
7: How to set a host name
8: Booting for the first time
9: How to set a fixed IP address for your Raspberry Pi
10: Basic configuration
11: Working as the 'root' user
12: Raspberry Pi pins, roles, and numbers
13: A taste of Python on the Raspberry Pi
14: Python functions
15: A simple Python program
16: A simple circuit
17: Control an LED with GPIOZERO
18: Read a button with GPIOZERO
19: Setup the DHT22 sensor with Git
20: Use the DHT22 sensor
21: Raspberry Pi OS 64-bit vs 32-bit
Last Updated 1 year ago.
We publish fresh content each week. Read how-to's on Arduino, ESP32, KiCad, Node-RED, drones and more. Listen to interviews. Learn about new tech with our comprehensive reviews. Get discount offers for our courses and books. Interact with our community. One email per week, no spam; unsubscribe at any time
