RASPBERRY PI GETTING STARTED SERIES
Boot Into Raspbian For The First Time
In this lesson you will boot up your Raspberry Pi for the first time, and connect to it using SSH.

If you have set its hostname, you will use that hostname to access the Raspberry Pi.
If you have not, no problem: I will show you how to determine the IP address that your router has assigned to your Raspberry Pi, and use that IP address to access it (again, via SSH).
I will be using a Raspberry Pi Zero W.
To boot your Raspberry Pi Zero W and operate it, apart from the Raspbian SD Card, you will need a USB power supply and a USB cable with a Micro Type B plug at one end, and the regular USB Type A plug at the other end.

To operate your Raspberry Pi Zero W, apart from the Raspbian SD Card, you will need a USB power supply and a cable.
Insert the Raspbian SD card into the SD Card slot of the Raspberry Pi, and plug the USB power supply into the mains power socket. Then, plug the Micro USB connector into the USB port that is marked “PWR IN”.
In the photograph below, you can see my Raspberry Pi Zero W, powered by USB. The tiny green LED is showing disk activity by blinking irregularly as the computer is booting.

When you apply power to your Raspberry Pi, the green LED will blink irregularly to indicate disk activity.
Allow at least two minutes for your Raspberry Pi to boot and connect to your Wifi network. You will know that it is ready when the disk activity indicator (the green LED) stays on.
If you have set a hostname in the previous chapter, now is time to use it. Start your terminal emulator (such as iTerm or Terminal on Mac OS, and Putty or PowerShell on Windows), and issue this command:
$ ssh [email protected]
Of course, replace “raspberrypi-zero.local” with the host name of your Raspberry Pi. The default password for user “pi” is “raspberry”.
Let’s break down this instruction:
- “ssh” is the protocol you are using for the communication session.
- “pi” is the user name for the account you are logging into.
- “raspberrypi-zero.local” is the hostname of your Raspberry Pi.
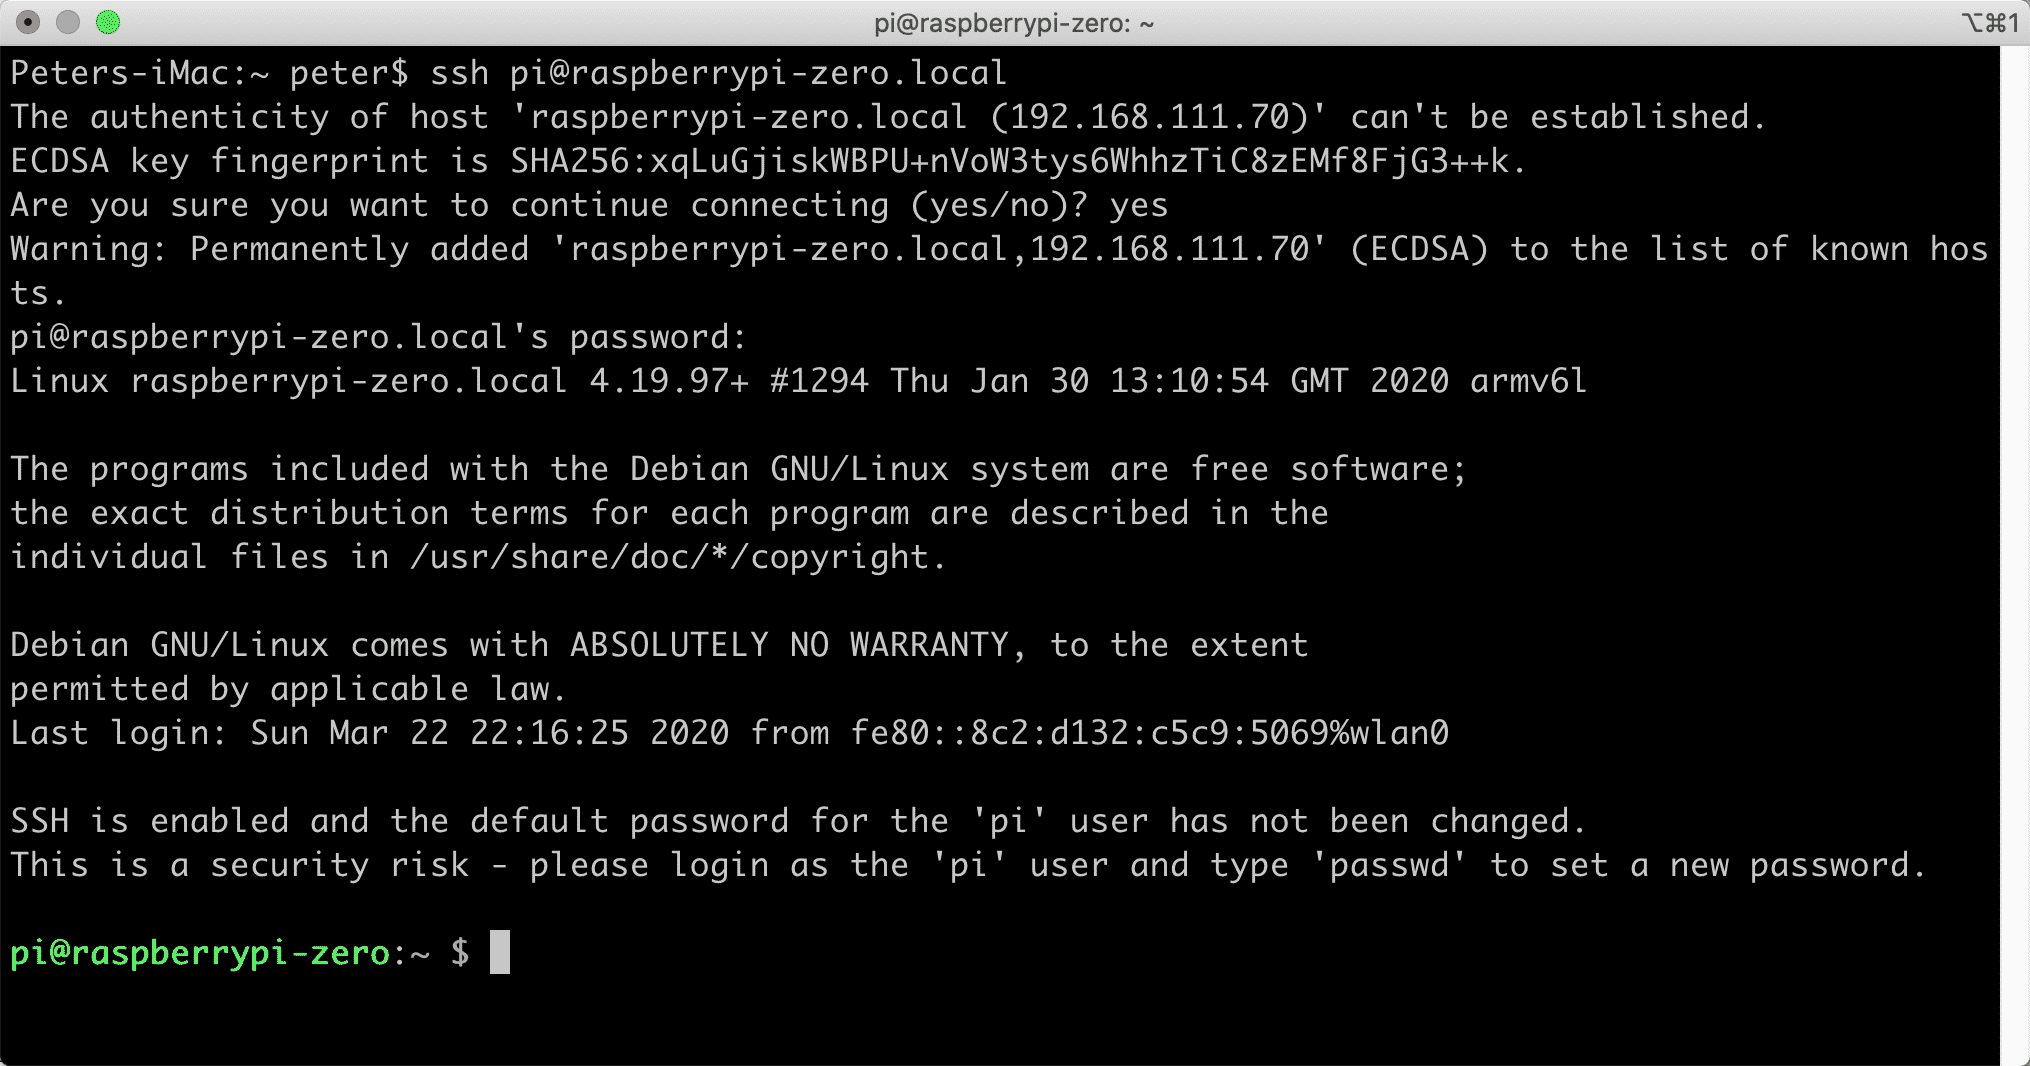
In the screenshot below you can see an example of what to expect when you issue this command.

Connect to the Raspberry Pi using SSH and a terminal emulator.
Your SSH client will ask you to confirm that you want to connect to the new host because it has never seen its “fingerprint” before. Answer “yes”. Your computer will store your Raspberry Pi’s fingerprint and will not ask you again.
After this, SSH will ask you for the password for user “pi”. Type “raspberry”, and hit enter.
You’re in!
Before doing anything else, I’d like to show you how to connect to your Raspberry Pi in case you have not set a hostname. In this case, you will need to find out the IP address that your router assigned to your Raspberry Pi.
There are two ways to do this:
- With the help of a network scanner
- By looking into your routers DHCP page
Method 1: network scanner
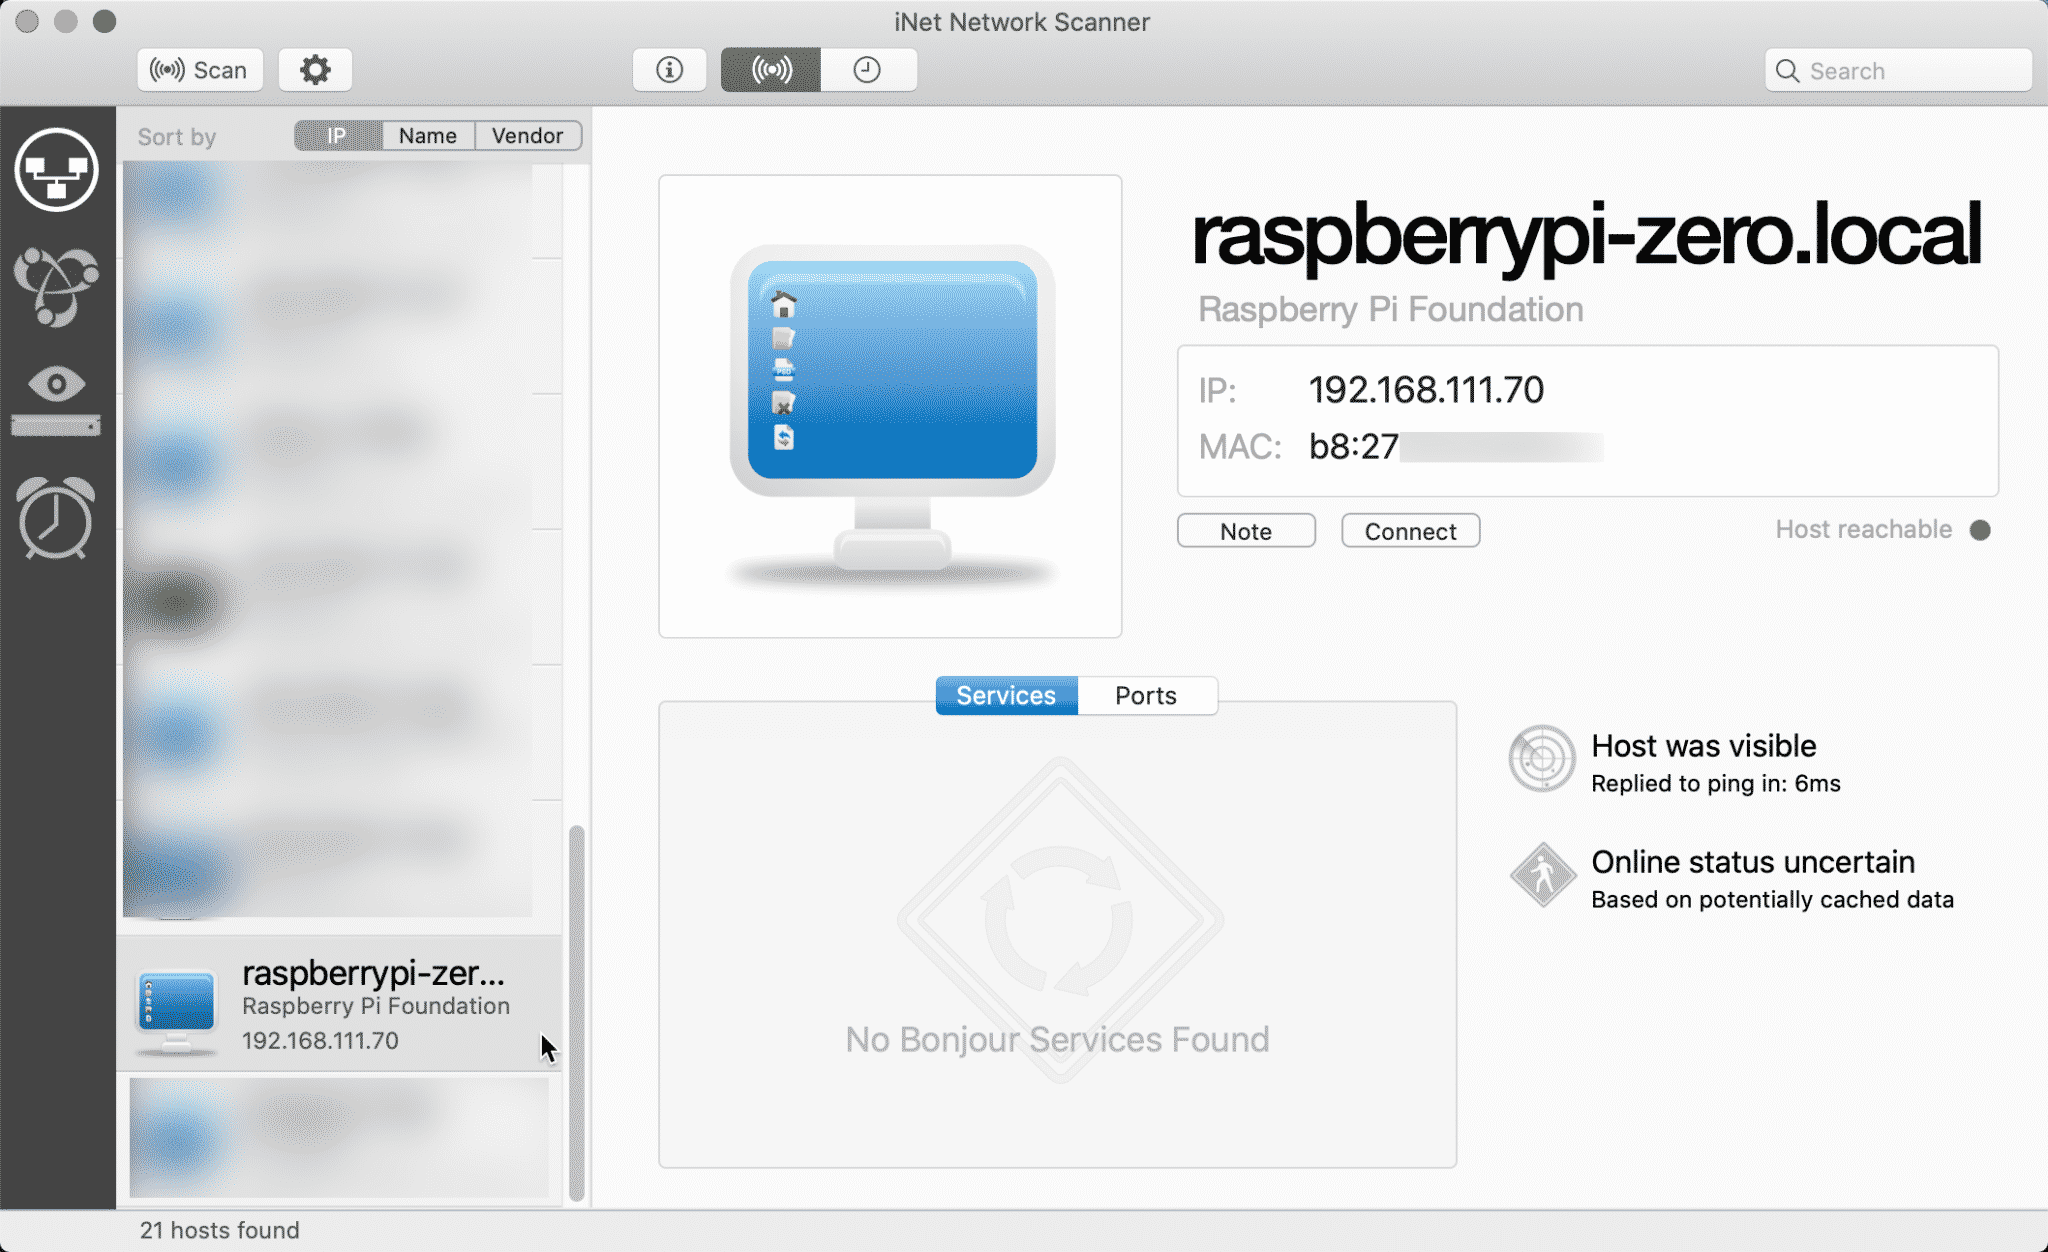
You can use a network scanner like “iNet Network Scanner” for Mac OS and the Advanced IP Scanner for Windows. Either utility will scan your network and make a list of all the hosts that it can find. One of those hosts will be your Raspberry Pi, and the scanner will give you its IP address.
In the screenshot below, you can see that my network scanner has found my Raspberry Pi, and is showing relevant information such as its hostname (which I set earlier), its IP address, and its MAC address.

My network scanner has found my Raspberry Pi.
As you can see, the assigned IP address of my Raspberry Pi is 192.168.111.70. You can use the IP address instead of the hostname to connect via SSH:
$ ssh [email protected]
Method 2: Router DHCP table
An alternative to the network scanner is to look for the same information in your router’s DHCP table. You will need to login to your router’s admin panel, and look for the DHCP page, usually available under a diagnostics menu item. In the screenshot below you can see the DHCP table of my router, which gives the IP address of my Raspberry Pi.

My router’s DHCP table show the IP address of my Raspberry Pi.
Use one of these methods to find our your Raspberry Pi IP address. Without this, or the hostname, you will not be able to connect to your Raspberry Pi, and therefore you will not be able to do the following work.
In the next lesson, I will show you how to set a fixed IP address for your Raspberry Pi, which is a good practice for any computer that offers services (such as a web server) to the network.
Ready for some serious learning?
Start right now with Raspberry Pi Full Stack - Raspbian
This is our most popular Raspberry Pi course & eBook.
This course is a hands-on project designed to teach you how to build an Internet-of-Things application based on the world’s most popular embedded computer.
You will learn how to build this application from the ground up, and gain experience and knowledge with technologies such as...
Jump to another article
1: What is the Raspberry Pi?
2: Raspberry Pi vs Arduino
3: Raspberry Pi operating systems
4: Headless and graphical (GUI) operating systems
5: How to install Raspbian Lite
6: SSH and headless configuration
7: How to set a host name
8: Booting for the first time
9: How to set a fixed IP address for your Raspberry Pi
10: Basic configuration
11: Working as the 'root' user
12: Raspberry Pi pins, roles, and numbers
13: A taste of Python on the Raspberry Pi
14: Python functions
15: A simple Python program
16: A simple circuit
17: Control an LED with GPIOZERO
18: Read a button with GPIOZERO
19: Setup the DHT22 sensor with Git
20: Use the DHT22 sensor
21: Raspberry Pi OS 64-bit vs 32-bit
Last Updated 1 year ago.
We publish fresh content each week. Read how-to's on Arduino, ESP32, KiCad, Node-RED, drones and more. Listen to interviews. Learn about new tech with our comprehensive reviews. Get discount offers for our courses and books. Interact with our community. One email per week, no spam; unsubscribe at any time