RASPBERRY PI GETTING STARTED SERIES
Raspberry Pi Pins, Roles, And Numbers
In this lesson you will learn about the Raspberry Pi's pins, their roles, and how to address them.

It is time to dig into your first hands-on experiments. In the next few chapters you will learn how to work with an LED and a button using Python. This is the first step towards doing much more interesting things.
On the Raspberry Pi, you can connect external devices, like buttons and LEDs, to the various pins that are exposed through a 40-pin header. Each of the pins perform specific functions.
Most of the pins can perform multiple functions, as you will see later.
There are two attributes that are most important when it comes to the Raspberry Pi pins:
- The pin number, which allows you to refer to a pin inside your Python scripts
- The pin capabilities, so that you know what it is that you can do with a pin.
Let’s have a look at some examples:
- Pins 1 and 17 provide 3.3V power.
- Pins 2 and 4 provide 5V power
- Pins 6, 9, 14, 25, 30, 34 and 39 are GND.
- Pin 22 is a general-purpose input/output (GPIO) pin. You can use it to drive an LED or sense the state of a button.
- Pin 14 is a GPIO, but also the transmit pin of the UART (serial interface).
- Pin 32 is a GPIO, but also a PWM pin.
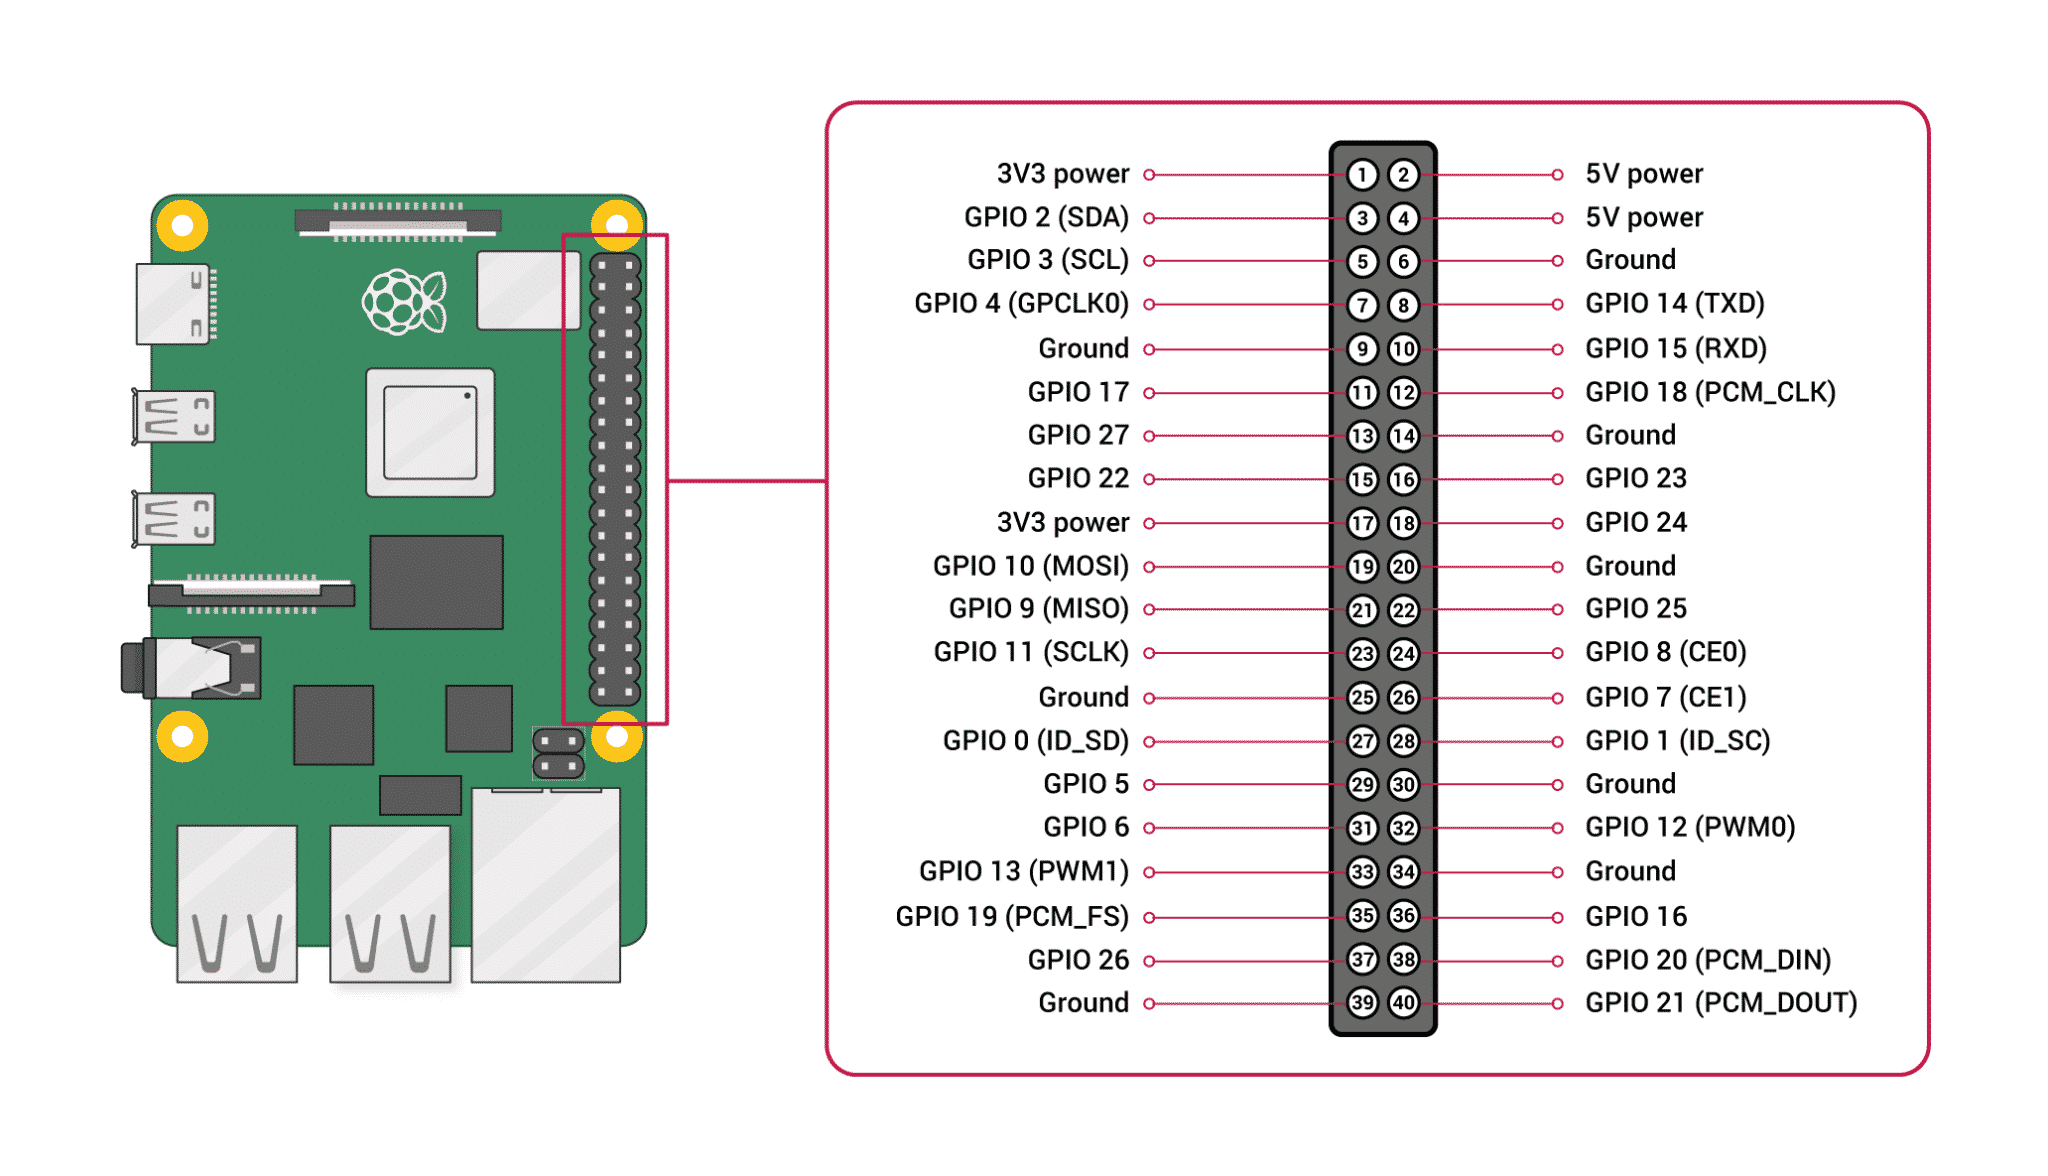
In the diagram below you can see a full map of the Raspberry Pi 40-pin header. The map shows the primary and secondary function of each pin.

This is a map of the Raspberry Pi 40-pin header, with information about the primary and secondary role of each pin (borrowed from https://www.raspberrypi.org/documentation/usage/gpio/).
A handy tool to have on your Raspberry Pi is pinout, a component of a library called GPIO Zero. With pinout, you can see a simple header map and basic information about your Raspberry Pi on your command line. It looks like the example below.

Pinout is a handy utility that shows basic information about your Raspberry Pi and a map of its header.
Pinout is already installed in the full version of Raspbian, but not in Lite.
To install pinout in Raspbian Lite, issue this command:
$ sudo apt install python3-gpiozero
To show the pin map, type this:
$ pinout
As you can see in these two maps, each pin has two numbers. For example, with reference to screenshot from the Pinout output above, the second pin from the top in the left column is “GPIO2 (3)”.
This means that you can refer to this pin in two ways in your Python scripts:
- With its GPIO reference number, which is “2”.
- With its board reference number, which is “3”.
Similarly, for “GPIO11 (23)”, the GPIO number is 11, and the board number is 23.
In the scripts in this project we will use the GPIO numbering system unless noted otherwise.
Ready for some serious learning?
Start right now with Raspberry Pi Full Stack - Raspbian
This is our most popular Raspberry Pi course & eBook.
This course is a hands-on project designed to teach you how to build an Internet-of-Things application based on the world’s most popular embedded computer.
You will learn how to build this application from the ground up, and gain experience and knowledge with technologies such as...
Jump to another article
1: What is the Raspberry Pi?
2: Raspberry Pi vs Arduino
3: Raspberry Pi operating systems
4: Headless and graphical (GUI) operating systems
5: How to install Raspbian Lite
6: SSH and headless configuration
7: How to set a host name
8: Booting for the first time
9: How to set a fixed IP address for your Raspberry Pi
10: Basic configuration
11: Working as the 'root' user
12: Raspberry Pi pins, roles, and numbers
13: A taste of Python on the Raspberry Pi
14: Python functions
15: A simple Python program
16: A simple circuit
17: Control an LED with GPIOZERO
18: Read a button with GPIOZERO
19: Setup the DHT22 sensor with Git
20: Use the DHT22 sensor
21: Raspberry Pi OS 64-bit vs 32-bit
Last Updated 1 year ago.
We publish fresh content each week. Read how-to's on Arduino, ESP32, KiCad, Node-RED, drones and more. Listen to interviews. Learn about new tech with our comprehensive reviews. Get discount offers for our courses and books. Interact with our community. One email per week, no spam; unsubscribe at any time