RASPBERRY PI GETTING STARTED SERIEs
How To Set A Hostname
In this lesson I will show you how to set the hostname of your Raspberry Pi, and give it a fixed IP address. Although these two configurations are not essential, they will save you time over the long term.

Your SD Card with Raspbian Lite is ready.
You’ve enabled SSH and configured the Wifi settings.
You are eager to use it and start your Raspberry Pi for the first time.
But, wait, there is one more thing you should do now, before you the first boot.
In this lesson I will show you how to define the hostname of your Raspberry Pi, and give it a fixed IP address. Although these two configurations are not essential, they will save you time over the long term.
By giving your Raspberry Pi a hostname, you will be able to access it with an easy to remember name, instead of an IP address.
For example, I can access the home page of my application in my browser with this:
http://raspberrypi-zero.local/lab_env_db
Instead of this:
http://192.168.1.45/lab_env_db
Much better with the hostname, right?
Once you have a hostname, you will be able to identify your Raspberry Pi in your router by name, instead of the IP address. This way, you will be able to use your router’s administration tools to assign it with a fixed IP address. This is not critical, however it is good practice to give computers that offer services to the network (such as file, web, or printing services) a fixed/permanent IP address.
You can certainly skip this step and set your hostname after you boot your Raspberry Pi for the first time. But, because there is no monitor connected to it, you will need to use a network scanner application or information from your router to find out your Raspberry Pi’s assigned IP address. Once you know the IP address, you will be able to connect to it via SSH and edit the host name. This is something I will show you how to do very soon.
But here, it is worth looking into the option of setting the hostname before the first boot so that you sort out the hostname early in the process (and get the easy access benefits). At the same time, you will learn about the internal structure of your Raspberry Pi’s SD card.
Let’s start.
At the time I am writing this, there is no reliable way to set the hostname of a Raspberry Pi computer running Raspbian by setting a configuration file in the root partition. I am aware of efforts by members of the community to create a solution for this based on a script, however this solution is not reliable at the moment.
Ideally, the Raspberry Pi Foundation will provide a solution similar to the SSH and wpa_supplicant method that you learned about in the previous chapters.
But, it is still possible to set a hostname before we boot the Raspberry Pi for the first time.
The Raspbian SD Card contains two partitions. You already know about the “boot” partition. You modified the contents of this partition in previous chapters to enable the SSH deamon and set the Wifi configuration.
The second partition is named “rootfs”. This partition is formatted with the extFS4 filesystem. If you are working on a Linux computer, then you will be able to access this partition natively, like any other disk. However, if you are using a Mac OS computer (as I do), or a Windows computer, you will need to install an extFS4 driver first.
I use a utility called “extFS for Mac”. There is a version for Windows. This utility allows you to mount an extFS3 or extFS4 disk in your file system, and use it as you would with a native disk. An alternative to the paid solution from Paragon is the MacFuse project for the Mac OS, or the Ext2Fsd Project for Windows. The Ext2Fsd Project seems to not be active though, with the latest release being in November of 2017.
Install one of those solutions to enable your computer to work with extFS4 drives, and then insert your Raspbian SD Card into your computer. Then, select the rootfs drive partition.
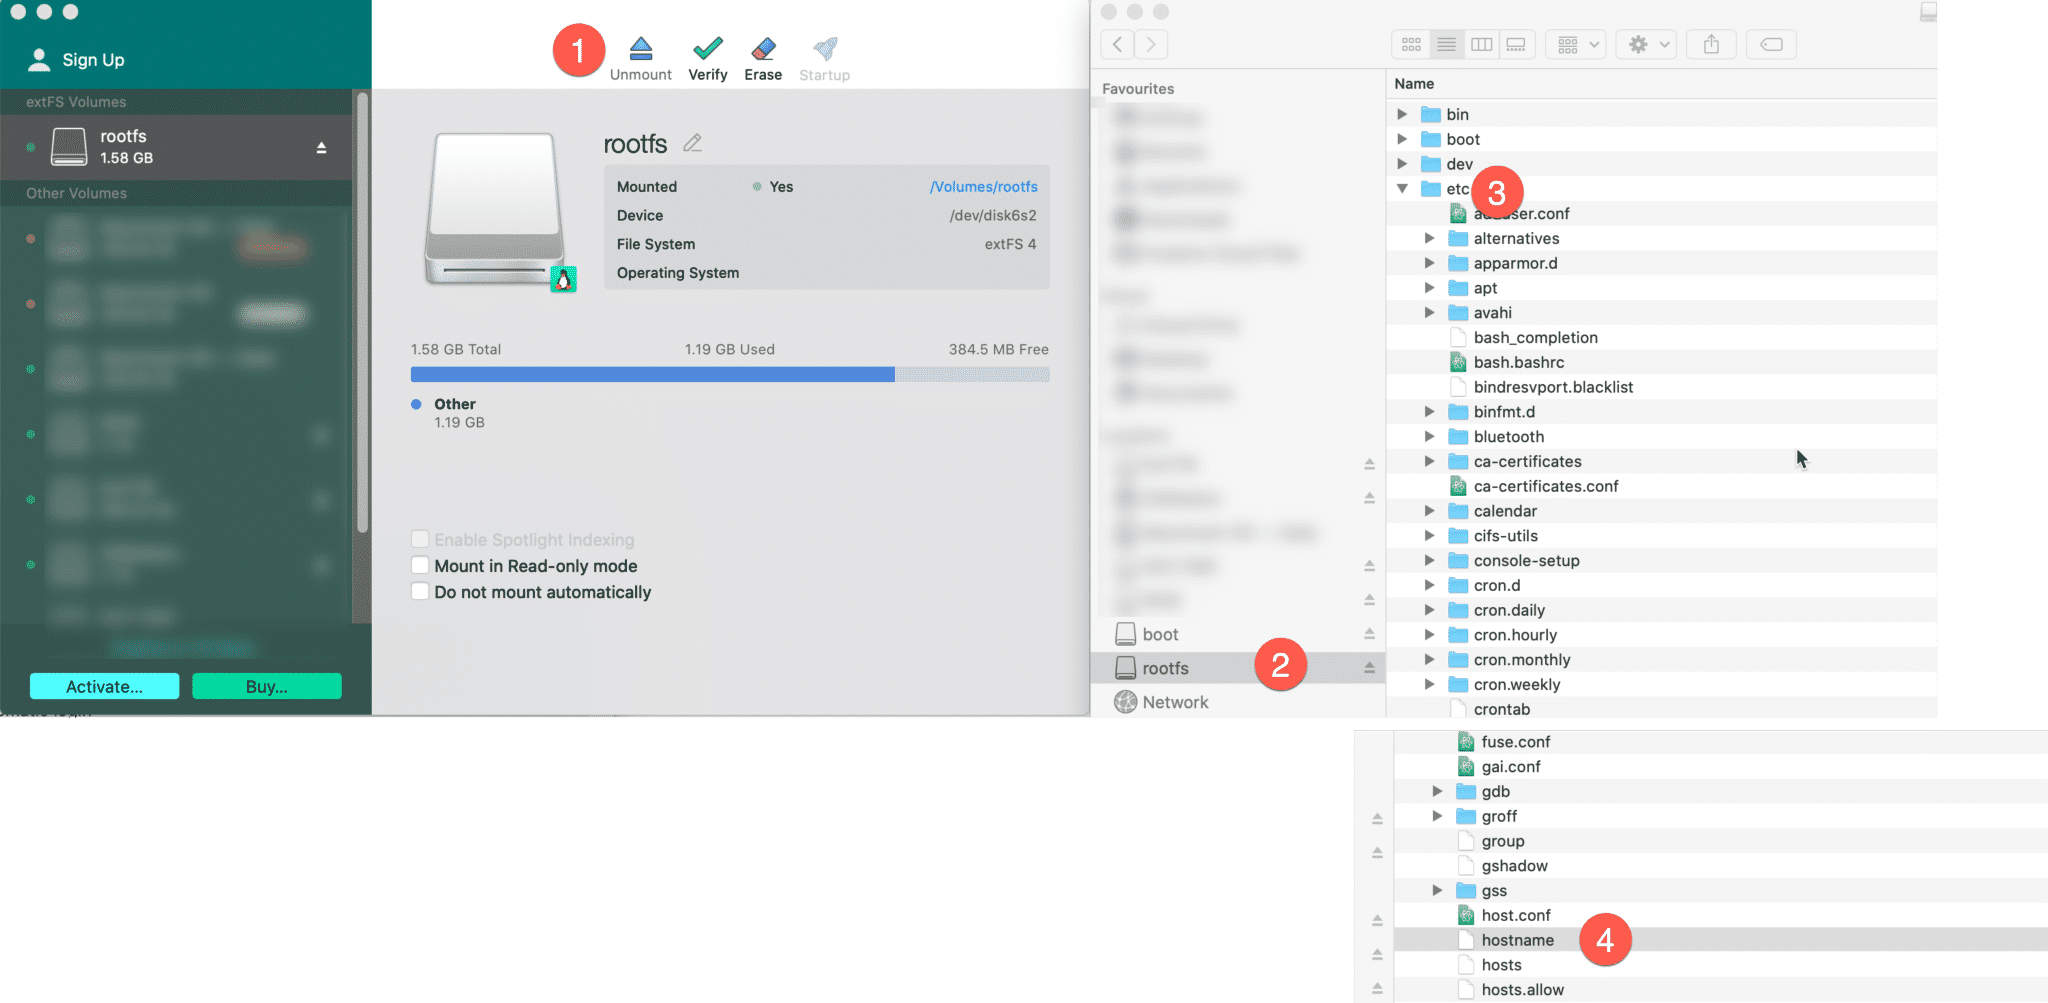
In extFS For Mac, it looks like the example in the screenshot below.

To set the hostname, edit the “hostname” file under rootfs/etc.
Once you mount the rootfs partition on your computer, browse to rootfs/etc/.
Then, open the “hostname” file in a text editor, and type in the name that you’d like to refer to your Raspberry Pi by.
My Raspberry Pi hostname is:
raspberrypi-zero.local
Save this text file with the single line, close the text editor and eject the rootfs and boot partitions from your computer.
You are now ready to boot your Raspberry Pi for the first time, and access it with its new hostname. Let’s do that next.
Ready for some serious learning?
Start right now with Raspberry Pi Full Stack - Raspbian
This is our most popular Raspberry Pi course & eBook.
This course is a hands-on project designed to teach you how to build an Internet-of-Things application based on the world’s most popular embedded computer.
You will learn how to build this application from the ground up, and gain experience and knowledge with technologies such as...
Jump to another article
1: What is the Raspberry Pi?
2: Raspberry Pi vs Arduino
3: Raspberry Pi operating systems
4: Headless and graphical (GUI) operating systems
5: How to install Raspbian Lite
6: SSH and headless configuration
7: How to set a host name
8: Booting for the first time
9: How to set a fixed IP address for your Raspberry Pi
10: Basic configuration
11: Working as the 'root' user
12: Raspberry Pi pins, roles, and numbers
13: A taste of Python on the Raspberry Pi
14: Python functions
15: A simple Python program
16: A simple circuit
17: Control an LED with GPIOZERO
18: Read a button with GPIOZERO
19: Setup the DHT22 sensor with Git
20: Use the DHT22 sensor
21: Raspberry Pi OS 64-bit vs 32-bit
We publish fresh content each week. Read how-to's on Arduino, ESP32, KiCad, Node-RED, drones and more. Listen to interviews. Learn about new tech with our comprehensive reviews. Get discount offers for our courses and books. Interact with our community. One email per week, no spam; unsubscribe at any time